Skip to content

Posts from the ‘Features, Articles and Recipes’ Category

Happy First Day Of Spring An Angel Food Cake To Celebrate
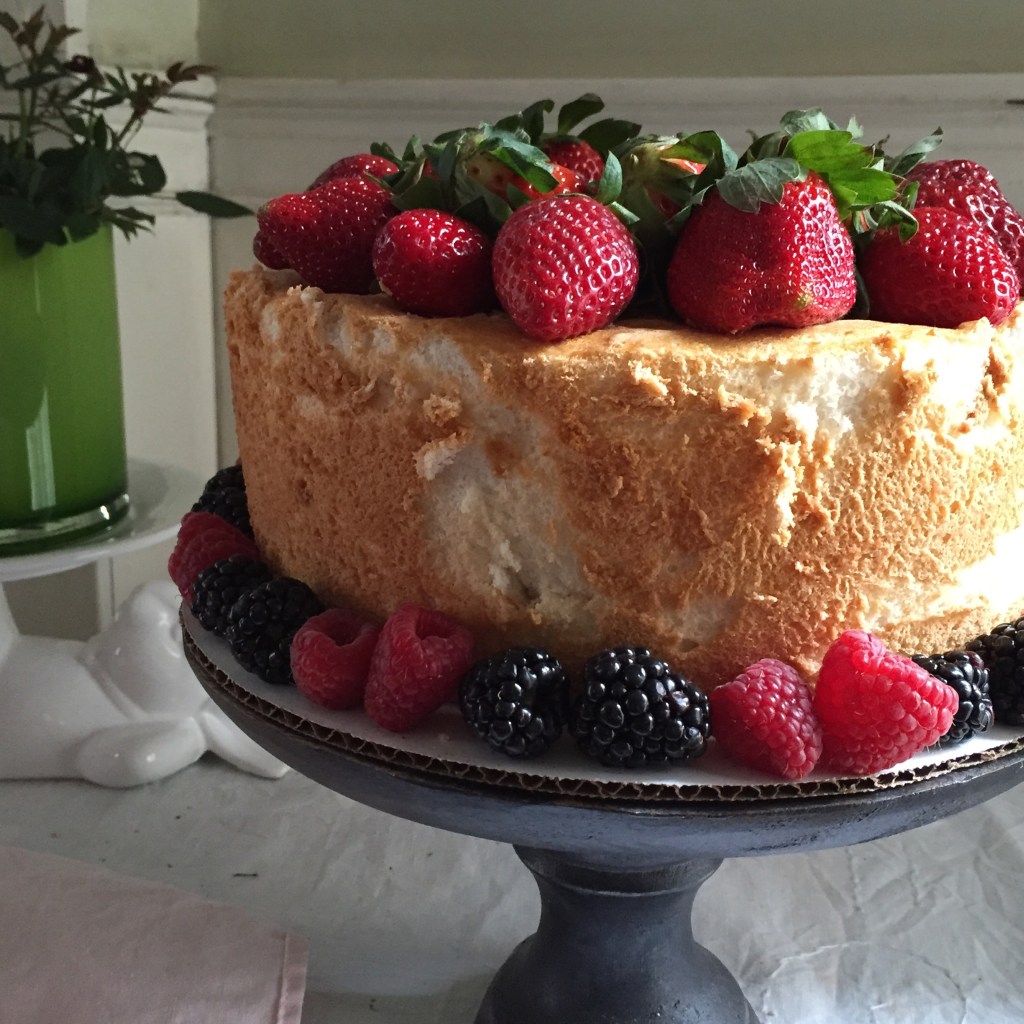
Angel Food Cake

Angel Food Cake

It’s the first day of Spring and guess what, in NYC we are waiting for a snow storm, kind of dismal so to cheer myself up I made an Angel Food Cake, which is one of my all time favorites, I love how light it is, that it’s fat free and so moist. I usually serve it simply with berries and whipped cream or if I make cupcakes I will sometimes frost with a chocolate swiss meringue buttercream. This cake is perfect for spring and summer when berries are in season and plentiful. It’s a little early for berries at the farmers market but the berries I got in the supermarket weren’t bad. I have been making this cake recipe for years, It’s from James McNair’s “Cakes”. I love his cookbook the angel food and chiffon cakes are the best and always consistently good. I made a raspberry whipped cream frosting and decorated with fresh berries.

I am bringing this cake to Fiesta Friday #111 this week. A super light cake with loads of assorted berries and gently sweetened whipped cream makes a lovely dessert. This week Angies wonderful co hosts are Naina @ Spice in the City and Julianna @ Foodie On Board.

IMG_1890


Angel Food Cake

Recipe by James McNair from his book “Cakes”

1 cup cake flour

1 1/2 cup granulated sugar divided

1/4 tsp salt

2 cups egg whites at room temperature (approximately 16 large eggs)

2 tsp cream of tartar

zest of 1 lemon

1 tsp vanilla extract

Pre heat oven to 325 degrees. No need to prep your pan all you need is a 10 inch tube pan with removable bottom and feet (so you can invert while cake cools). Sift flour, salt, and 3/4 cup sugar and set aside. In stand mixer with whisk attachment start whipping the egg whites, when they are frothy add the cream of tartar increase speed to medium high and whip until the egg whites are billowy and form soft peaks. Add the remaining 3/4 cup sugar a little at a time (about a tbs) whip until the egg whites form stiff peaks being careful not to overwhip. It takes about 5-6 minutes, now add the lemon zest and vanilla. Remove the bowl from the mixer and gently fold in the dry ingredients with either a spatula or balloon whisk in 3 increments making sure that all the dry ingredients are incorporated. Spoon into tube pan, smooth the top and bake for approximately 50 minutes. Cake will be golden brown and springy when touched.

Invert cake pan so it is standing on the feet, if your tube pan does not have feet you can invert onto a wine bottle. Let cool completely approximately 1 1/2 -2 hours. To remove cake run flexible offset spatula around the edge of the pan and around the tube. Gently remove the cake by pushing the tube part. When the cake is out of the pan you can free it from the tub by running  a spatula or butter knife along the bottom of the tube, the cake will come off and you can place on serving dish.
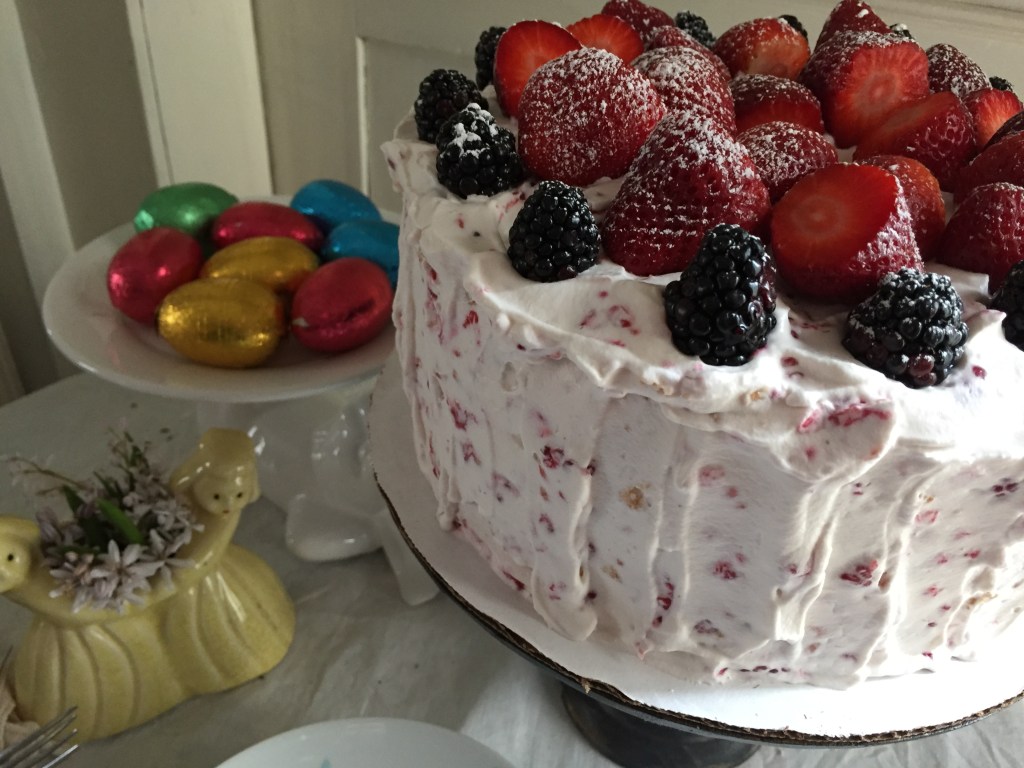
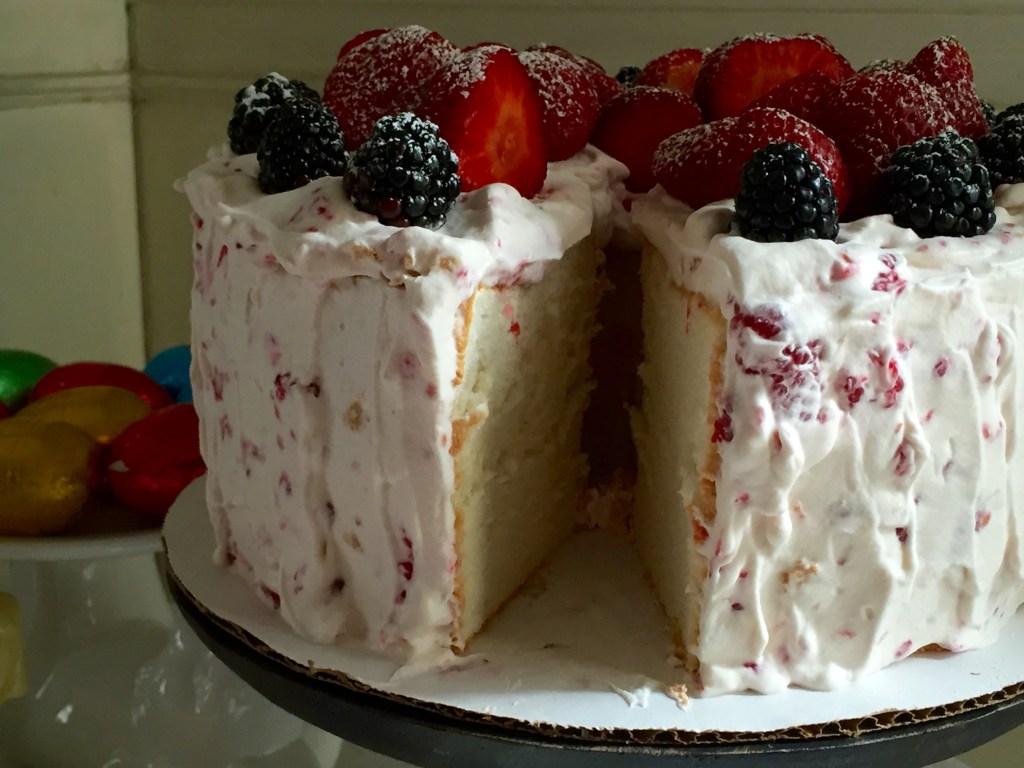
Frosted Cake

Frosted Cake

Raspberry Whipped Cream Frosting

2 cups heavy cream very cold and divided

1/2 cup powdered sugar

2 tsp corn starch

1 tsp vanilla

1/2 pint fresh raspberries mashed.

Place 1/2 cup of the heavy cream in a small saucepan, add the cornstarch and powdered sugar and whisk so there are no lumps. On medium heat stirring constantly stir or whisk the cream mixture until it thickens, it is like pudding, spoon into a bowl and let cool to room temperature stirring occasionally.

While the stabilizer is cooling place whisk attachment and bowl of mixer in the freezer to get cold. When it’s sufficiently cold add the cold cream, stabilizer, and the vanilla. Whip until thick and spreading consistency. Gently fold in the raspberries and frost the cake immediately.

IMG_1980 IMG_2004


fiesta-friday-badge-button-i-was-featured1


Horrible Evil Cake Pops For Fiesta Friday #110


cake pops

cake pops

I seriously doubt I will ever recover from the trauma of making cake pops. When I got a request to make cake pops for a childs birthday bash at school I thought gee, how hard could that be? She wanted oreo cake pops and honestly I was excited to make them thinking this will be a breeze, no baking, crush the cookies, dip them in white chocolate sprinkle with decorations and call it a day. I ambitiously said I would do 2 per child which would be 64 pops. I totally underestimated how challenging it would be to make these things. I bought these adorable Wilton cardboard cake pop stands, lots of decorations, tall sticks and was ready to make those pops. I read recipes online and watched video’s showing just how simple it is to make. Simple to make, yes, executing a successful cake pop was a challenge.

Cake pop stand assembly required

Cake pop stand assembly required and it didn’t work

I am bringing these cake pops with me to Fiesta Friday#110. This weeks co hosts are  Jhuls @ The Not So Creative Cook and Apsara @ Eating Well Diary

Back to the cake pops, I bought way too many oreo’s which will promptly be given away, the recipe calls for 1 package of oreo’s and 1/2 cup softened cream cheese to bind it. You crush or process the oreo’s so that they are like flour (I left some bigger crumbs for interest) add the cream cheese and it will become a cohesive dough. Scoop out some roll with your hands into a round and refrigerate. While they are in the refrigerator melt a little white chocolate to dip your stick in before inserting into the cake pop. Everything was going well at this point. I actually made 72 cake pops. The problem arose when I was finishing them. I melted some white chocolate over simmering water, got the cake pops out of the refrigerator. I noticed some cracks in some of them and smoothed them. The very first one I dipped in the thick warm chocolate fell off the stick and broke in half, hmmmmm…. I didn’t let that discourage me did it again. same thing.

The carnage

The carnage

To make a long story short (er) it was pretty bad, I managed to get 32 cake pops with many disasters that went straight into the circular file. I was not able to use the cardboard stands because they would not fit together properly and the sticks were too tall anyway I used the bottom of it to stand the pops so the coating could dry. You have to be careful not to let it get too hard because the decorations won’t stick or do it too soon because the weight of the decorations causes the coating to run. I did manage to get some cute ones placed them in cellophane bags and off they go.

drying on the stand

drying on the stand

cute

cute

If I ever do cake pops again I will not use oreo’s I think it would have worked much better with crumbled cake mixed with buttercream like Starbucks cake pops. It will be a long time before I attempt this again if ever. I will probably stick to cupcakes and cookies.

fiesta-friday-badge-button-i-was-featured1


Guest Post- Falafel By Elaine From Foodbod

Beautiful Elaine and her sweet Bob

I love this photo of beautiful Elaine and her sweet Bob

I feel so very lucky to know so many lovely and talented people. When I think about some of the exceptional cooks/bloggers that have agreed to do guest posts here I am honored and so very happy to present them to all of you that stop by for a read. This blogger/cook and amazingly talented woman is one of my favorite people, she can make a die hard vegetable hater a veggie lover. Elaine’s gorgeous blog Foodbod is one that I have followed for a few years now, I love her recipes like this Middle Eastern Aubergine or her wonderful sourdough bread.  She inspires with her creativty, amazes with her talent and I like to call her the vegetable whisperer, she can coax incredible flavor from the most humble of vegetables by adding a little of this and that and when she pulls that tray out of the oven you know the master has done her magic I know most of you know her and if you don’t please visit her blog and read about Elaine and how her mission to eat healthful and delicious food came about, you will love it as much as I do, I guarantee it. Take it away Elaine…..

What can I say about the lovely Suzanne that hasn’t already been said by her previous guest posters?? Nothing really, they’ve said it all so beautifully, I’ll just be repeating things..but hey, who cares?!

Suzanne is such a constant, supportive and complimentary food blogger; she always has time to visit and comment on people’s posts, and is always positive and interested in what people have cooked, asking questions, giving suggestions and being a lovely friend. And Suzanne is such a gifted cook that I always feel honoured when she likes my food, so I was happily surprised, and honoured, when she asked me if I would like to put together a guest post for her…I hope she likes it, and that her readers do too 🙂

The fact that we share a love of dogs only makes me like her more xx

I wanted to push myself and create something new for Suzanne so I bring you:

the joy of a homemade falafel mix..

img_1534

Falafels are a middle eastern ‘pattie’, typically made with dried soaked chickpeas and they tend to be deep fried; they are very much middle eastern street food. I love falafels and, in particular, I love the flavours in the mix of ingredients and like applying it to other dishes. On this occasion I decided to experiment with fava beans, which are dried broad beans, in place of dried chickpeas – whichever you choose, do not use the cooked or canned versions; the success of falafels comes from using dried & soaked pulses, that all adds to their crunch. I have also oven baked my falafels which I think works well, but that’s not all, read on…

The mix:

Ingredients

250g dried split fava beans, placed in a large bowl of water and soaked overnight

1 medium red onion, peeled and roughly chopped

2-3 garlic cloves, peeled

1 bunch flat leaf parsley

1 tsp ground coriander

1 tsp ground cumin

1/4 cayenne pepper (optional)

Juice of 1 lemon

Salt to taste

Flour of your choice as needed

Method

Wash and drain the fava beans

Put everything EXCEPT the flour in a blender and chop to a chunky crumb

At this point I stored the mixture in a wrapped bowl in the fridge and let the flavours develop, then started to make things with it over the next few days. You could use it immediately depending on your plans.

My first use of the mixture creates a lovely brunch, lunch or dinner..a falafel crunch with spinach and eggs..

img_1464

Put about a quarter of the falafel mixture in a pan with melted coconut oil, over a medium heat. As you cook it, turn it all over every so often, and it becomes lovely and crunchy and browned.

Once cooked, add a handful of baby spinach leaves, and once that is cooked without becoming mushy, make some spaces in the mix and cook eggs into the mix.

A sprinkle of grated cheese finishes it all off perfectly.. I ate mine directly from the pan – saves on washing up!!

img_1461

For a other idea, how about a falafel quinoa goodness bowl?

First, spoon about a quarter of the falafel mixture again into a pan with olive oil over a medium heat.

img_1467

Start to cook it through then add several spoons of cooked quinoa.

img_1469

Cook the mixture until the fava beans are cooked and the mixture starts to crisp slightly.

This creates a lovely dish of tasty goodness on its own, perfect for me for lunch with some homemade dips.. …

img_1473 img_1476 img_1478

or you could use it as a side dish or in place of something like rice. Or again add some eggs to the dish, or your choice of meat or fish.

And finally..the actual falafels..

img_1537

These falafels are oven baked; I’ve never deep fried my falafels so I can’t tell you how well it does or doesn’t work, but I can tell you that they are very good when baked..

A quarter of the mixture formed 6 falafels

Add 1-2 tablespoons of flour (I used spelt flour but any all purpose plain flour will do) and bring the mixture together with your hands, it will create a ‘dough’

I use a falafel press to create my patties but you could easily split the mixture into 6 and create balls then flatten them to discs

Brush olive oil on both sides and place on parchment paper on baking tray

Bake at 200C for 10 minutes then turn them all over and bake for another 10 minutes

img_1547

They come out lovely and crunchy 🙂

I enjoyed mine wrapped in lettuce leaves with tahini sauce and homous.

img_1544-1

In the Middle East falafels would typically be served in flat bread wraps with salad and tahini sauce so the lettuce formed my ‘bread’.

I hope you like my falafels and other ideas for the mix. I think it could also be utilised as a ‘crumble’ topping over a lovely dish, or as a crumb on a piece of fish or meat. The possibilities are endless!

Thank you again to Suzanne for inviting me to appear on her lovely blog, I hope you all enjoyed a bit of my world 🙂

Chocolate Madeleines

IMG_1352

I’ve posted this recipe before, it’s so good it’s worth posting again. The recipe comes from Gale Gand. I love her and have been watching her show, buying her cookbooks and following her recipes for years. The only thing I haven’t done is go to her restaurant in Chicago, Tru, it’s on my bucket list and one day I will.

These madelienes are very simple and always turn out great. I saw her once making these on Martha Stewarts show and she was agast that Gale would add baking powder to madeleines. Gale explained that because of the cocoa being heavy you need a little extra lift and it makes sense. Gale also lightly browns the butter and sieves out the solids for this recipe, it makes a difference trust me.

I made these for several reasons, they are simple and delicious, I just got this oh so pretty madeliene pan at Williams Sonoma and I am bringing these little treats with me Fiesta Friday #109. I had so much fun co hosting last week and this week our lovely co hosts are Josette @ thebrookcook and Lily @ little sweet baker.

Pretty shell pattern

Pretty shell pattern

IMG_1395

Chocolate Madeleines

A recipe by Gale Gand – Makes 2 dozen

1/2 cup, plus 4 tablespoons unsalted butter softened, for buttering madeleine molds
3 large eggs
1/2 cup granulated sugar
2 tablespoons packed dark-brown sugar
1 cup cake flour (not self-rising)
1/4 cup cocoa powder, preferably Dutch-processed
1 1/2 teaspoons baking powder
1/8 teaspoon salt
1 tsp vanilla extract

Preheat oven to 325 degrees. Brush madeleine pans well with 4 tablespoons softened butter; refrigerate 5 minutes.
In a small heavy-bottomed saucepan, melt remaining 1/2 cup butter over medium heat. Continue to cook until butter turns golden brown, being careful not to let the butter burn. Remove from heat and strain through a fine mesh sieve into a small bowl; set aside.
In the bowl of an electric mixer fitted with the whisk attachment, whip eggs with granulated and brown sugars until light and thickened, 3 to 5 minutes. Add flour, cocoa powder, baking powder, and salt, and stir on low speed until combined. Add vanilla and reserved browned butter; mix just until blended.
Insert a 1/2-inch plain tip into a pastry bag and fill with batter. Pipe mounds of batter into prepared pans until each mold is full, mounding batter in the center of the molds but not filling to the edge. Alternatively, you can use a teaspoon to fill the molds with batter (which is what I did). Bake until madeleines are firm and a little mound is puffed up in the middle, 10 to 12 minutes. Madeleines are best eaten the same day they are baked.

Light and elegant

Light and elegant

fiesta-friday-badge-button-i-was-featured1

Roasted Carrot, Golden Beet And Goat Cheese Tart With Dukkah


IMG_0984

Recently while browsing in the neighborhood bookstore I broke down and bought “Plenty More” a brilliant and beautiful cookbook which really is an homage to vegetables by the amazing Yotam Ottolenghi. Everything in the book looks wonderful and I want to make it but the recipe that stuck out is the roasted carrots. Now it’s odd that this recipe attracted me since I really dislike cooked or roasted carrots, I only eat them raw.  There is something about this simple dish that I find so appealing.  The carrots are glazed with honey, olive oil, crushed toasted coriander and cumin and salt and pepper. They are then roasted in a hot oven until tender. I had some golden beets that I needed to use so I peeled and quartered them, slathered them with the same glaze and roasted them as well. The carrots were quite delicate and slim so I started with the beets roasting for 15 minutes then placed the carrots on the same pan and continued roasting for another 20 minutes.

The vegetables are wonderful on their own but I decided to make a savory tart filled with goat cheese and topped with the roasted vegetables. To add a little crunch and make the tart more interesting I made dukkah from nuts, seeds and spice and sprinkled on top. My photo’s are horrible so disregard,  it poured rain all day, and there was no sunlight. It makes it very difficult to get a decent photo in bad weather,

I used the rest of my saffron pastry dough that I had left over from the lamb pot pies.  I think it made the tart even more interesting . The carrots and beets are only slightly sweet from the honey and nicely spiced,  it goes perfectly with the tangy goat cheese and flaky pastry, the dukkah has the same spice as the carrots along with seeds and nuts. It’s a great combination, easy to put together and makes a lovely presentation. If you are a fan of roasted carrots, beets, goat cheese and Ottolenghi I think you will really enjoy this tart.

I am bringing this tart to Fiesta Friday #108. Angie is such a great hostess and this week the co hosts are me, yep I am co hosting and the lovely Zeba@Food For The Soul

Join in, you are all invited, bring something delicious, see you at the party!!

Roasted Carrot, Golden Beet, Goat Cheese Tart With Dukkah

Makes one 9 inch rectangular or round tart

Roasted Carrots and beets

8 carrots peeled and cleaned and left whole (I used rainbow)

3 small golden beets peeled, cleaned and quartered

3 tbs honey

2 tbs olive oil

2 tsp toasted coriander seeds crushed (use mortar and pestle)

2 tsp toasted cumin seeds crushed

1 tsp salt

several grinds of pepper

3 or 4 sprigs fresh thyme

Pre heat oven to 425 degree’s. Line baking sheet with parchment. Toss the vegetables in the glaze. Place the beets on the baking sheet first with a sprig or two of thyme and roast for 20 minutes. Remove from oven, turn the beets over place carrots and remaining thyme sprigs on the pan and roast for another 30 minutes gently turning them at least once while they are roasting. Set the vegetables aside.

Blind bake the pastry in a 400 degree oven weighted with pie weights until golden brown approximately 25-30 minutes.

Goat Cheese Filling

10.5 oz soft goat cheese softened and at room temperature

2-4 tbs whole fat buttermilk or créme fraîche

Mix the softened goat cheese with buttermilk or créme fraîche a tbs at a time until you reach a spreadable consistency. I used the full 4 tbs.

Dukkah

1 tbs coriander seeds

1 tbs cumin seeds

1 tbs white sesame seeds

1/4 cup toasted pistachio’s

sea salt and pepper to taste.

Toast the spices and  seeds, first the coriander and cummin and then the sesame. I like to use a fry pan. Toast until you can smell them shaking the pan frequently. I used toasted pistachio’s if yours are not toast in the oven for about 15 minutes.

Add the spices, seeds and nuts to a spice grinder and pulse until broken up but not completely pulverized, alternately you can use a mortar and pestle. You want it to have some texture. Season with salt and pepper.

IMG_1015

Serving the tart

Spread the goat cheese in the baked pie shell, arrange the vegetables on top, brush with some of the leftover glaze and sprinkle with dukkah.

IMG_1047

fiesta-friday-badge-button-i-was-featured1

New Kitchen Toy And Percy Update

From Williams Sonoma Site

From Williams Sonoma Site

In an effort to cut carbs and eat more healthfully I invested in a spiralizer attachment for my Kitchen Aid. I totally love it, it’s easy to use and you actually can sort of fool yourself into thinking you are eating pasta (well sort of) anyway it is wonderful and must say I love zucchini pasta. Broke in my new gadget tonight with a zucchini and made this:

zucchini pasta

zucchini pasta with roasted tomatoes and parmigiana

Now for Mr. Percy, he is doing fantastic. He really seems to be happy here, I have totally spoiled him (as it should be). He will only rarely eat dog food now because I cook for him, he sleeps on the bed with me at night. He has made friends with my neighbors and their dogs, he adores the cats that I feed in the backyard and last Saturday I took him to Ft Greene Park, quite a long walk for the little guy at almost 11 years young so we brought Nando’s stroller if he got tired. He made it all the way to the park, had a glorious time playing with other dogs and getting lots of love from strangers,  but he got a ride most of the way back home. He is a love, so sweet, so well behaved and a real joy.

IMG_0846 IMG_0848 IMG_0951

Exciting News- Meet Percy My Valentine


IMG_0685I have adopted a dog!!

A few weeks ago,  I got an email from my good friend Emily, she and I have known each other for quite some time now, we met on Food52 where I have met and am friends with some amazing people. Well, Emily lives in DC with her husband T and two children, their cat Nutmeg and pug Percy, I follow her blog Em-i-lis, reading it every day it’s part of my morning routine. She is an amazing writer, a great cook and the sweetest person. In the email Em asked me if I would consider adopting her pug Percy, he is 10 years old and a real sweetheart but she just can’t give him the attention he needs with her busy life. I said yes, of course I would. After losing Izzy first and then Nando shortly after I was grief stricken but at the same time I needed some time to recover from the trauma of their deaths, I had always said that although I was not looking for another dog, at least not now, I thought that if the situation presents itself I will do it. So it did, and yesterday, Saturday February 13, they brought Percy to live with me in Brooklyn. There is once again a pug in my kitchen and I couldn’t be happier. I am grateful to Em for giving me this sweet gift and I know she will miss Percy but she can be certain that he has a good and loving home.

Got his green

Got his greenie

Out for a walk

Out for a walk

Made himself right at home

Made himself right at home

Fast asleep

Fast asleep


Cupcakes For Valentines Day And Fiesta Friday #106


IMG_0551Chocolate cupcakes with a cream cheese buttercream filling and covered with ganache, I saw these in an email or instagram or something from Williams Sonoma only they used a strawberry cream cheese filling which sounds delicious,  but I opted for a vanilla cream cheese filling instead. The cupcakes are adorable and mimic the famous Hostess Cupcake with the white squiggle on top of the icing, Instead of the squiggle you write a valentine message or pipe some hearts. I thought they were too cute (and delicious) not to make. My writing/piping skills are not that great and I think I should have followed a recipe for the icing used to write because it ran a bit, no it’s not your eyes that are blurry it’s the runny icing. Despite the less than perfect appearance they are quite delicious. Because I was having a hard time with the writing I decided to do half of the cupcakes with the vanilla cream cheese icing.

For our very special Valentines Day party I thought a nice dose of chocolate would be in order, so for Fiesta Friday #106 I am bringing these cupcakes.  This week the co hosts are  Steffi @ Ginger & Bread and Andrea @ Cooking With a Wallflower 

Happy Valentines Day Everyone!!

IMG_0516

Hershey’s Chocolate Cupcakes

Makes 24 cupcakes or two 9 inch round layers

1 3/4 cup all purpose flour
3/4 cups cocoa (I use hershey’s) the recipe doesn’t specify whether or not to use dutch or natural cocoa since its a hersheys recipe I use what they say to use.
2 cups sugar
1 teaspoon salt
1 1/2 teaspoon baking powder
1 1/2 teaspoon baking soda
1/2 cup vegetable oil (If you want to substitute melted butter for the oil its fine)
1 cup whole milk at room temperature
2 large eggs at room temperature and lightly beaten
2 teaspoon vanilla extract
1 cup boiling water
2 teaspoons instant espresso coffee (Optional but recommended)
soft butter and flour to prep baking pans or you can use cooking spray
Pre-heat oven to 350 degrees. Prepare two 9″ round baking pans, butter the bottom add a parchment round then butter bottom and sides and flour the pan or you can use cocoa powder instead of flour. If you are making cupcakes place liners in two 12 cup muffin tins. In large mixing bowl add your dry ingredients, flour, cocoa, sugar, salt, baking soda and baking powder and whisk to combine. Now add the wet ingredients milk, oil,eggs and vanilla do not add the boiling water yet. With hand held mixer beat for 2 minutes. Now add the boiling water with optional espresso powder, beat just until combined. Pour into your prepared pans (the batter is quite thin) and bake for 30-35 minutes or until toothpick inserted in center comes out clean.

Cream cheese buttercream filling

4 oz unsalted butter softened at room temperature

4 oz cream cheese at room temperature

1 3/4-2 cups powdered sugar

1 tbs milk (plus more if needed)

Beat butter and cream cheese until fluffy and soft. Add powdered sugar and 1 tbs milk. The frosting should be soft and fluffy.

Ganache

4 oz milk chocolate

4 oz dark chocolate

1 cup heavy cream

Heat the cream to scalding, chop the chocolate and place in mixing bowl, pour the hot cream over the chocolate and let sit for 5 minutes. Stir until smooth. Let the ganache come to room temperature stirring frequently.

To make the filled cupcakes, refrigerate the cupcakes so they are cold, with a paring knive cut a small hole in the center of the cupcake (you can eat that little tidbit) pipe the filling into the center, smooth the top and refrigerate for several hours. Pour the room temperature ganache on top and refrigerate again. If you want to try your hand at piping the squiggle either get the pre packaged stuff or make your own with confectioners sugar and water. I don’t really have a recipe for that but it should be easy enough to locate. Won’t give you mine since it ran.

IMG_0633

I am receiving a very special Valentines gift today which I am so excited about. I’ll let everyone know about it later. Have a great day and lots of Love!

fiesta-friday-badge-button-i-was-featured1

Guest Post- Three Little Halves Meyer Lemon, Cornmeal And Olive Oil Cake With Rosemary Glaze

I am honored to know and call Aleksandra a friend, she is the author of the gorgeous blog Three Little Halves. I met her several years ago on Food52 and was immediately mesmerized by her delicious recipes and then I saw her blog and was literally blown away with the beauty and artistry of her photographs and illustrations, her writing is lyrical and engaging and speaks of family and history and travel and her recipes are delicious and creative and literally make you want to make them immediately. Read a little about her accomplishments, she is a James Beard Foundation nominee, her blog was a finalist for Savueur Magazines Blog awards, her blog is named as one of the top 100 for 2015  by Inspired. She has also won many contests on Food52 and has numerous Wildcard Wins and Community Picks. Oh, yes, I also should add that she is a brilliant Scientist by avocation. This uber talented and accomplished woman is one of the nicest people you will ever meet, and before I introduce Aleksandra, Queen Sashy, I  want to thank her for being so kind and I am humbled and grateful for her friendship and support. I also want to thank her for making this cake, a nod to my recipe, which she made her own and took to another level with her wonderful additions and photographs.

Everyone meet Aleksandra..

meyer lemon cake

It gives me a great pleasure to contribute this post to Suzanne’s blog…

Four years ago, I stumbled upon a gorgeous photo of plum and mozzarella salad on Pinterest, or maybe it was on Facebook, I do not quite remember anymore. It took me to a place called Food52 – an awesome little corner of the Internet where home cooks got together to exchange recipes, chit-chat, ask questions, debate and learn. And compete — that’s the part they all liked a lot! I joined and Food52 became my virtual playground, a kitchen family so to speak. As it happens most of the time in the world of the World Wide Web, one does not get to see one’s cyberspace buddies, just their avatars — oftentimes their pets or plants they like to grow — and one gets to know them by their semi-real names (meet emilyC and drbabs), the causes they champion (hello healthierkitchen and Greenstuff), their favorite foods (nice to meet you Brussels Sprouts for Breakfast, sexyLAMBCHOPx and gingeroot), or what they excel at (yup, that’s boulangere). I often catch myself trying to imagine how my kitchen comrades look, wondering who they are in real life, what they do, or what kind of person they might be. Sometimes, their comments and answers on the hotline add a trickle of information. Some folks are chatty, some are serious and to the point. There are the funny ones, the polite ones and the fact checkers. Those who like to brag a little, and those who know what they are talking about. The opinionated, the passionate, the informed… And the ones with a big heart. That’s about the first thing that comes to mind when you meet sdebrango on Food52. The ones with a really, really, really BIG heart. That’s about the first thing that comes to mind when you meet Suzanne in real life.

Suzanne does not brag and it might take a thing or two — a glimpse at her profile, a walk through her recipes, a tour of her blog — to realize what an extraordinary cook she is. She is the kind of cook you trust, the kind of cook you would like to have cooking for you every single day. Suzanne’s recipes are about honoring good food and good ingredients, and about feeling good. I had the privilege to cook for Suzanne when she organized Food52 potlucks in her Brooklyn home — it’s a privilege and responsibility, because you know you are cooking for a mighty good cook. Writing a guest post for Suzanne’s blog kind of makes you feel the same, and when she asked me to contribute, I caught myself wondering. What to cook? Which recipe to share? One of my favorite Food52 recipes is Suzanne’s citrus and semolina olive oil cake; it’s a poor man’s dessert one might find somewhere on the Mediterranean coast, a simple thing, yet a slice of it feels like a piece of sunshine on the plate. I made the cake many times, citruses and olive oil are a combination I love, so perhaps, I thought, a tiny tribute to it, an homage so to say, would be a way to give back and honor a great recipe, a magnificent cook, and most of all, a wonderful person.

meyer lemon cornmeal and rosemary cake-3-2

meyer lemon cornmeal and rosemary cake-3-4

Meyer Lemon, Cornmeal and Olive Oil Cake with Rosemary Glaze

This cake will really benefit from a good olive oil and Meyer lemons. Needles to say, when Meyers are not in season, you can always use plain good old lemons. I also like to play with different combinations of citruses and herbs, such as grapefruit and mint, lime and lemon thyme, and orange and lemon verbena.

for the cake

* 1 1/4 cup all purpose flour
* 1/2 cup stone ground cornmeal flour (I used Bob Red Mills)
* 1 tsp baking powder
* 1/2 tsp baking soda
* 1 tsp kosher salt

* 3 large eggs
* 1 cup full fat Greek yogurt
* 3/4 cup fruity extra virgin olive oil
* 3/4 cup granulated sugar
* zest of two Meyer lemons
* 3/4 cup lemon juice (juice of two Meyer lemons)

* a little bit of butter and extra flour for greasing and flouring the pan

for the glaze

* 1 cup granulated sugar
* 1 cup water
* 3-4 sprigs of rosemary

hardware

* 9 x 5 inch loaf pan

Heat the oven to 325F convection (350F regular).

In a bowl mix together all purpose flour, cornmeal, baking powder, baking soda and salt.

In a small bowl, whisk the eggs gently.

In a large bowl mix yogurt, olive oil, sugar, lemon zest and lemon juice. Add the eggs to the yogurt mixture and stir until combined. Add the dry ingredients into the mixture, and stir gently, until fully combined. Be careful not to overwork the batter.

Grease and flour the pan. Pour the batter into the pan and bake for about 50 minutes, until cake is golden and toothpick inserted into the center comes out clean. Leave the cake in the pan for about 15 minutes, and then take it out and place on a serving plate.

While the cake is in the oven, make the glaze. Combine water, sugar and rosemary in a medium saucepan over medium-high heat. Bring to a boil, stirring occasionally, and boil until sugar is completely dissolved. Remove the saucepan from the heat, and let it stand, covered, for about 30 minutes to an hour.

While the cake is still warm, pour the glaze all over it. Wait for a while until the cake absorbs the syrup and repeat once more. (You will have some extra syrup left.) Serve the cake warm, at room temperature or cold, with the remaining syrup on the side.


meyer lemon cornmeal and rosemary cake-3

Rustic Italian Rolls For Fiesta Friday #105

IMG_0360

This is not exactly conducive to dieting, I have been baking bread, a lot of bread lately. the good news is I give away some and freeze some. One recipe of The Solitary Cooks rustic Italian bread makes 3 medium size loaves, boules or batards. With this batch I made 2 boule and 8 sandwich size rolls. Just a hint, once I make the dough and it proves at room temp I put it in the refrigerator for 48-72 hours, believe me,  this is a good thing, the bread develops incredible character and flavor. I also stagger the making of the bread. I made the 2 boule yesterday and the rolls today. I have never gone more than 72 hours in the refrigerator but I can’t imagine it would be bad to even give it an extra day. Building character is a good thing.

2 Boule

2 Boule

The rolls are perfect sandwich size, or would be a generous dinner roll. Because they are portable and delicious and who doesn’t like bread I thought I would bring them with me to Fiesta Friday #105. This week Angie’s co hosts are Lily @ Little Sweet Baker andJulianna @ Foodie On Board. Hope to see some (or all) of you there and bring a dish, it will be fun. Guaranteed!!

I am giving the link to the recipe which I have done many times, Cynthia, The Solitary Cook gives amazing, explicit instructions on how to make this bread also including a link to her instructions on making the preferement or biga and I want you to go to her site and read it. She is amazing.

gorgeous rolls

gorgeous rolls

fiesta-friday-badge-button-i-was-featured1