Skip to content

Archive for

Vegetable Lasagna And A Frittata

img_9841

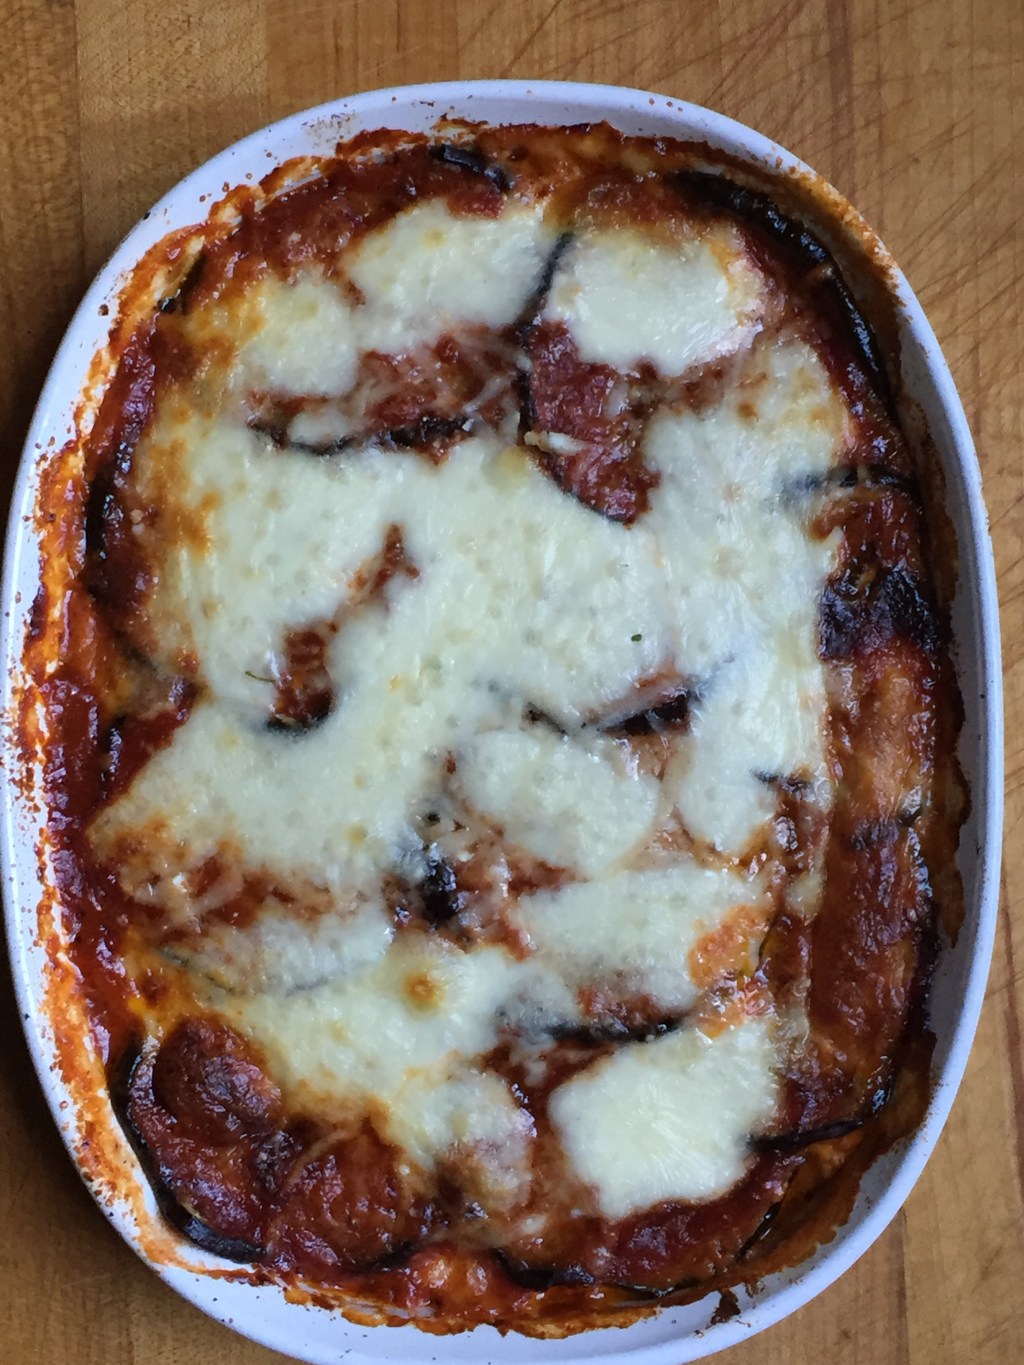
Whenever I hear vegetable lasagna I think of that Seinfeld episode when Elaine is on a plane, sitting next to a guy she refers to as “vegetable lasagna” because thats what he ate. That show still makes me laugh. This is not a lasagna in the truest sense of the word, there is no pasta. Instead zucchini and eggplant are layered with ricotta, grated cheese, mozzarella and sauce. This is so good I really don’t miss the pasta, at all. This is me getting back on track, cutting carbs and sugar, trying to eat clean and light. I had some homemade marinara in the freezer, just enough, not having to make sauce made this a quick and easy dinner. This would also be delicious with a béchamel rather than ricotta.

The frittata is a wonderful for any meal, breakfast with a cup of coffee or tea, for lunch/dinner with a salad, it’s a light meal that satisfies. Fritatta is so simple to make and you can add whatever you like to make it your own. I used roasted tomatoes, zucchini and shallot along with taleggio and parmigiana. Please Note, the measurements of my ingredients are not exact. I don’t really measure but they are very close, I’ve gotten pretty good at eyeballing it and am usually really close. You can add more or less cheese depending on your personal taste.

img_9882

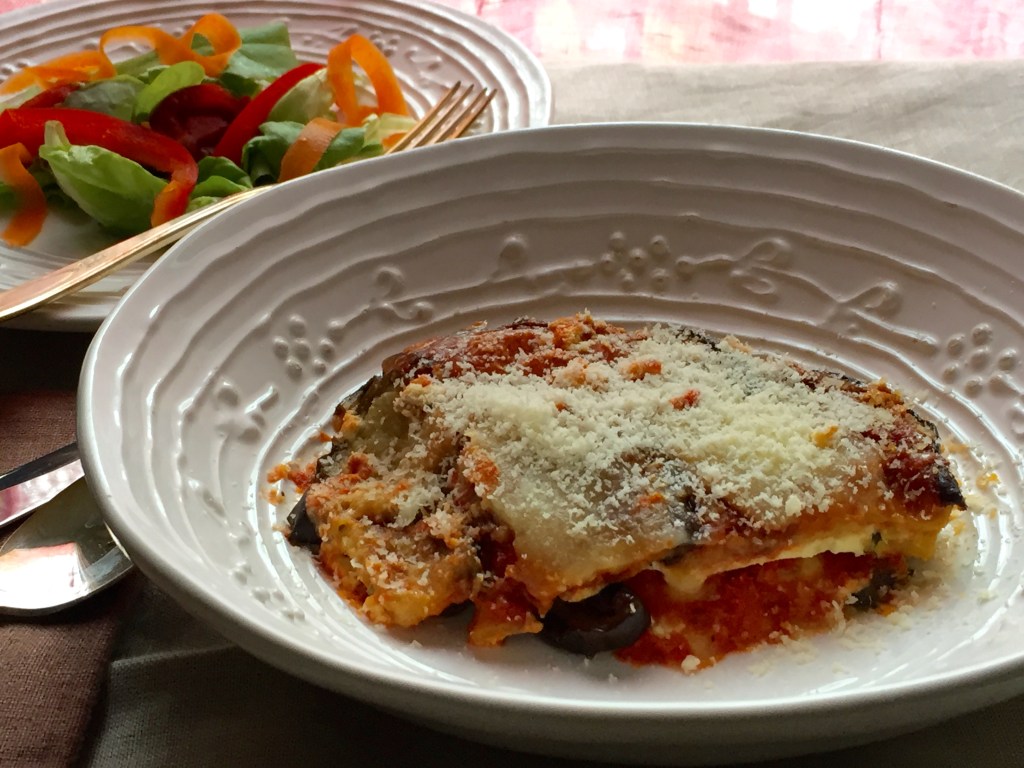
Eggplant And Zucchini Lasagna (senza la pasta)

Serves 4-6

2 zucchini unpeeled, washed and ends cut off

1 large eggplant

1 1/2 cup ricotta

1 egg

handful flatleaf parsley chopped

1/2 cup grated cheese (I used parmigiana, asiago and romano) for the ricotta mixture

8 oz mozzarella (fresh if possible) sliced thinly or grated

approximately 2 cups marinara sauce

more grated cheese used when layering

Heat oven to 375 degree’s.

Slice the zucchini in approximately 1/4 inch slices and lay on parchment lined baking sheet. Drizzle with olive oil, turn and drizzle more so each side is covered. Sprinkle with salt and pepper.

Roast in the oven until the zucchini starts to brown, turning after approximately 20 minutes. Remove from oven and set aside. Save the parchment and keep the oven on.

Slice the eggplant with skin on in approximately 1/4 inch thick rounds. Rub or brush olive oil on one side, turn over and rub more olive oil on the other side. Sprinkle with salt and pepper and roast in the oven until lightly browned, turn and roast the other side. You want the eggplant and zucchini lightly browned. Removed from oven and set aside. Because eggplant absorbs the oil I recommend using a pastry brush and brush each side with oil to make sure it’s evenly coated.

Mix ricotta with egg, grated cheese, parsley and some salt and pepper.

Slice or grate the mozzarella. Now you are ready to assemble. Spread some of the marinara in the bottom of your baking dish. Layer some of the eggplant, add a few dollops of ricotta, spread as evenly as you can (doesn’t have to be perfect) add some of the mozzarella, grated cheese and a few spoon full of sauce. Next a layer of zucchini and repeat the layering. I used eggplant as the top layer, spread some sauce on top of the eggplant, sprinkle some grated cheese and put mozzarella on top. Bake uncovered on a sheet pan for approximately 45 minutes until browned and bubbly.
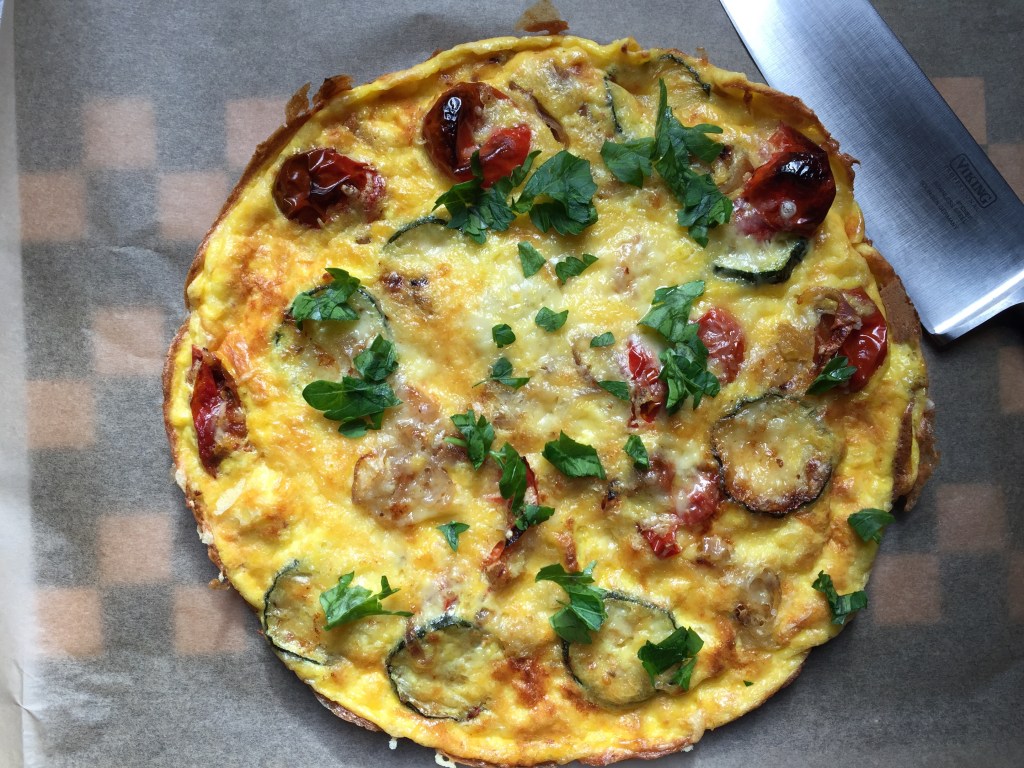
img_9800

Frittata

Serves 4

1 zucchini unpeeled, cut into thin rounds

1 shallot, sliced

8-10 (approx) small tomatoes, cherry, kumato, zima, whatever you can find that look good sliced in half

olive oil, salt and pepper

8 large eggs

3 tbs sour cream

approx. 1/2 cup grated parmigiana or blend of grateable cheese

approx. 1/3 cup taleggio grated plus a little more to sprinkle on top before baking.

Heat oven to 425 degree’s.

Place tomatoes, zucchini and shallot on parchment lined baking sheet, drizzle with olive oil lightly coating both sides of zucchini and tomato, season with salt and pepper. Roast until the zucchini and onion are lightly browned and the tomatoes start to caramelize. Approximately 25 minutes. Remove from the oven and set aside.

Add a little olive oil in a non stick skillet (cast iron is great) and heat on medium high heat. Meanwhile beat the eggs with a fork, add the sour cream, and grated cheese (parmigiana and taleggio) season with salt and pepper. Reduce oven temperature to 400 degree’s.

Pour into hot skillet (oven proof) and when you see the egg is starting to set on the edges move the eggs gently (I push towards the center) letting the liquid stream to the fill in where you have moved the eggs that have set. When the egg is cooked about a third of the way add the vegetables and sprinkle with the rest of the taleggio. Place in the oven for approximately 10 minutes, cut the oven off and turn on the broiler. Cook for another 5 (or so) minutes until it’s lightly browned. Remove to serving platter or board and let cool a bit before serving.

img_9816

Coconut Caulifower Soup With Ginger And Turmeric


Looking through Clean Soups the one that leapt out at me was the Coconut Cauliflower Soup, actually I decided on this soup before I chose which broth to make. You all know my love affair with cauliflower and I am such a big fan of pureed soups, this was the one I had to make. Turmeric has amazing medicinal, nutritional properties and I have it every day with milk and a grind of black pepper. When I saw the gorgeous golden yellow soup it was love at first sight. I am also a big fan of Thai flavors, lemongrass, ginger, lime and coconut are a happy marriage of flavors and make this silky pureed soup exotic and delicious. A touch of red Thai chili paste provides a gentle bite and the sum of all of the ingredients is wonderfully comforting and so yummy.

I made the soup exactly as written in the recipe but ended up tweaking just a bit as I wasn’t quite satisfied with the results. The cauliflower is roasted in a hot oven drizzled with olive oil and turmeric and what ended up happening is that it started getting too dark and the cauliflower was not tender enough,  I kept turning it and moving it around until the prescribed length of baking time was reached. I didn’t think the cauliflower was quite soft enough but continued, blending it with the other vegetables and I didn’t like the texture. Now it could be my wonky oven or maybe the florets were too big,  I don’t know. I ended up cooking the pureéd soup for about 20 minutes and then put it back in the blender so that it was velvety smooth. The soup is delicious and I would definitely make it again.

Coconut Cauliflower Soup With Ginger And Turmeric

2 1/2 – 3 lb cauliflower cut into 1 1/2 inch florets

3 tbs extra virgin olive oil

1/2 tsp ground turmeric

sea salt

1/4 tsp freshly ground black pepper

1 yellow onion peeled and chopped

2 cloves garlic minced

2 carrots peeled and chopped

2 stalks celery chopped

2 tsp Thai red chili paste

6 cups Thai coconut broth plus more if needed (I did need more)

2 tsp grated fresh ginger

1 tbs freshly squeezed lime juice plus more if needed

garnish with fresh chopped mint or cilantro

Position a rack in the middle of the oven and heat to 425 degree’s. Line a rimmed baking sheet with parchment paper.

Put the cauliflower, 2 tbs olive oil, 1/4 tsp turmeric, 1/2 tsp salt and the black pepper in a large bowl and toss until coated. Transfer to the prepared baking sheet and spread to an even layer. Bake for 20-25 minutes until golden and tender.

Meanwhile heat the remaining tbs of olive oil in a soup pot, then add the onion, a pinch of salt and the remaining 1/4 tsp of turmeric and sauté until translucent about 3 minutes, add the garlic, carrots and celery and 1/4 tsp salt and sauté until the vegetables begin to turn golden, about 10 minutes. Add the chili paste and stir to coat the vegetables. Pour in 1/2 cup of the broth to deglaze the pot, stirring to loosen any bits at the bottom of the pot. Let cook until the liquid reduces by half.

Pour 1/3 of the broth into a blender, add the ginger and 1/3 of the vegetables and cauliflower and blend until smooth adding more broth if needed. Continue to blend until all of the broth and vegetables are pureed. Pour back into the soup pot and cook over low heat until warmed,  add salt if needed and the lime juice.  Soup will keep 5 days in the refrigerator or up to 6 months in the freezer.

Clean Soups- Magic Mineral Broth and Thai Coconut Broth

img_9743

I’m a cookbook hoarder, well hoarder may be too harsh but I love my cookbooks, collect them and can literally spend hours in the bookstore looking at them and almost always leave the store with at least one if not more. When I received an email from the editors at Food52 asking if I would be interested in reviewing a cookbook for the Piglet Community Picks  there was no pause in my answer, a resounding YES.  I was given a choice of 6 cookbooks and Clean Soups was my first choice. It is not a voluminous cookbook, but offers some fantastic healthful and delicious basic broths used as a base for a variety of different types of soups.

I chose to make the Magic Miracle Broth,  a vegetable broth, and a stepping stone to another recipe Thai Coconut Broth which will  become a pureed soup. One thing I loved about this broth is that the vegetables are used unpeeled, everything, onion, carrot, garlic with the peels and all, it’s so easy to just throw it all in a pot and let it cook. If you love soup and clean eating I really recommend you purchase this cookbook. Part two of this post will be published in a few days, the finished soup.

Magic Mineral Broth

Makes approximately 1 gallon of broth

6 unpeeled carrots cut into thirds

2 unpeeled yellow onions, quartered

1 leek, white and green parts cut into thirds

1 bunch celery including the heart, cut into thirds

4 unpeeled red potatoes

2 unpeeled Japanese or regular sweet potatoes, quartered

1 unpeeled garnet yam, quartered

5 unpeeled garlic cloves, halved

1/2 bunch flat leaf parsley

1 (8 inch strip) kombu

12 black peppercorns

4 whole allspice or juniper berries

2 bay leaves

8 quarts cold filtered water

1 tsp sea salt plus more if needed

Rinse all vegetables well including the Kombu.
In a 12 quart or larger stockpot, combine the carrots, onion, leek, celery, red potatoes, sweet potatoes, yam, garlic, parsley, kombu, pepper, allspice berries and bay leaves. Add the water, cover, and bring to a boil over high heat. Decrease the heat to low and simmer, partially covered, for at least 2 hours or until the full richness of the vegetables can be tasted. As the broth simmers some of the water will evaporate, add more if the vegetables begin to peek out.

Strain the broth through a large course mesh sieve (use a heat resistant container underneath) and discard the solids. Stir in the salt adding more if desired. Let cool at room temperature before refrigerating or freezing. Store in the refrigerator up to 5 days or in the freezer up to 6 months.

img_9732


Thai Coconut Broth

Makes approximately 2 1/2 quarts of broth

8 cups Magic Mineral broth

2 13.5 oune cans coconut milk

3 1 inch pieces of fresh ginger

2 shallots peeled and halved

3 kaffir lime leaves or 1 tsp lime zest

1 stalk lemongrass, cut in chunks and bruised

1/4 tsp sea salt, plus more if needed

In a 6 quart pot combine the broth, coconut milk, ginger, shallots, lime leaves or zest, lemongrass and salt, bring to a low boil over medium heat. Cook for about 20 minutes. Decrease to low and simmer for another 30 minutes. Remove the solids, taste and add more salt if desired.

Let cool to room temperature before refrigerating or freezing. Store in refrigerator for up to 5 days and 6 months in the freezer.


Happy Valentines Day-Chocolate Layer Cake With Whipped Chocolate Caramel Ganache Frosting

img_9500

I don’t really celebrate Valentine’s Day but one thing I love to do is make a special dessert, usually containing chocolate. The cake is chocolate, my favorite go to recipe from Hershey and the frosting is one that I developed and entered in a contest at Food52, I was lucky enough to win the contest with this simple and very delicious frosting, there is no added sugar so it’s not cloyingly sweet and is it’s very light. Three layers of cake piled high with chocolate caramel whipped ganache is a great way to celebrate this day that celebrates love. Speaking of love, February 13th is Percy’s gotcha day, I will forever be grateful to Emily for letting me adopt Percy and although he cannot have chocolate cake I will make him a special dinner, his outfit a vest, white shirt and red bow time was made by an uber talented designer I met on Instagram see her work @thestylishbisou, she is amazing.  I made a 8 inch 3 layer cake and the recipe for the ganache made just enough to fill and frost the top, you can easily double the recipe for more frosting to cover the entire cake.

I am bringing this special Valentines cake with me to Fiesta Friday #158 and the co hosts this week are Ai @ Ai Made It For You and Petra @ Food Eat Love Check out all the gorgeous food and join us all at the party.

img_9400

Hershey’s Best Chocolate Cake

makes 24 cupcakes, two 9 inch layers or three 8 inch layers

1 3/4 cup all purpose flour

3/4 cup unsweetened natural cocoa powder

2 cups sugar

1 tsp salt

1 1/2 tsp baking soda

1 1/2 tsp baking powder

2 tsp espresso powder (optional)

1/2 cup vegetable oil

1 cup whole milk at room temperature

2 large eggs at room temperature lightly beaten

1 tsp vanilla extract

1 cup boiling water

Heat oven to 350 degree’s. Line muffin pan with liners or butter and flour cake pans.

Whisk dry ingredients together in a large mixing bowl. In 4 cup measuring cup add the wet ingredients and whisk together. Add to the dry ingredients and mix with electric mixer for 2 minutes. In the meantime put water on to boil and add the 1 cup boiling water to the batter and mix with electric mixer for 1 minute or until combined.

The batter will be thin, thats ok it’s supposed to be that way. Pour into prepared pans and for cupcakes bake 20-25 minutes. Layer cakes 30-40 minutes depending on size of the pan. Cake is done when tester inserted in middle comes out clean.

img_9367

Whipped Chocolate Caramel Ganache

Chocolate Caramel Sauce:
1 cup sugar
6 tablespoons salted butter cut into tablepoon-size pieces
1/2 cup heavy cream
2 ounces dark chocolate (I used bittersweet)
1 teaspoon vanilla extract
Put the heavy cream in a glass measuring cup and microwave on high for 45 seconds, add chocolate and microwave another 30 seconds Stir until its smooth, add the vanilla extract and stir to combine, add the butter to the warm chocolate cream and set aside .
In large saucepan add the sugar, turn heat to med/high and let sit until it starts to liquefy. Swirl the pot and gently move  with a heat proof spatula.  Cook until it turns amber in color.
Remove from heat and add the chocolate cream. Stir until its incorporated. Be careful when adding the cream and butter the hot liquid sugar will bubble and could burn you. Store in a container at room temperature until ready to use. If you make this ahead of time, simply place the bottle or jar in hot water to warm the caramel so it’s pourable. Note: I changed this slightly, instead of adding the butter and then the choolate cream. I added the butter to the warm chocolate cream and added it all at once after removing the caramel from the heat.
Ganache :
4 ounces dark chocolate broken into small pieces
4 ounces milk chocolate broken into small pieces
1 cup plus 2 tablespoons heavy cream
1 tablespoon liquor (I like cointreau or kahlua) or vanilla extract
1/2 cup chocolate caramel sauce
Heat cream to scalding (not boiling). Pour over the pieces of chocolate that are in a mixing bowl. Let sit 5 minutes then stir until there are no pieces of chocolate and it’s smooth and shiny, then add the chocolate caramel sauce and stir to combine.
Place bowl in an ice bath or in the refrigerator until cooled but not COLD  — it will stiffen fairly quickly if it gets too cold. Remove from the ice bath and beat with a mixer or whisk until the ganache is fluffy and spreadable. Frost the cake immediately. Best served at room temperature.

img_9589

Percy

Percy