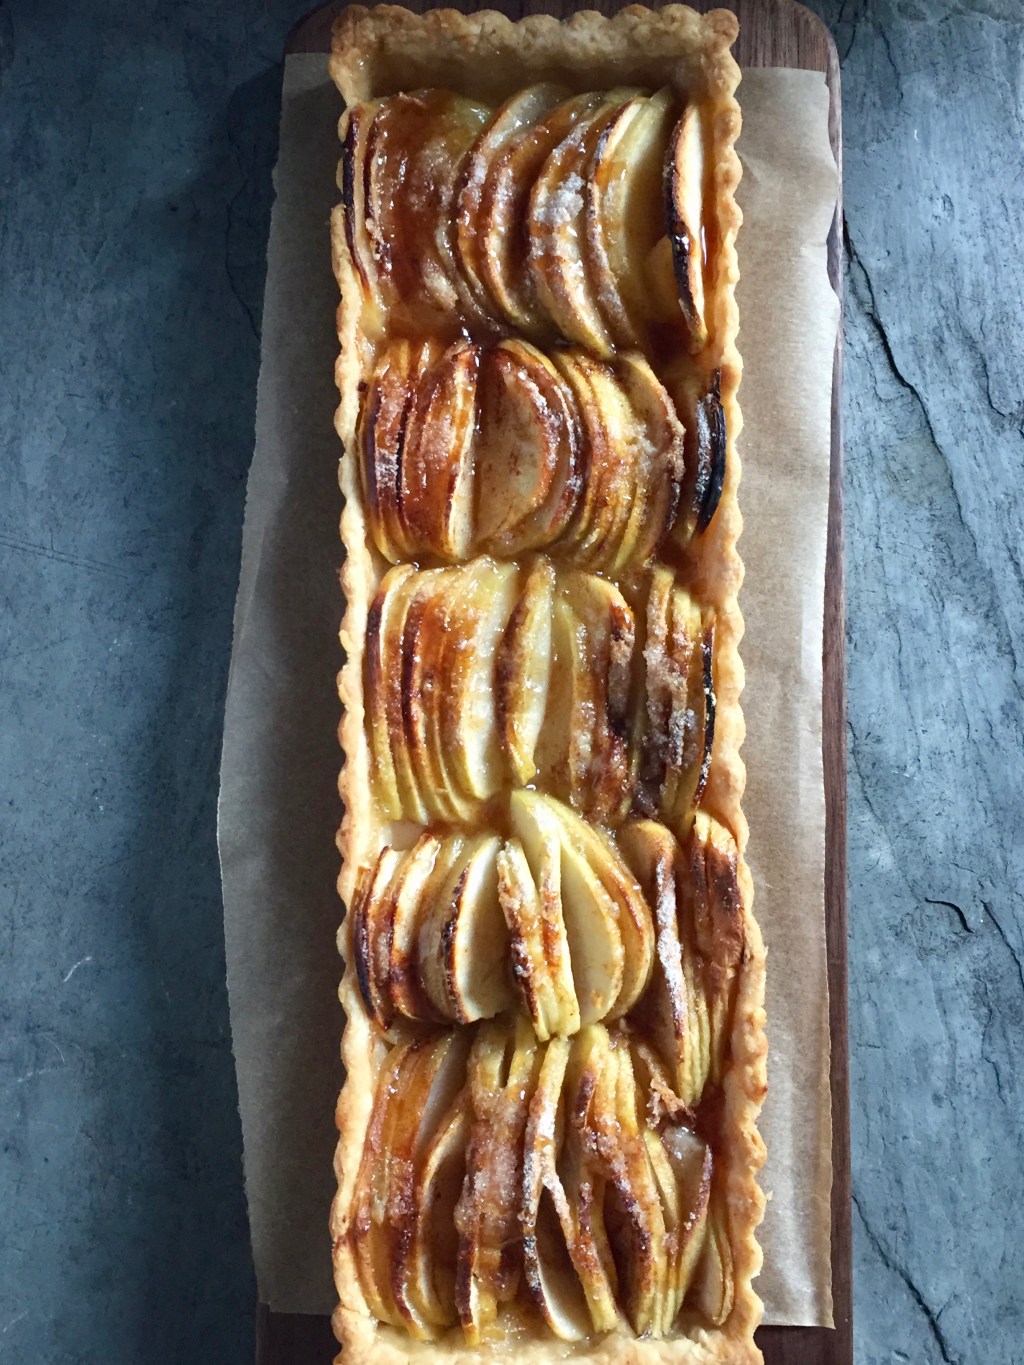
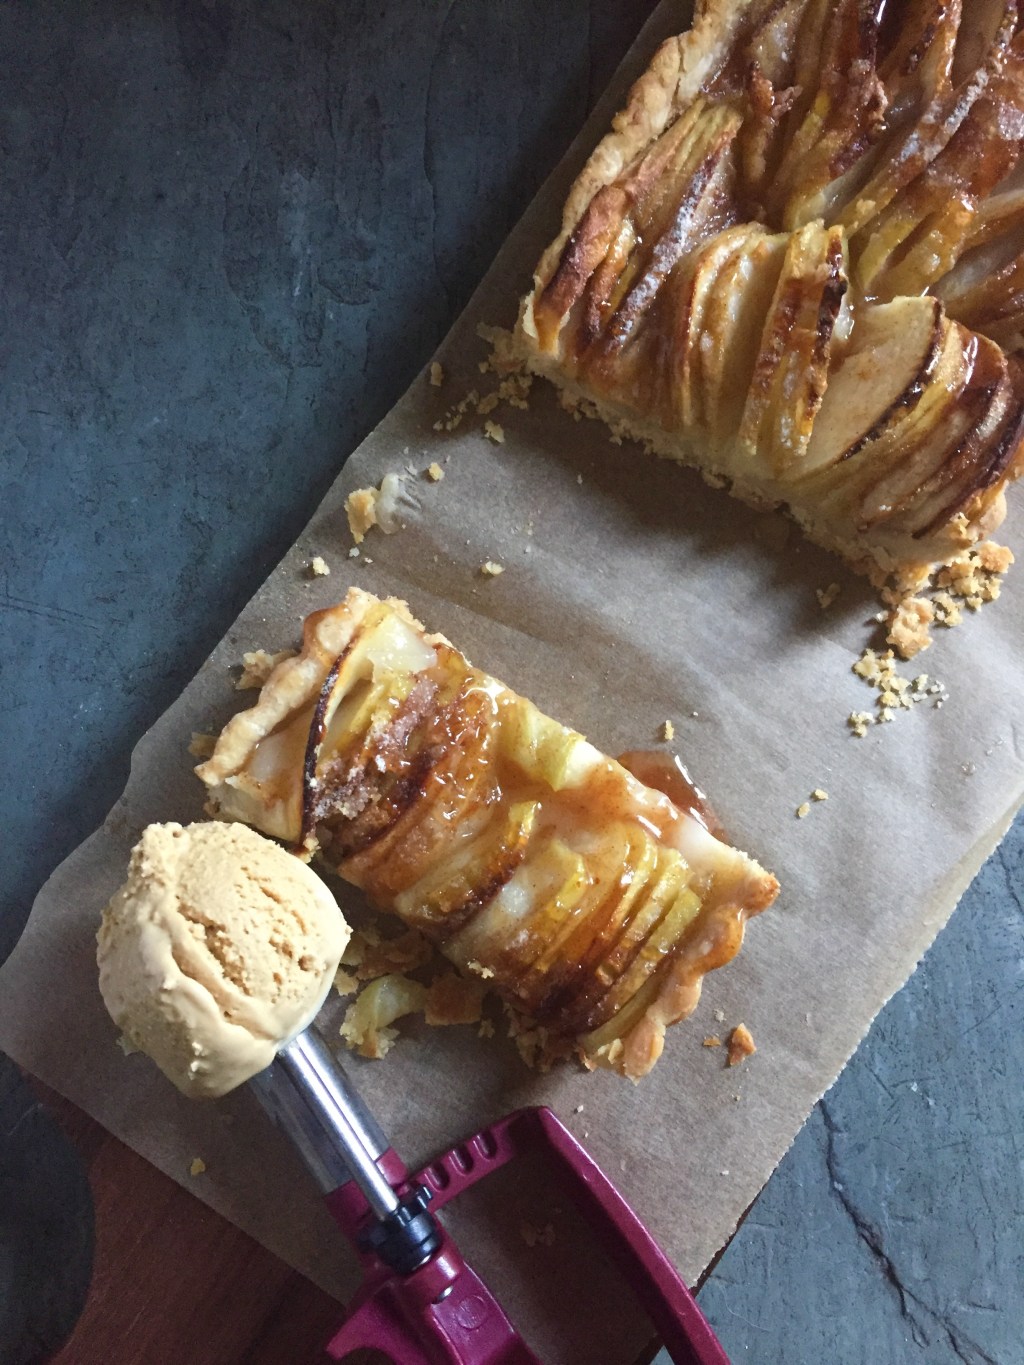
Skip to content

Posts from the ‘Fruit Desserts’ Category

Lemon Cream Tart

I have posted this recipe and several variations multiple times but the lemon cream is so good it’s time to post it again. Recipes get lost in the volumes of pages on the blog and are all but forgotten. This creamy lemon filling has been used in cakes, to stabilize whipped cream and as is the case here in a tart. I love just eating it on its own, it’s that good!! You can use other fruit and fruit juice besides lemon, I’ve made this with blackberry, orange, raspberry. It always turns out delicious.

The recipe is from Tartine Bakery and I saw it years ago on Food52. Its super easy to make and has always turned out perfectly. The only change I made was that I added some lemon zest to make the lemon flavor even more intense. I used my go too pie crust by Julia Child and whipped some heavy cream for the top, it would be equally good with meringue.
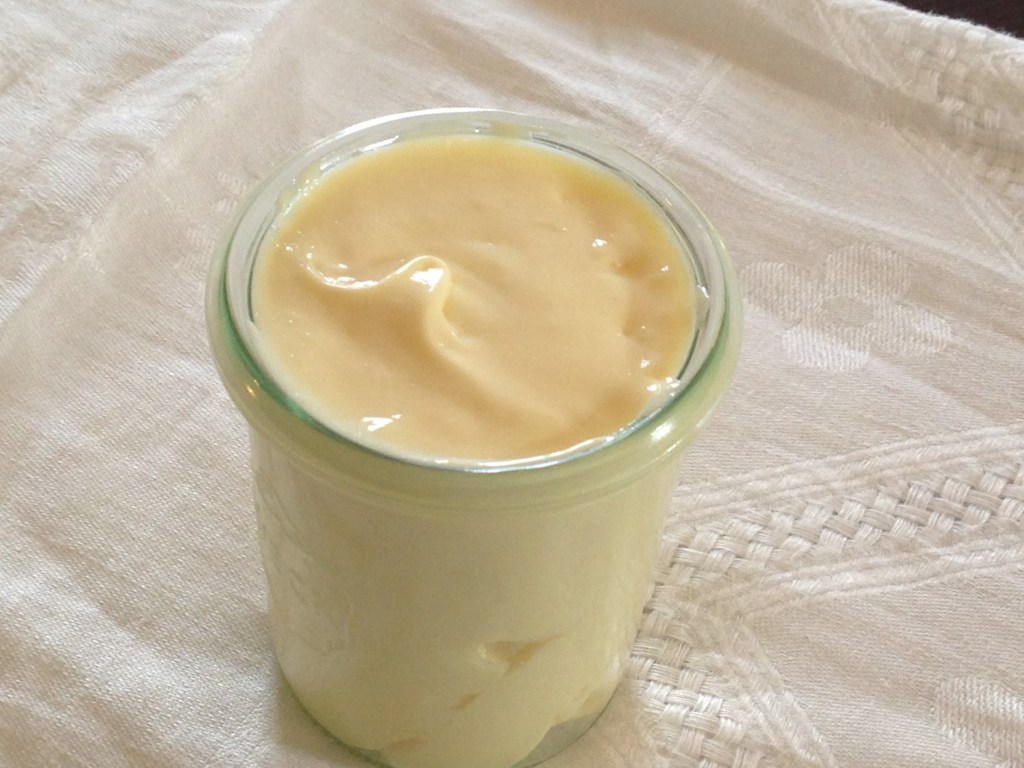
Lemon Cream

 Recipe for Tartine Bakery’s Lemon Cream

Makes about 2 1/2 cups (625 ml)

1/2 cup + 2 tbsp (5 oz/155 ml) lemon juice (Meyer or regular)

3 large eggs

1 large egg yolk

3/4 cup (6 oz/170 g) sugar

Pinch of salt

1 cup (8 oz/225 g) unsalted butter

zest of 2 lemons (0ptional)

Pour water to a depth of about 2 inches into a saucepan, place over medium heat, and bring to a simmer.

Combine the lemon juice, lemon zest, whole eggs, yolk, sugar, and salt in a stainless steel bowl that will rest securely in the rim of a saucepan over, not touching, the water. (Never let the egg yolks and sugar sit together for more than a moment without stirring; the sugar will cook the yolks and turn them granular.) Place the bowl over the saucepan and continue to whisk until the mixture becomes very thick and registers 180° F on a thermometer. This will take 10 to 12 minutes. If you don’t have or trust your thermometer, don’t worry. It should thicken to the point that your whisk leaves a trail through the curd. NOTE: I don’t use a thermometer, the lemon mixture will thicken and coat the back of the spoon, draw a line on the back of the spoon with your finger, the line will stay intact. It took about 11 minutes for mine to thicken properly.

Remove the bowl from over the water and let cool to 140° F, stirring from time to time to release the heat.

Meanwhile, cut butter into 1-tablespoon (15-ml) pieces. When the cream is ready, leave it in the bowl if using an immersion blender, or pour it into a countertop blender. With the blender running, add the butter 1 tablespoon at a time, blending after each addition until incorporated before adding the next piece. The cream will be pale yellow and opaque and quite thick.

You can use the cream immediately, or pour it into a storage container with a tight-fitting lid and refrigerate for up to 5 days.


Cake – A Learning Experience And A Tip

This is a cake recipe that I have been making for years and years, the recipe is tried and true, tested and developed by my Mom many moons ago. Why then did it fail?  I posted this recipe a long time ago on Food52, it has been featured, made over and over again by hundreds and it’s a really good recipe. It all started a few weeks ago when I decided to make a cake, I followed the directions as I always do, did not deviate, everything looked good until I got the cake out of the oven, it looked different, the sides were shrinking, coming away from the sides of the pan, not just a little but dramatically and the texture just didn’t seem right. It was more like an angel food cake than a yellow cake and was mis-shapen and lopsided. I thought I had to have done something wrong, maybe I whipped the egg whites too long, so I threw it away and made it again this time being EXTREMELY careful with my preparation. Guess what, same outcome. I honestly didn’t know what to think, I am not a novice baker, I try to use quality ingredients and follow directions to the letter. It was discouraging to say the least. I systematically started analyzing everything that went into this cake, eggs were the right size and at room temperature, milk also room temperature, my baking powder was not expired, the only change was that I opened a new box of  cake flour so I thought hmmmm maybe it was the flour. I called King Arthur Bakers Catalog, who by the way are a wonderful company and spoke to one of their baking experts, they took down the lot number and other information on all 3 boxes that I had received and asked me to do an experiment, try making my own cake flour, in case you have never done this you remove 4 tbs of flour from 1 cup of all purpose flour and replace with 4 tbs of corn starch, btw, they refunded my money which I didn’t ask them to do but because they are an outstanding company they did it. A few weeks went by before I decided to give it another try.

The bottom layer is the one using the new cake pan, can you see the difference?

THE RESULT

I made the cake using homemade cake flour, it turned out really well except for one thing, one layer I baked in my Chicago Metal cake pan that I have been using for ions, the other layer I baked in a newish cake pan. The layer in my old pan was great, the other layer was good but not as good as the other layer, how could that be? To be fair I have used the new cake pan for other cake and it turned out just fine but for some reason not as much for this yellow cake. Truth be told I’m very picky and OCD about what I make and I notice even minor changes and they bother me. The cake was good, don’t get me wrong but there was a minute difference in that one layer. Going forward I will only bake my yellow cake recipe in the Chicago metal pans and will continue to be loyal to King Arthur flour but from now on I think I will make my own cake flour. Lesson learned.

I’ve posted this recipe before and it’s a favorite, Coconut Pineapple layer cake It’s delicious, the cake was perfect with a tender crumb, great flavor and very moist. I won’t post the recipe again just the story and some photo’s. Links are provided if you would like to give this a go.

single serve mixed nut milk

Nut milk is wonderful and a fantastic alternative to milk (dairy). I make nut milk all the time but sometimes would forget to soak my nuts overnight, the other problem is that nut milk doesn’t last long before it goes bad. I had an idea that ended up working out great, I soak a large quantity of nuts overnight, drain and freeze. That way I have pre soaked nuts ready to make milk and can portion out as much as I want. Don’t throw away the nut meal left from straining the milk, it’s fabulous when added to granola. Another perk is that when you add cold water to the cold nuts you have ice cold nut milk, delicious!!

frozen mixed nuts

I’ll leave you with a few photos of Percy and Jenna Rose who by the way is doing great and adapting to her new life in Brooklyn.


Cookies, Fruitcake and More Cookies

I am going to try to keep this short and sweet. I have been baking and packing gift boxes for the last week. My meals are take out or a quick sandwich. Have to say my new oven is amazing. It literally cuts baking time in half having an oven that actually works like it’s supposed to. My first attempt at convection baking wasn’t the best, not a disaster but not great, I read that it automatically converts the temperature and I didn’t realize you have to change the setting on the stove to convert the temp. Second round was perfect.

Got 3 gift boxes mailed, no small feat as I had to wait almost 2 hours in line at the post office. It’s been pretty busy around here, I volunteered as a foster for a rescue organization and they had an urgent need to foster a little chiweenie (chihuahua dachshund mix). He is about 7-8 yrs old and is named Gosha. He will stay with me until he finds a forever home much to the chagrin of Mr. Percy, he is not pleased and is moping around the house, won’t eat unless I hand feed him and is generally perturbed.

Christmas cards have been pouring in, for Percy, LOL! I have gotten 2 with over 30 cards for Percy from our friends on social media.

I found a great recipe for Chocolate thumbprint cookies, better than the recipe I have been using for the last few years. It’s from Martha Stewart and have to say it’s terrific. The cookies are soft and moist and I love adding the striped Hershey’s kiss in the center while the cookies are still warm.

chocolate thumbprint cookies

I’ve also made fruitcakes, chocolate chip cookies, rugelach and biscotti. This week I’m making Stollen, more cookies and more.

rugelach, chocolate, orange hazelnut

fruitcake

Chocolate Thumbprint Cookies

Recipe from Martha Stewart

Makes 90 small cookies

2 cups all purpose flour

1 cup plus 1 tbs dutch cocoa, unsweetened

2 tsp course salt

8 ounces (2 sticks) unsalted butter softened

1 1/3 cup sugar (plus more for rolling the cookies in)

2 large egg yolks

2 tbs heavy cream

2 tsp vanilla extract

Heat oven to 350 degree’s. Sift flour, cocoa powder and salt into a small bowl and set aside. Cream butter and sugar until fluffy. Reduce speed to medium and add egg yolks, cream and vanilla, beat until combined scraping sides when needed. Beat in flour mixture just until combined.

Scoop out approximately 2 tsp and roll into a ball, roll in sugar and place on parchment lined baking sheet. Use your thumb or the end of a wooden spoon to make an indent in each cookie. Bake for 5 minutes rotating the pan and then bake another 5 minutes (10 minutes total baking time).
Remove from oven and place a Hershey’s kiss in the center, let cool completely before packaging or storing.

Apple Cake With Brown Sugar Buttercream Frosting

Continuing my homage to the apple, the quintessential harbinger of Autumn I made an apple cake. I have been making this cake for many years and it never fails, I found it years ago while watching an episode of Martha Stewarts show on Food Network.  The cake is moist and rustic in texture, loaded with apples and warm autumn spices. Sometimes I use a cream cheese frosting but this time I made the frosting that is featured in the recipe on Martha Stewarts site. The frosting is gently sweet, buttery and has a lovely caramel flavor that comes from using brown sugar instead of granulated.

I really love this cake, it couldn’t be easier to make, no mixer required. The recipe calls for grated and diced apples but I like to use homemade applesauce, I make it in the oven, peel and quarter 4 apples, add a splash of apple cider, cover and bake for about 30 minutes until the apples are soft. Let them cool and mash with a fork. I prefer using applesauce rather than grating apples, the cake has some small pieces of apples and a balanced apple flavor. I think the buttercream is good but I prefer the cream cheese frosting,  it’s a bit sweeter but the tangy creaminess from the cream cheese goes so well with this cake. Just saying!!

I am bringing the cake to Fiesta Friday #196. This weeks co hosts are Antonia@Zoale.com and Jhuls@The Not So Creative Cook.

Cake

Recipe from Martha Stewart

2 cups flour

2 tsp baking soda

1/2 tsp baking powder

3/4 tsp salt

2 tsp cinnamon

1/2 tsp powdered ginger

1 stick (4 oz) unsalted butter melted

2 large eggs

2 cups packed light brown sugar

1 1/2 cup applesauce or 4 apples peeled- 2 grated and 2 diced)

Heat oven to 350 degree’s. Prepare 3 8 inch round baking pans by lining with parchment, butter or grease and dust with flour, set aside.

In medium bowl whisk together the flour, baking soda, baking powder, cinnamon, ginger and salt and set aside. In a large bowl whisk together the melted butter, brown sugar and eggs. Fold in the applesauce or apples. Add the flour mixture and mix with a spatula or wooden spoon just until combined. Divide equally into prepared baking pans and bake for 25-30 minutes until browned and toothpick comes out clean. Remove from oven and allow to cool in the pan for 10 minutes, run butter knife or offset spatula around the edges to loosen and turn out onto cooling racks. Let cool completely before frosting.

Brown Sugar Swiss Meringue Buttercream

Recipe from Martha Stewart

4 egg whites from large eggs

1 cup light brown sugar lightly packed

3 sticks or 12 oz of softened unsalted butter

Set pan with about 2 inches of water on low heat, place the egg whites and brown sugar in mixing bowl and set on top of the simmering water (bowl should not touch the water). Whisk until mixture is warm to the touch and sugar is completely melted. Place on stand mixer with whisk attachment and mix on medium speed until fluffy and completely cooled, approximately 15 minutes. Change to paddle attachment and add the soft butter 1 tbs at a time while the mixer is on med low speed. Once butter is incorporated continue to mix on medium speed for another 3-5 minutes. If it curdles it’s ok, keep mixing it will come together. Frost cake immediately.  I piled way too much frosting on top, don’t do like I do and make sure the frosting is evenly spread all over the cake. Thats what happens when you are in a hurry.

Basic Hummus And A Vegan Apple Tart

This recipe is from Ottolenghi’s cookbook “Jerusalem” it calls for dried chickpeas rather than canned. I always stayed away from recipes where you have to cook the beans/peas and rather opt for canned because it’s easy and I guess I am a bit lazy. Well, have to say there is a difference, a big difference in flavor and texture when you use freshly made chick peas. I love just about anything from any of the cookbooks by Ottolenghi or the team of Ottolenghi and Tamimi. The books are beautiful to look at, the ingredients they use are always fresh and the recipes are simple but creative and everything so far that I have made has been absolutely delicious. Like chocolate chip cookies there are thousands of recipes out there for hummus. It’s not rocket science and is made easily and quickly and has always been welcome as an appetizer or part of the main meal. It’s a wonderful recipe and if you are hesitant to use dried chickpeas, it takes a little more time and effort but the results are well worth the effort. The only change I made when making this recipe is that I use half the garlic indicated, I am not a big fan of raw garlic, the garlic is flavor is definitely there but is more subtle with 2 cloves, of course if your garlic cloves are very small use more.

I am bringing the hummus and tart to Fiesta Friday #191, this week, the co cohosts are Judi @ cookingwithauntjuju.com and Antonia@ Zoale.com thank you ladies for co hosting and as always a big thank you to Angie for putting this party together every week!

Basic Hummus

Serves 6 or more

1 1/4 cup dried chickpeas

1 tsp baking soda

6 1/2 cups water

1 cup plus 2 tbs light tahini

4 tbs lemon juice freshly squeezed

4 cloves garlic crushed (I used 2 cloves)

6 1/2 tbs ice cold water

The night before put the chickpeas in a large bowl and cover them with cold water at least twice their volume. Leave to soak overnight.

The next day, drain the chickpeas. Place a medium saucepan over high heat and add the chickpeas and baking soda, cook for about 3 minutes, stirring constantly. Add the water and bring to a boil. Cook, skimming off foam and any skins that float to the surface. The chickpeas will need to cook between 20-40 minutes, depending on the type and freshness, sometimes even longer. Once done, they should be very tender, breaking up easily when pressed between your thumb and finger, almost but not quite mushy.

Drain the chickpeas. You should have roughly 3 2/3 cups. Place the chickpeas in the food processor and process until you get a stiff paste. Then with the machine still running, add the tahini, lemon juice, garlic and 1 1/2 tsp salt. Finally, slowly drizzle in the ice water and allow it to process for 5 minutes until you get a very smooth and creamy paste.

Transfer to a serving bowl, cover with plastic wrap and let sit for 30 minutes before serving, you can also refrigerate until needed. Make sure to take it out of the refrigerator 30 minutes before serving. I drizzle the hummus with olive oil and sprinkle some sumac.

Delicious with fresh veggies and pita

I recently heard from friend I used to work with, it had been years since we have seen each other and I invited him over the other day to catch up, he is vegan and specifically requested pastry.  This tart is vegan,  has very little sugar, only about 2 tbs and is drizzled with apple cider cinnamon reduction. It couldn’t be simpler and it’s so beautiful. The pie crust is from the Crisco package and is one my Mother used for her pies, she didn’t even know her pie crust was vegan, I sliced the apples hasselback style, sprinkled with a little sugar, flour, cinnamon mixture, dotted a little earth balance and baked.

Simple, beautiful and delicious and it’s vegan

Flaky Pie Crust (Vegan)

Recipe on Crisco Shortening- makes single 9 inch pie crust

1 1/3 cup flour

1 tsp salt

1/2 cup vegetable shortening

6-8 tbs ice cold water

Whisk flour and salt together, add the shortening and with a pastry cutter combine until it resembles moist crumbs. Add water and stir with a fork. Gather together into a ball, wrap in plastic wrap and flatten into a disk and refrigerate for at least an hour. Roll the dough on floured work surface and line your tart pan. Refrigerate.

While dough is chilling, cut the apples in half, skin on, core and slice thinly keeping each half together, it’s easier to lift the sliced apples and place in pie shell. Heat oven to 400 degree’s. Mix 2 tbs sugar, 1 tbs flour, 1/4 tsp cinnamon in a small ramekin and set aside. Arrange the apples in the cold pie shell and sprinkle with the sugar, flour, cinnamon mixture. Dot with butter or vegan butter. Line a baking sheet with parchment and bake the tart until golden brown approximately 40-45 minutes.

Apple Cider Reduction

1 cup apple cider

1/2 tsp cinnamon

1 tbs sugar

Place everything in a non reactive heavy bottom saucepan and boil on medium high until it reduces to a syrup. Approximately 30-40 minutes.

Served with Vegan salted caramel ice cream.


A Tale Of Two Cobblers

Making cobbler with summers best produce is one of my favorites. Using fresh seasonal fruit and vegetables  makes this delicious dish even more amazing. I thought I would make both savory and sweet just for fun. The other day I went to the farmers market and stocked up on fresh vegetables and fruit without knowing what I would make with them, I was inspired by Mollie @frugalhausfrau, she and I were commenting about how much fun it would be to make cobblers, pandowdy’s, crisps etc… she has some awesome recipes make sure you check her blog out.

Both recipes are original or as original as any recipe can be. I posted the cobbler pastry on food52 years ago, it is adapted from Julia Childs Galette dough. The savory cobbler is Vegetarian, loaded with vegetables in a rich mushroom leek cream sauce. I used a biscuit cutter for the cobbler top rather than a rough look and to finish it, I grated some gruyere on top of each round. The beauty of the savory cobbler is that you can make the mushroom and leek base and add whatever kind of vegetables you like or have on hand. Note: For the savory cobbler I added some baking powder, I had thought about that before and my friend Emily who made this also suggested it. It’s not necessary for the sweet cobbler really as I treat it more like a pie crust but can be used for both.

The dessert cobbler is made with fresh ripe nectarines which are sweetened only with some gooseberry jam that I made a few weeks ago, the cobbler top is roughly pressed on top of fruit and sprinkled with a little sugar before baking. There is really no recipe required for this you can ad lib adding the type of fruit you like and sugar or jam. I love super easy to prepare foods.

This week I am honored to co host Fiesta Friday # 185 with the totally awesome Monika @ Everyday Healthy Recipes and I am bringing both a dessert and main with me, both in the form of cobbler

Pastry for Cobbler

1 cup flour

1/4 cup cornmeal

2 tsp baking powder (recommended for savory cobbler)

1/2 tsp salt

2 tsp sugar or brown sugar (Use 1 tbs for the savory cobbler pastry)

3 tbs cold butter cut into pieces

1/4 cup sour cream

1/4 cup whole milk

Whisk together the dry ingredients, add the cold butter and break up with your hands or pastry cutter until it looks crumbly. Add the sour cream and milk and mix with a fork. It will become a cohesive but slightly wet/moist dough. Set aside or refrigerate until ready to use.

Savory filling

3 small leeks, using only the white parts, cleaned VERY well (I cut into rounds and put in cold water rinsing until there is no sand in the bottom of the bowl)

1 package of mushrooms (I used white button) cleaned and sliced

String beans ( I used yellow) stem end removed (I did’t measure add as much as you like)

1 medium size zucchini – cut into bite size pieces

2 small carrots quartered lengthwise

2 tbs flour

cherry tomatoes cut in half

3 sprigs thyme

white wine (about 1/2 cup)

1 cup heavy cream (You can also use light cream, milk, half and half or non dairy milk)

splash of Worcestershire sauce (omit if making vegetarian or vegan)

salt and pepper to taste

Heat oven to 375 degree’s. Line a sheet pan with parchment, place the zucchini, carrots and beans on the pan, drizzle with olive oil and sprinkle a little salt and pepper and roast until tender (approximately 20 minutes. While the vegetables are in the oven, put a little butter in a sauté pan and add the leeks, cook on medium high until softened, add the mushrooms and continue cooking until soft. Add the flour and continue to cook stirring so that the flour coats the leeks and mushrooms, add the wine, continue to cook, it will thicken considerably, stir in the cream and thyme,  cook until thickened, you can add a little water to thin it out if desired. Add the Worcestershire sauce and cherry tomatoes and continue to cook for about 10 minutes, remove the thyme sprigs. When vegetables in the oven are done add to the cream sauce and let cool a bit and spoon into baking dish, or a  10 inch cast iron skillet.

Making the cobbler

Increase oven temperature to 400 degree’s. Press the pastry into a circle approximately 1/2 inch thick. Using a glass or biscuit cutter cut rounds using all the dough. Place on top of the filling, grate a little gruyere or your favorite cheese on top of the rounds and bake until golden brown and bubbly about 35-45 minutes depending on your oven.

Nectarine Gooseberry Cobbler

1 small cobbler made in 6 inch cast iron skillet – serves 2

First let me say many will not have gooseberry jam, you can use anything you want or omit jam and use just fruit mixed with a little sugar.  I happened to have gooseberry jam in the fridge but any jam would be good, cherry I think would be delicious.

2-3 nectarines, cleaned and sliced

1/3 cup gooseberry or your favorite jam (if using just fruit add 2-3 tbs sugar)

Heat oven to 400 degrees. Place a sheet of foil or parchment on baking sheet. Mix the fruit and jam or sugar and put into the skillet,  press the cobbler crust on top, sprinkle with a little sugar and bake until browned and bubbly approximately 30 minutes. Serve with a scoop of vanilla ice cream, whipped cream, heavy cream poured on or a spoonful of lightly sweetened creme fraiche.


Some Jam, Scones And Sour Cherry Hand Pies

When I saw the baskets of sour cherries and gooseberries at the farmers market I had to buy them. Both are delicious but really not great eaten fresh/raw. They are very sour on their own and I thought they would be best made into jam or preserves and a small jar of sour cherry pie filling. They are very tedious to prep, the sour cherries are small and soft and juicy and hard to pit, (please don’t eat cherry pits you can actually get sick when eaten in large enough quantities, saw this article on food52) and the gooseberries need to have the ends pinched off, both ends. Luckily I did not buy a huge amount of the fruit so although tedious it didn’t take me all day to prep them. I have been working on recipes for Teagan’s wonderful Thistledown episodes, I absolutely love this story and am inspired by the magickal world of faeries.

Refrigerator jam is a wonderful thing, no muss no fuss, no canning or preserving, it’s stored in the refrigerator rather than sealed properly and stored in the pantry. I still use sterilized jars and it does seal somewhat but not enough to make me comfortable storing unrefrigerated. It really lasts a long time in the fridge and if you haven’t ever made your own jam or preserves you must give it a go, it really is delicious.

I had 3 pints of sour cherries and 2 pint of gooseberries which was enough to make 2 16 ounce jars and 8 ounces of cherry pie filling. The scones are my favorite recipe from my friend on Food52 Liz Larkin aka @sconeladylarkin on Instagram. The recipe for scones IMHO is the best scone recipe ever, they are tender and light and delicious.

The hand pies were an after thought. There was leftover galette dough after making the tomato tart, and the small jar of cherry pie filling. Cherry pie has always been one of my favorites especially warm with a scoop of vanilla ice cream

Royal Wedding Scones

Recipe by Liz Larkin on Food52

2 1/2 cups all purpose flour

3/4 tsp salt

1/4 cup sugar

1 tbs baking powder

6 tbs cold unsalted butter

1 large egg

1 cup heavy cream

1 tsp vanilla extract

3/4 cup frozen blueberries

Pulse the flour, salt, sugar and baking powder a couple of times in the food processor, add the butter and pulse about 10 times until the butter is broken up in the flour mixture don’t worry if there are some larger pieces butter it doesn’t have to be uniform crumbs. Dump the mixture into a large bowl and add the frozen blueberries. Mix the egg, cream and vanilla together and add to the flour mixture. Mix with a fork until just combined, be careful not to over mix.

The dough will be a bit shaggy, place on floured work surface and press gently into a circle that is about 1/2 inch thick. Cut in half, in half again and then each quarter into two wedges you will have 8 scones. Place on parchment lined baking sheet and freeze until completely frozen about 1 hour. You can then bake them or store in freezer bags until ready to use, I like to wrap each frozen scone individually in either plastic wrap or parchment.  Before baking brush the scones with some heavy cream and sprinkle some sugar on them. Bake in a 420 degree oven until golden brown, when touched with finger they will feel solid. Don’t over bake, because they are frozen it can take a little longer than usual approximately 20-25 minutes.

Sour Cherry Jam and Gooseberry jam

Makes 2 16 oz jars

2 pint sour cherries pitted, in separate pot 2 pint gooseberries trimmed

1 1/2 cup sugar each

pinch of salt

Cook on medium high heat until thickened. Test to see if its ready by spooning some of the jam on a very cold spoon, if it thickens it’s ready because it was not a lot of jam it only took a little less than 30 minutes to cook. Pour into sterilized jar, let cool to room temperature and refrigerate. Note: The longer you cook the thicker your jam will be, I like mine on the loose side so for my taste about 30 minutes was perfect.

Sour cherry pie filling

Makes 8 ounces

1 pint sour cherries pitted

2/3 cup sugar

4 tsp corn starch

pinch of salt

pinch of cinnamon (optional)

place everything in a medium non reactive pot and cook on medium high heat until thickened. Pour into clean or sterilized jar and refrigerate after it’s cooled to room temperature.

To make the hand pies use your favorite recipe for pie dough or pre made dough works great as well, using a biscuit or something round cut out circles, you will need 2 for each pie. Spoon a little filling in the middle, brush some egg was on the edge of the circle place the other round on top, seal, cut a vent in the top, brush with egg wash and sprinkle with sugar and bake in 375 degree oven for about 20-25 minutes.

Chocolate Marbled Banana Bread

This banana bread recipe has been featured on this site many times, as banana bread and also using other fruits like apples and figs. It is IMHO the best banana bread recipe I have found. While perusing recipes I saw a gorgeous chocolate marble banana bread and although I have added chocolate chips never a chocolate swirl. I used my go to recipe and copied how the chocolate marble swirl was made. The bread is delicious, simple and I like to make 3 mini loaves and freeze them, it freezes beautifully.

It’s moist and chocolaty with lots of banana flavor. The spelt adds some texture and a delicious nuttiness that you only get from spelt.

Chocolate Marbled Banana Bread

Makes one 9 inch or 3 mini loaves

Adapted from a recipe by Martha Stewart

1 stick 4 oz softened butter

1 cup sugar

2 large eggs at room temperature

1 cup flour

1/2 cup spelt flour

1 tsp baking soda

1 tsp salt

1 heaping cup mashed very ripe banana (2 1/2 large or 3 medium bananas)

1/2 cup sour cream or creme fraiche

1 tsp vanilla

3 oz dark chocolate melted

2 tsp unsweetened cocoa powder

Heat oven to 350 degree’s. Prepare your baking tins by greasing generously either with cooking spray, butter or shortening. Place flours, baking soda and salt in bowl and whisk to combine.

In the bowl of a stand mixer add the butter and sugar. Cream until light and fluffy scraping the sides occasionally. Add the eggs one at a time beating well after each addition. Add the flour mixture and beat on medium high speed just until combined. Now add the banana, sour cream and vanilla and mix to combine.

Remove one cup of the batter to a small bowl. Melt the chocolate and add the cocoa powder, stir. Add to the 1 cup of batter and fold in.

Spoon some of the regular batter into the baking pan if using a 9 inch loaf pan add half the batter, now half of the chocolate batter in two spoonful. Add the rest of the plain batter and spoon the rest of the chocolate batter on top. Swirl gently with a knife or skewer being careful not to over swirl, a few times back and forth will be enough.

Bake the 9 inch loaf approximately 50-55 minutes and the 3 mini loaves approximately 25-30 minutes. A cake tester or toothpick should come out clean when inserted in the center. The loaves will be browned and feel firm.


Strawberry Rhubarb Tart Using Puff Pastry

I have a ritual that I do every time I cook, my kitchen must be thorougly cleaned, counters, floor, no dishes in the sink, every surface clean, for me it creates new energy and clears my kitchen. I also try to make sure everything I need is ready so I don’t have to go finding and grabbing with flour on my hands. So the ritual began early this morning in preparation for my puff pastry adventure. I had the butter in the freezer all night, the flour weighed and in the fridge as well. In retrospect I would not freeze the butter quite so hard because let me tell you it was hard work pounding that butter when it’s rock hard. In the video he makes it look easy, well not so much. I had it wrapped in plastic wrap which after a good pounding broke and I had to peel off the pieces from the butter. I decided to use a zip lock bag and sprinkled a little flour on the butter as per The Kitchn. It worked and I got the butter in a nice square and it was still pretty cold. The butter went back in the refrigerator while I rolled out the dough.

The dough comes together nicely in the food processor and forms a cohesive ball which I let rest for a few minutes under a damp tea towel. The hardest part of this recipe is pounding the butter initially, the rest goes very smoothly and if you have any frustration or feel the need to pound something try making puff pastry, it’s a stress reliever.

The first two turns went pretty well, it was hard to make it a neat rectangle but I did the best I could. After a 30 minute rest in the refrigerator I took it out for 2 more turns and there was a marked difference in the dough, it’s very soft, tender and pliable. Rolling it out was a breeze and doing the second set of 2 turns was easy. With only 2 more to go I have to say puff pastry is not all that much work but the proof is in the pudding I guess you can say and I was nervous to see how it turns out when baked.

Final Analysis: AMAZING recipe, with the exception of trying to pound frozen butter it was so easy to make. Honestly, I will never buy puff pastry again. It’s tender, flaky, buttery, pretty much perfect. I have enough dough in the freezer for another large tart. This recipe is a keeper. Also note, I am convinced using a good European butter is key, I used Kerrygold unsalted butter and it really does make a difference.

ready for the 4th turn see the flecks of butter

6 turns and I’m done, smooth, supple and feels like a beautiful dough if you look closely you can still see pieces of butter


strawberries and rhubarb

3 stalks rhubarb, washed, ends removed and cut into approximately 1/4 inch pieces

1 punnet of strawberries, trimmed, hulled and cut into pieces (quartered or halved depending on size)

1/2 cup sugar

1/2 tsp orange zest

dash of salt

2 tsp cornstarch

Mix everything in a bowl and let sit until sugar has melted and fruit has given off juices. Drain but save the juice. After draining sprinkle the cornstarch on the fruit and mix with a spoon. Pour the saved juice into a sauce pan and cook on medium heat until thick and reduced slightly. When you remove the tart from the oven cool for about 15 minutes then drizzle the thickened syrup on top of the tart. It’s delicious.

docked and ready for the fruit

Making the tart

Cut your dough in half and freeze the other half. Roll into a rectangle, using a sharp paring knife make a slice not all the way through so cut gingerly, you want the slice about an inch from the edges. Roll the edges to the cut line, dock the inside of the dough well with a fork (this is so it doesn’t puff). Arrange fruit on the dough, brush the edges with egg white that has been beaten with a fork. Sprinkle some finishing sugar or turbinado sugar on the whole tart. Bake in a pre heated 400 degree oven until golden brown and bubbly this tart took about 35-40 minutes.


Happy Mothers Day, Waste Not Want Not Bread Pudding

My Mama taught me not to waste food, I had to clean my plate and sit at the table until either the food was gone or one of us, both stubborn by nature gave in. One day my Mom made liver and onions, bleh, hate it still do. I refused to eat it and literally sat at the table all night long with the food in front of me and still wouldn’t touch it.  To this day I have not eaten liver and onions and won’t make it.

Honoring my wonderful Mother on this day I decided instead of baking something new I decided to repurpose leftovers and make this bread pudding. Here is what I had:

2 challah rolls (more than a day old but still good)

4 egg yolks (left over from my dacquoise)

peaches from the peach ice cream

1/2 container of blueberries

creme fraiche

With those ingredients I made bread pudding.  Bread pudding is simple rustic down home fare. I remember Mom made bread pudding often and it was one of my favorite desserts. She was frugal and never wasted anything and would save bread that wasn’t eaten to make this pudding. This is not her recipe it’s mine but it’s equally as good as hers. Mom is a great cook, intuitive, creative and accomplished. I learned so much from her and wish that I were with her this Mothers Day!

Bread Pudding With Peaches and Blueberries

2 large challah rolls day old or older is best, brioche is also good

4 egg yolks plus 1 whole egg

1 cup whole milk

1 1/4 cup heavy cream

1/3 cup creme fraiche

1/2 cup sugar

1 1/2 tsp vanilla extract

dash of salt

Peaches (optional) chopped or crushed or even a peach jam or preserve

fresh blueberries (you decide how much to add)

Heat oven to 350 degree’s. Whisk the egg yolks and whole egg with the sugar in a mixing bowl. Add the milk, cream and creme fraiche and continue whisking until combined. Add a dash of salt and the vanilla and whisk just until mixed.

Add the torn bread and stir until the bread is completely immersed in the custard base, add the blueberries and fold them in.

Butter your ramekins or baking dishes, spread some peaches on the bottom and spoon the bread pudding mixture, dividing into 3 large or 6 small baking dishes.

Place the baking dishes in a large roasting pan or baking dish place into the oven and then add enough hot water so that it comes halfway up the sides of your dishes. Bake for 30-40 minutes or until set.

I served it with some creme fraiche gently sweetened with brown sugar. It’s fantastic and adding the peaches and blueberries make this dessert so good!

Happy Mothers Day to all of you whether you have children, fur babies, a classroom of children, do volunteer work with kids or just love them it’s a day to celebrate women and Mothers and caregivers. I hope you all have a wonderful day.