Skip to content

Archive for

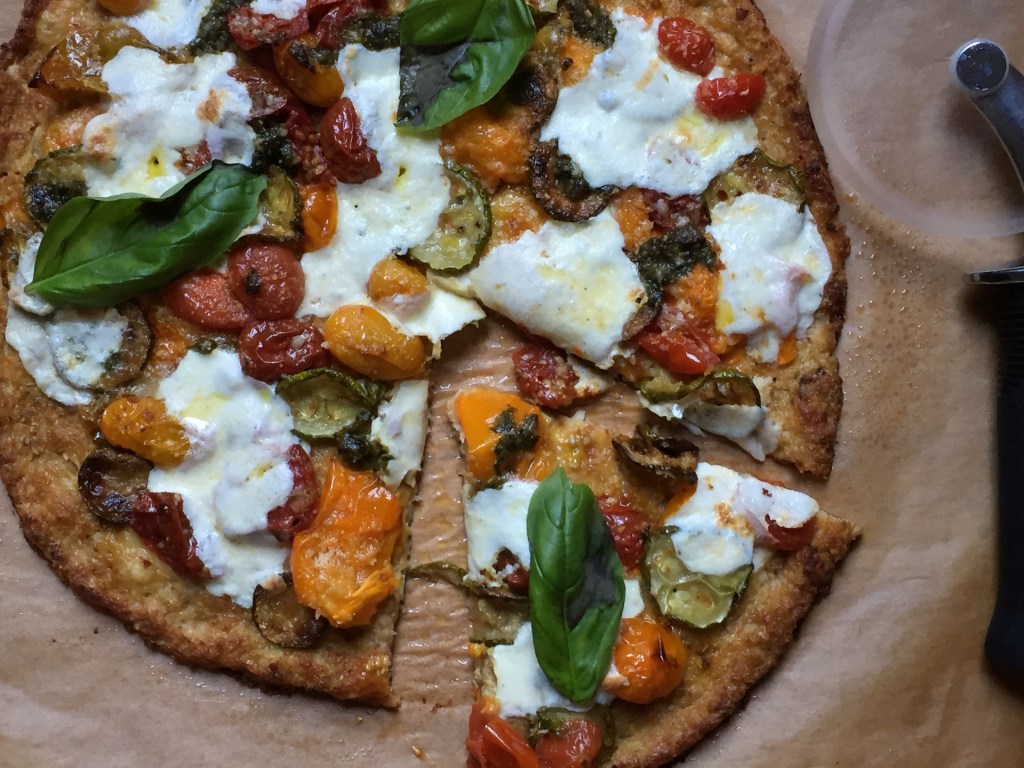
Pizza With Cauliflower Crust

IMG_5148

In my quest to eat less carbs and still hoping to have some of the same flavors that I love I discovered that you can make pizza with a cauliflower crust. I knew about cauliflower mash (instead of potatoes), and cous cous and rice. This did not start out to be pizza crust, at first I planned on a cauliflower and cheese bake, then thought I would do a roasted cauliflower soup (still too hot out) it then morphed into this pizza crust. Since it was not originally meant to be used for pizza I didn’t follow the directions for making it. They have you grate raw cauliflower and depending what recipe you use steam or dry roast in a skillet. My method may not be entirely orthodox and because of this I had to add a little bit of flour, I used only 1/4 cup of spelt flour along with egg and cheese to bind. The cauliflower was steam roasted first in the oven then covered in grated parm/asiago/romano, drizzled with a little olive oil and roasted again uncovered this time until lightly browned and the cauliflower is soft. Now Cauliflower has a high water content and depending which method you use they have you squeeze out the water with a towel. Because I dry roasted the water pretty much evaporated except for a few drops. I then blitzed it in the food processor mixed in the flour, egg and some taleggio cheese (grated) laid it on a cast iron pizza pan on some parchment (sprayed with cooking spray) and baked at 425 degree’s for about 25 minutes. Before baking I grated a little taleggio on top. When making a cauliflower crust you have to pre bake otherwise you will have a soupy mess.

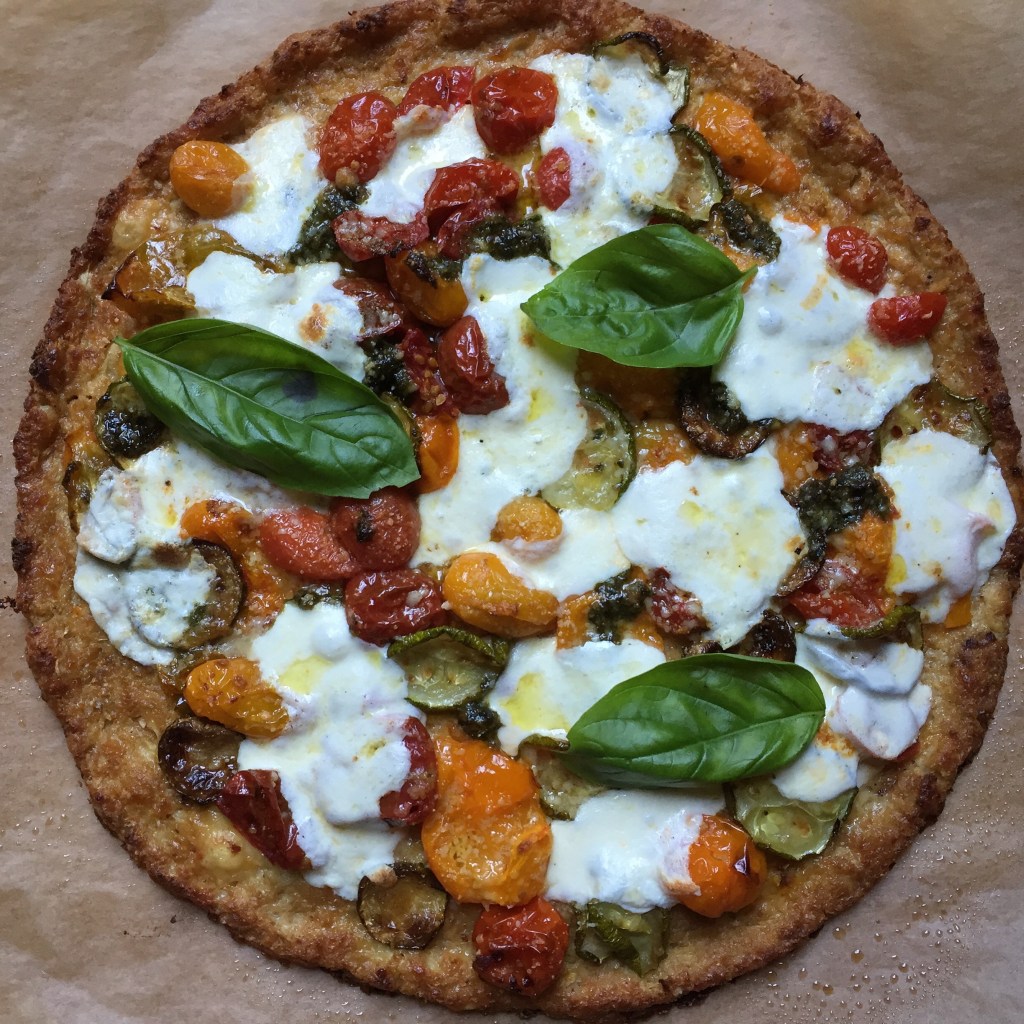
The pizza turned out great and I love that I have the flavor of pizza without feeling bad about eating it.

Preparing the Cauliflower

1 head cauliflower cut into florets (my cauliflower was medium size)

grated cheese

olive oil

salt and pepper

Heat oven to 375 degree’s.  Place the cauliflower on a parchment lined baking sheet and cover with foil, or you can steam it if you like. Bake for approximately 30 minutes or until the cauliflower is tender. Remove the foil and drizzle with some olive oil, sprinkle with a little salt and pepper and grated cheese of your choice. I make a blend of parmigiana, romano and asiago. Place back in the oven and roast until it is very tender and lightly browned.  Let it cool and place in a sieve or colander over a bowl or plate, cover with plastic wrap and let sit overnight. Cauliflower has quite a bit of water and you want to make sure it is pretty dry when you make the pizza dough.
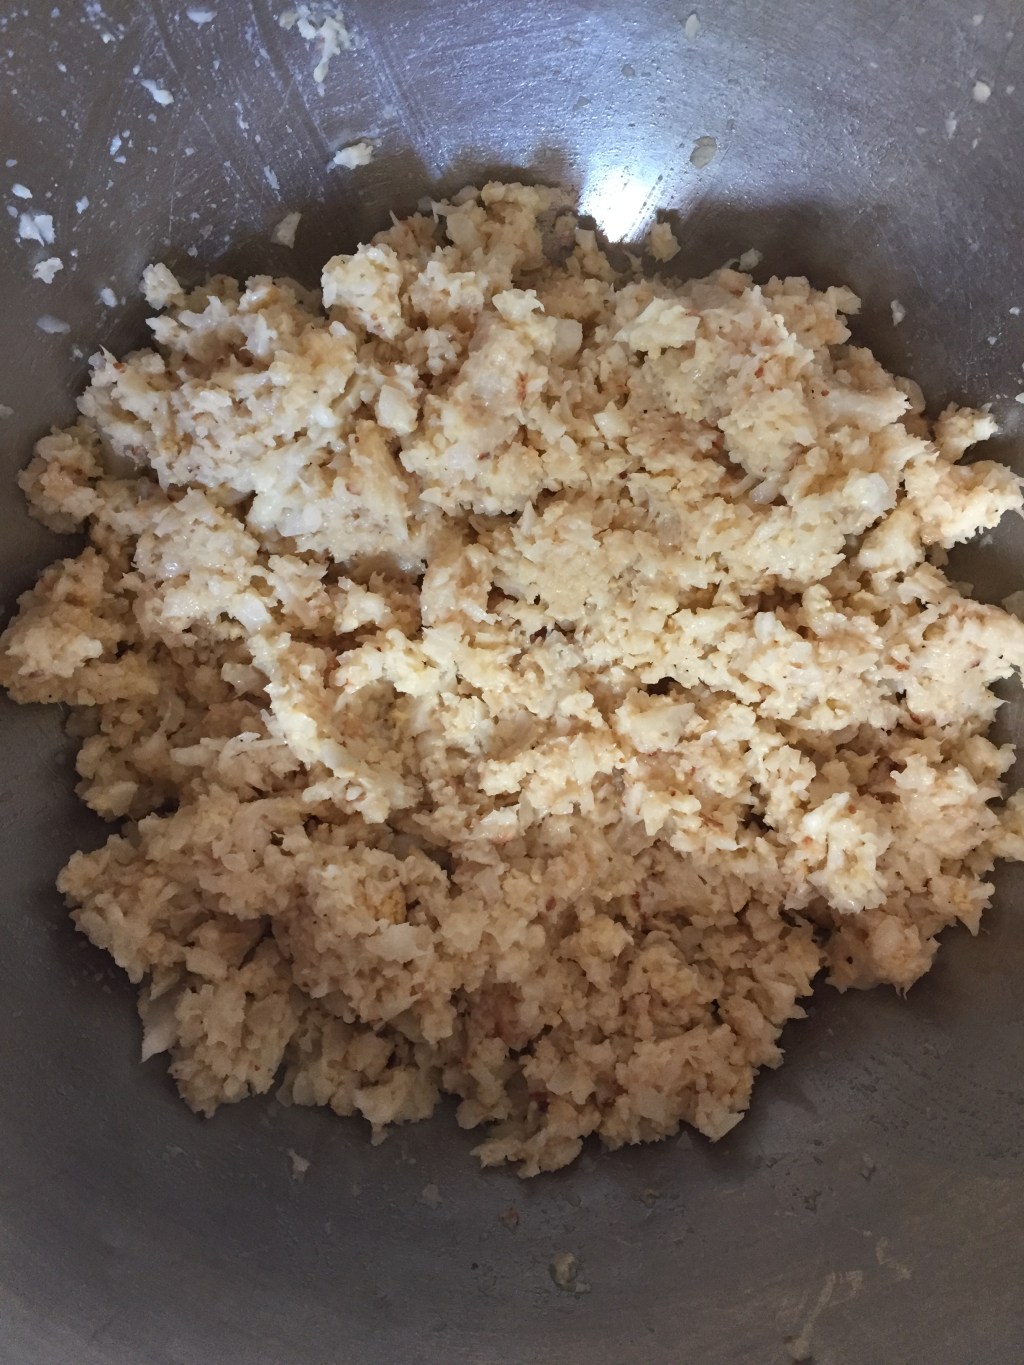
pulsed in processor

pulsed in processor

Making the dough

makes one 12 inch pizza

2 1/2 cups of cauliflower crumbs (there will probably be leftover cauliflower, I put in a ziplock and froze)

1 egg lightly beaten

1/4 cup spelt flour

1/4 cup grated cheese

1/2 cup grated melting cheese like mozzarella or I used taleggio (Highly recommend taleggio)

Note: If you use all of the cauliflower (more than 2 1/2 cups) you should add an additional egg and a little more spelt flour and when grating either taleggio or fresh mozzarella it should be cold, the cheese is soft and even softer at room tempurature.

IMG_5099

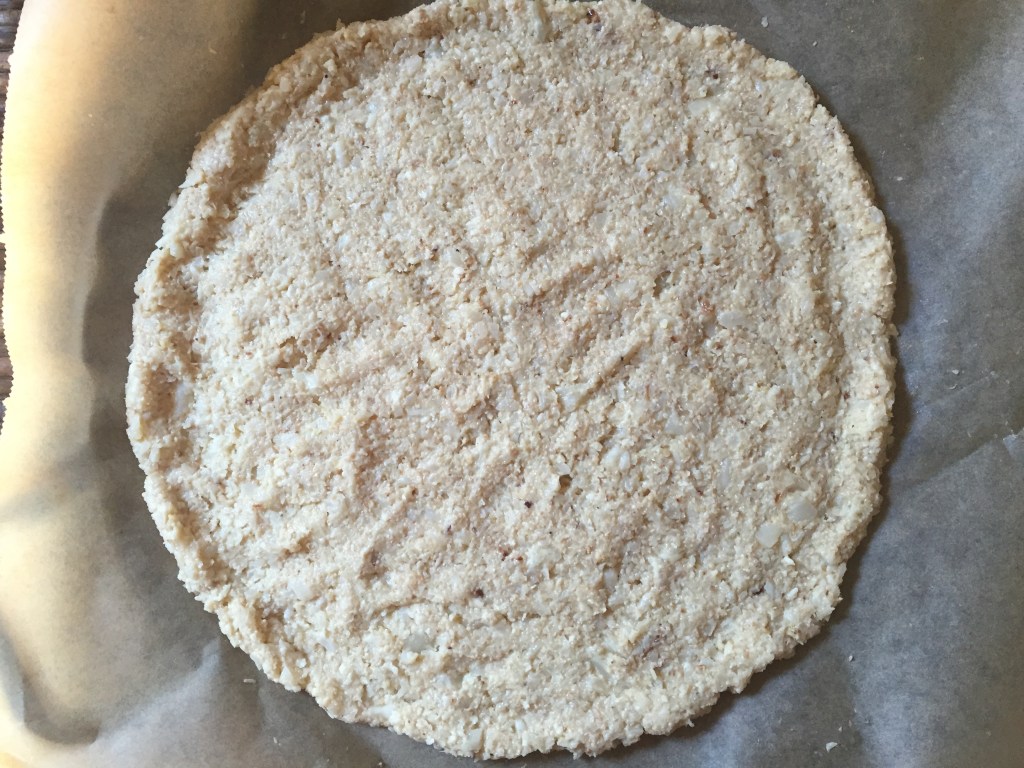
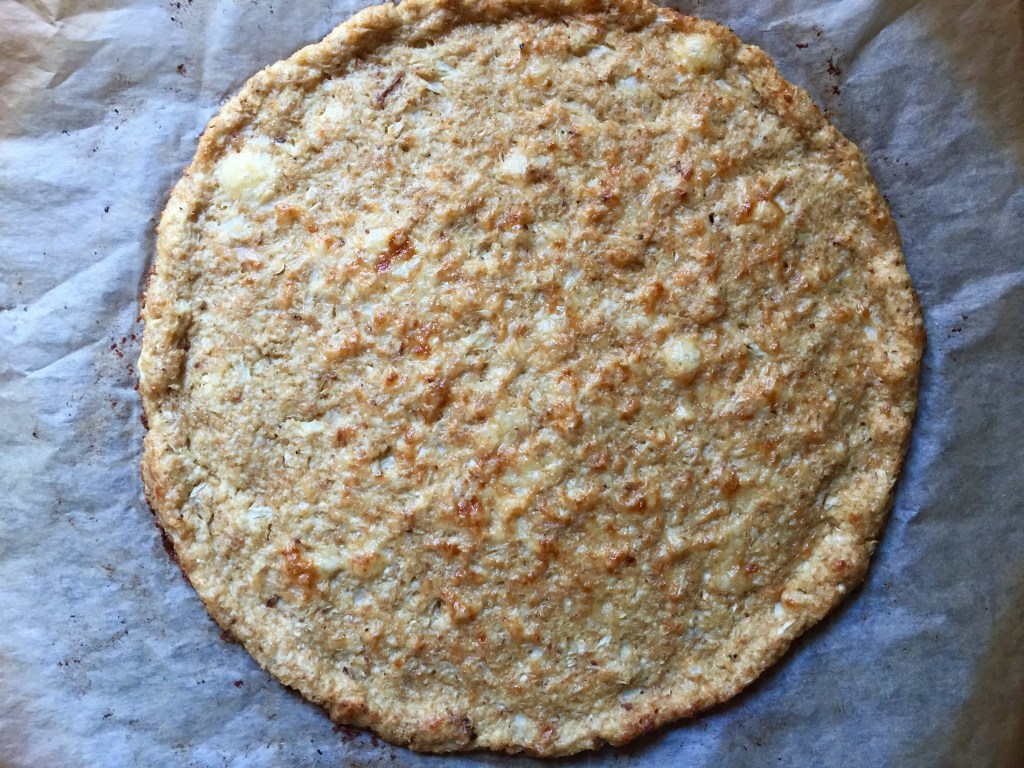
Place the cauliflower crumbs in a mixing bowl add the egg, flour and cheeses and form into a cohesive ball. Heat the oven to 425 degree’s and line a baking sheet or pizza pan with parchment, spray lightly with cooking spray. Press the dough onto the parchment into whatever shape you like, square, rectangular or round. Grate some more taleggio or mozzarella on top and bake for approximately 25 minutes or until golden brown. Remove from the oven and let cool, after 10 minutes transfer the parchment sheet to a cooling rack. Let cool completely before putting the pizza together.

IMG_5115

Top your pizza with whatever you like I topped with roasted tomatoes and zucchini, mozzarella, dollops of pesto and grated cheese. It’s really so good and I didn’t miss the regular pizza crust at all.

IMG_5174

Zucchini Pesto Lasagna And A Kale Lentil Salad

IMG_4944

Here are a quick couple of recipes that I have made that turned out well and I wanted to share them with you. We had 2 days where the temps were under 90 woo hoo!! We are back up almost at 90 again but I have seen the light at the end of the tunnel. I harvested my basil from the garden and made a big jar of pesto, also working on harvesting my herbs and drying them so I have for the winter. The lasagna uses some of the pesto and the zucchini I got at the farmers market. It’s so simple to make and really delicious. I haven’t been eating meat lately, I can’t bring myself to eat it right now. The Kale and lentil salad provides protein from the lentils and cheese and pistachio a very nice substitute and delicious. The lighting was weird on the photo of the lasagna, it was daylight but I guess the natural light wasn’t sufficient, the pan is sitting on a white cloth that looks purple or blue.

Zucchini Pesto Lasagna

Serves 2

1 or 2 large zucchini cut into thin strips approxmately 1/4 inch thick

roasted tomato (you don’t need much it’s only for the bottom of the pan)

2-3 tbs pesto

mozzarella

ricotta

grated parmigiana or romano cheese

olive oil

Heat oven to 375, brush the zucchini strips with olive oil, sprinkle with a little salt and pepper and roast until lightly browned, it only took about 20 minutes. If you don’t have roasted tomatoes you can make those at the same time. I used an oval roasting pan and placed some tomato at the bottom, add a layer of zucchini, spread some of the pesto on each zucchini slice, dollop on some ricotta, a little grated or sliced mozzarella and sprinkle with grated cheese. Repeat and top with mozzarella and grated cheese. Bake at 375 for approximately 30 minutes until golden brown and bubbly.

lentil and kale salad

kale and lentil salad

Lentil and kale salad

Serves 2

1 cup dry lentils washed

1 carrot cut into pieces

1 shallot

3 sprigs of thyme

water to cover the lentils

salt and pepper

In skillet sauté the shallot and carrot, add the lentils and water, salt and pepper and cook until lentils are al denté, add more water if you need to during the cooking. Rinse the lentils and set aside.

Assembling the salad

Kale leaves washed (as much as you want)

some crumbled feta (again as much as you want)

handful roasted pistachio chopped

tomato chopped.

Place the kale in a large salad bowl drizzle with olive oil and massage until softened. Add the lentils, tomato pistachio and feta. To dress just whisk a little honey, thyme leaves and white wine vinegar together and pour on the salad. Keeps beautifully even until the next day.

In closing I made another parfait, I love eating them, they are delicious and for me guilt free. This is just Carr’s whole meal biscuit, greek yogurt, peaches and blackberries. Thats it!!

IMG_4932


A Breakfast Skillet And Dessert

IMG_4804

First let me say how encouraged and overwhelmed I am by all the support from all of you good people. Thank you, thank you!! Because of the outpouring of support it made me even more resolute. I have to say it really helps baring your soul to your friends, I have always found that a diet and exercise buddy helps me stay on track,  I  live alone it’s and it’s really easy to fall off the wagon, my best friend Carla lives in Long Island, not exactly close to Brooklyn but we talk on the phone almost every day and encourage each other. I feel now like I have LOTS of diet buddies in all of you and it has helped tremendously. I encourage anyone in the same shoes to do this, we will all cheer you on.  Special thanks to Elaine @foodbod who chatted with me by PM on Instagram in the wee hours and Cheryl @cheryl cheffie cooks Wiser, who did a special post for me with fantastic salads, I am so touched.  It means the world to me.

So far I am doing fine. This morning I wanted something substantial that would nourish and keep me from getting hungry. There is nothing worse than being hungry and perusing all the food blogs and food photo’s on instagram. I used what I had for this breakfast skillet, eggplant, zucchini (used the pieces left from spiralizer) tomatoes, kale and micro potato. Half roasted in the oven, I wanted the kale crisp like a kale chip, transferred to a 6″ skillet (portion control) added an egg and completed the cooking until the egg was done. At the very end I added a little bit of raclette and put it under the broiler for a minute. A dash of hot sauce and it was a great meal.

IMG_4776

Skillet Breakfast

Made 2 #6 inch individual size servings

4 micro potatoes cut in half

approx a half of a medium zucchini cut into bite size pieces

handful cherry tomatoes larger ones cut in half

generous handful of kale leaves

4 asparagus stalks with tough end broken off and cut in half

4 tiny fairy eggplant cut in half or quartered lengthwise

Cheese, just a little, didnt’ measure. I used raclette but any good melty cheese will do

Pre heat oven to 375. Place all of the vegetables on a parchment lined baking tray. Drizzle with olive oil and sprinkle with salt and pepper, make sure the vegetables are coated with the oil. Bake for approximately 20 minutes, kale will be crisp and vegetables will have softened. Arrange in skillet, crack an egg on top and bake (again at 375) until the egg is done to your liking it took about 20 minutes for an egg where the white was done but yolk was runny.  Add some cheese, I used raclette, and place under the broiler just until the cheese melts.

Dessert

Dessert

I have to have dessert, something sweet it’s part of the fabric of my being. You have to be a bit creative when trying to lose weight and maybe a little crafty. I came up with this recipe, well it’s not really a recipe, but it is really good.  It made 2 small parfait or maybe they are more like an ice box cake or a combination thereof.

Strawberry and peach parfait

makes 2 small parfait

4 Carr’s whole meal biscuits smashed into crumbs

1 7 oz container plain greek yogurt (I used whole milk yogurt)

3 tbs heavy cream

1/2 tsp vanilla

honey to taste ( I used a little more than a tbs for both the fruit and yogurt mixture)

fruit of your choice, I used strawberry and peach.

Cut the fruit into bite size pieces and drizzle with a little honey. Smash the whole meal biscuits into crumbs. Whip the yogurt and cream, sweeten to your liking and add the vanilla. Layer into small containers and refrigerate at least an hour or two before eating. The biscuit absorbs some of the fruit juice. It’s delicious.

IMG_4861


I just have to show you the throw pillow I won in a charity auction to help pets with liver shunt disease. I love it!!

pug pillow

pug pillow

Lastly in memoriam for little Caleb a 3-4 month old dog in Atlanta that was brutally abused, if you think of the worst this is 100 times worse than you could possibly imagine. You can sign a petition by going to my facebook page . This has me so upset, to my very core, and it’s all over the news. Hoping they catch the monsters that perpetrated such a heinous and evil crime. Little Caleb is not the first dog to suffer horrific abuse and unfortunately he will not be the last. Raising awareness, supporting rescue organizations and being pro active reporting abuse perceived or otherwise is so important. RIP little Caleb. #justiceforcaleb

IMG_4872


What’s A Food Blogger To Do?

Green Market Haul

Green Market Haul

Lately I have been a pretty sorry excuse for a food blogger, sorry about that, I have several excuses, busy, it’s too hot to cook but honestly I think that I feel lost, not terribly motivated and a bit forlorn because I have gained weight. I love food, cooking it, eating it, shopping for it and blogging about it. Taking photo’s of what I prepare (when they are good) makes me happy. Unfortunately, the food I make ends up in my mouth at least a good portion of it, some gets farmed out to friends and family and even charity but what ends up in me has caused me to gain weight. I wish I were the person that could eat whatever they want and never gain an ounce but thats not me, I wish I could happily exist on salads and low fat food and no sugar, but thats not me either. There has to be a balance and I have not found that yet. I’m also not an exercise fanatic, sure I walk every day, walking Percy doesn’t really count because thats not much exercise, he is very slow. The heat has also taken it’s toll, making me lethargic, I just don’t want to be outside it’s too uncomfortable. After some soul searching and a glance in the mirror I decided to try to find my balance and watch what I eat, the reason for this post is that over the next few weeks you will not be seeing anything remotely fattening, no cakes or pies or bread or heavy calorie laden meals. I have to do it for me and I am challenging myself to come up with some great recipes that will help me, if you all have something you love comment and provide the link to your recipe. Will it make me happy, not really, I would rather eat what I want,  but if I slim down a bit maybe I will feel better about myself. I will still be posting recipes but until I find a balance in my eating I am staying away from the foods I love namely sweets, bread, rice and pasta. The photo’s you see I posted on the Food52 app for “not recipes” I will be posting these over the next few weeks, they are simple and delicious and fit into my diet.

0255AC78-DED0-41B1-9C3A-DFF25AAA8588

I have always fought to keep my weight down, I tend to yo yo. Years ago I saw a nutritionist who put me on phen phen, I was not dramatically overweight and just wanted to lose about 20 lbs. Well let me tell you that stuff works, I had no ill effects, I took a very low dosage about a quarter of what the Doc prescribed and the weight came off, too much really. People were actually telling me I need to gain weight, that felt good no one ever said that to me before. I was on it for a year and then the bottom dropped out, they took one of the phen’s off the market because some people had heart related complications. He put me on other meds that I didn’t like, they didn’t work and made me feel bad so I slowly gained weight. To this day I still have not gained back all of the weight I lost I have gained a good portion back though. A few years ago I tried South Beach and was very successful losing a lot of weight and I really liked the low carb and low sugar diet, I never really felt hungry and the weight melted off.  When I started competitive cooking on Food 52 and Whole foods, and blogging about it I  gained back most of what I lost on the South Beach plan.

strawberry buttermilk smoothie

strawberry buttermilk smoothie

I have to try again and if I cook the food I like then I gain weight. I am active, I work, I walk, I am constantly doing something but evidently not enough to mitigate the amount of calories I consume. I recently tried weight watchers, I really don’t like counting points or weighing food, the thing is I know how much I should be eating, I know my portions are too big. Portion control is key along with making the right choices.

IMG_0822

Sorry to bore you with all this but I wanted to lay it all out and explain why you may not see much from me for the next few weeks. The Holidays are coming, I can hardly believe it, and I can’t afford to allow the usual holiday weight gain to happen on top of what I have gained over the years. As you age your metabolism slows down, at least for some of us, and all of that needs to be taken into consideration when deciding what goes on your plate and into your mouth.

Here is a light, quick and delicious stir fry that I am making tonight. I use skirt or flank steak cut into strips it cooks up in no time and is tasty and satisfying without being heavy. Tonight I will have it without the rice just broccoli.

Beef and Pepper stir fry

1lb flank or skirt steak cut into strips

bell pepper, I used rainbow colors, orange, red, yellow. cut into strips

1 medium onion sliced thinly

1 clove garlic minced

1 tsp minced ginger

corn starch for dusting the meat

soy sauce

salt and pepper if needed

Coat pan or wok with a little oil, add the onion and sauté just until softened, add the garlic and ginger, now add the peppers and continue to saute until all the vegetables are cooked through. Remove from pan, add a little more oil if needed and saute the beef just until browned, put the onion and peppers back in the pan, add a little soy sauce, add salt and pepper if needed. Serve over rice or with vegetable like broccoli and I added some quick pickled radish.The broccoli is steamed then drizzled with soy sauce and toasted sesame oil and sprinkled with sesame seeds.

IMG_2722


Dog Biscuits

IMG_4619 Read more

Pralines And Cream Ice Cream

IMG_4307

It has been so hot in NYC that I have barely turned the stove or oven on. Salads, quick cooking foods are what I am making and because of this my blog has suffered from neglect. Ice cream has become a major food group for me along with cucumbers and tomatoes. A few weeks ago I made mocha almond fudge and now I am going to tackle the other flavor that I love, Pralines and Cream. I am partial to Haagen Daz ice cream and their Pralines and Cream is amazing, but I have not found it in a store around here for years, it must be really unpopular with the general public, it’s not even in the Haagen Daz store near me. The other day I was rummaging through the frozen case in the market looking for a pint of vanilla and almost shrieked, there it was 1 pint of Pralines and Cream, it had probably been there for a while, it was caked with ice but I got it anyway. It was a little worse for wear, probably had partially melted but still the taste of this creamy, dreamy concoction was still there. I was able to commit to memory the taste, fresh in my mind and I set out to make my own. Pralines are not readily available around here, you ask for them and people look at you like you have 2 heads. Searching the internet for recipes for Pralines and Cream Ice Cream I came across one from Emeril Lagasse. There is a vanilla custard base, caramel sauce and pralines, pretty simple really. Taking into account the terrible heat and humidity and not wanting to spend one minute more at my stove than absolutely necessary I decided to use already prepared vanilla ice cream, make some pralines and use dulce de leche I had in the fridge (it’s ridiculously easy to make).  Love this because the time at the stove is minimal and the ice cream is really wonderful. The recipe for pralines is from Emeril and makes enough for several quarts of ice cream.

I don’t like the term semi homemade but thats what this is. Using Haagen Daz vanilla with homemade dulce de leche and pralines this was easy to make and was almost instant gratification and really pretty close to my beloved Haagen Daz Pralines and Cream.

This yummy ice cream is coming with me to Fiesta Friday #132, I’ve got the ice chest ready and will try to make it there without it melting. Angie’s co hosts this week are Sandhya @ Indfused and Nancy @ Feasting With Friends.

Pralines

1 cup light brown sugar

1/2 cup granulated sugar

1/2 cup heavy cream

4 tbs salted butter

2 tbs water

pinch of salt

Put all the ingredients in a sauce pan and bring to a boil on medium high heat stirring constantly until it reaches the soft ball stage 238 -240 degree’s, if you don’t have a candy thermometer have a bowl of ice cold water next to the stove and drop a little in, if it forms into a soft ball it’s ready. Add the pecans and place the pan in an ice bath stirring constantly until cooled. Pour onto buttered parchment lined sheet pan and let cool. The consistency will be like fudge. When it’s cool break into pieces and store in the refrigerator until ready to use.

Making the Ice Cream

To make the ice cream (my shortcut) soften some vanilla ice cream (I chose haagen dazs) put half of it in a freezer container, sprinkle on some chopped praline and drizzle caramel or dulce de leche. Add the other half of the ice cream on top and add the rest of the praline and caramel, swirl with a butter knife and freeze for a few hours.

There was a little dulce de leche left so I added it to a homemade fudge sauce serving it warm over the ice cream. It was really good. To make the fudge sauce is easy, just like ganache, equal parts chocolate and cream. Add the chocolate to scalding hot cream, let it sit, stir and add some dulce de leche if you like and spoon over ice cream. It’s wonderful.

Hot Fudge Sundae

Hot Fudge Sundae

fiesta-friday-badge-button-i-was-featured1


Shumai

IMG_4251

Sometimes I like to step outside of my comfort zone and make something that is not familiar to me. When eating at a Japanese restaurant there are two things I always order, Shumai and Gyoza, portable little bites of deliciousness with a tasty dipping sauce. Although Shumai is familiar food making it, not so much. The other day there was an email from Food and Wine with a recipe from Andrew Zimmern for Shumai, looking it over it seemed straightforward and simple to make, both of these are requisites when I tackle a food that I have not cooked before. I did not own a bamboo steamer so I had to buy one, no problem. The list of ingredients were very familiar except for the black vinegar for the dipping sauce, instead I used mirin and rice wine vinegar and it was delicious. I also didn’t have Shaoxing wine or dry sherry so instead I used dry white wine and it turned out just fine.  I didn’t follow the recipe exactly, did not carefully measure, instead I sort of ad libed and eyeballed the ingredients I don’t think it’s an exact science like baking. The Shumai turned out great except for one thing, I forgot to line the steamer with the cabbage, which I had bought but forgot to use. If you don’t line the steamer the shumai stick, most of the bottoms of the little dumplings were stuck and I had to carefully pry them off, there were some casualties but they were still ok. Thank you to Stefan for pointing out that these are actually Chinese, I should have done my homework but since I ordered in Japanese restaurants I assumed and well you know what happens when you assume. Sorry for the mistake.

These little dumplings are portable and delicious and I thought I would bring them with me to Fiesta Friday #131, Angie is back and the co hosts this week are Su @ Su’s Healthy Living and Laura @ Feast Wisely

IMG_4262

Shumai

 Food and Wine- Recipe by Andrew Zimmern

Made 22 dumplings

Dipping Sauce

1/4 cup soy sauce (used light- lower sodium soy sauce)

1/4 cup black vinegar (equal parts mirin and rice wine vinegar)

1 tsp Chili garlic sauce

In a small bowl whisk all the ingredients together.

IMG_4238

Shumai

12 oz ground pork (I used less probably closer to 8 oz)

6 oz shrimp minced (used less shrimp as well probably 4 oz)

4 scallions chopped – the white and light green parts only (used 3)

3 tbs minced peeled ginger (used 1 generous tbs)

1 tbs soy sauce

1 tbs toasted sesame oil

1 1/2 tbs Shaoxing wine or dry sherry (used dry white wine)

3/4 tsp salt (used scant 1/2 tsp)

all purpose flour for dusting (didn’t need it)

round won ton or gyoza skins

napa cabbage leaves for steaming (don’t forget the cabbage like me)

blanched peas to garnish (You could place the pea on the shumai before steaming also)

Mix all the ingredients together, hold a won ton skin in the palm of your hand and place a tbs of the filling in the center. Gently fold the wrapper around the filling, it will stick to the filling. Place on parchment lined baking sheet and cover with plastic wrap. Place about an inch of water in your wok or a skillet, bring to a boil. Line steamer with the cabbage leaves and place the shumai on top of the leaves leaving some space in between each. Steam them until the filling is no longer pink. It took about 15 minutes (Note: the recipe said 8-10 minutes to cook but I erred on the side of caution because there was raw pork). Garnish each with a pea and serve hot with the dipping sauce.

fiesta-friday-badge-button-i-was-featured1

Bread To Celebrate The Harvest And A Grilled Cheese Sandwich

IMG_4115

First of all, my post yesterday was supposed to publish today, I must have done something wrong when I scheduled the post, I decided not to pull it and didn’t mention it hoping no one noticed the discrepancy. It is actually one year ago today that my Nando passed.  Thank you all for your kind words and support!

August 1 is the day that the harvest is celebrated, it is nearing the end of the summer and fruits and vegetables are ripe and ready for harvest. We are also inching closer to the Fall (my favorite season) looking forward to cooler temperatures, apples, pumpkins, sweaters, leaves turning a beautiful color, Halloween. Well, I guess you can tell how much I love the Autumn. To celebrate a plentiful and abundant harvest I made some bread. This bread has been posted on this blog numerous times, it’s a recipe I use over and over each time with stellar results. The recipe is from my friend Cynthia @The Solitary Cook. She is a professional chef, baker, caterer, restauranteur, she is amazing. The bread always turns out good. The recipe makes a lot of bread. I made a large boule, 8 rolls and still have bread dough resting in the fridge that I will make tomorrow, it gets even better with a good long rest to develop. The grilled cheese sandwich was inspired by my dear friend Cheryl (cheffie cooks Wiser, aka super woman who successfully runs 9 blogs, I have mentioned her before. She made this wonderful grilled cheese sandwich and although I cannot find it on her site, I wanted to give a shout out to Cheryl who inspires me all the time.

I made the bread yesterday and it was dinner with a salad made from tomatoes from my garden and from the farmers market and some tomato balsamic jam and olive oil to dip that bread in.

IMG_3621

This is an abbreviated version of the bread recipe without the wonderful tutorial from Cynthia, follow the link to her blog for expert directions.

Rustic Italian Bread

Makes 3 loaves, or 2 loaves and 8 rolls (You decide)

Preferment

12 ounces warm water

1 tsp active dry yeast or 1/2 tsp instant yeast (I used 1 tsp instant yeast)

2 cups bread flour

Mix everything together, cover with plastic wrap and a tea towel and let rise until double in bulk. Then refrigerate overnight.

The Bread Dough

16 oz warm water

2 tsp active dry yeast or 1 tsp instant yeast ( I used 1 1/2 tsp instant yeast)

1/4 cup warm milk

approx 1 heaping tbs of honey

The preferment

2 tsp salt

4 cups bread flour

2 cups all purpose flour

Note: If using active dry yeast add the water and yeast and whisk to combine. If using instant you don’t have to do that you can add everything together.

Add all ingredients to the bowl of your stand mixer fitted with the dough hook. Mix until it is completely combined there should be no streaks of flour. Turn off the mixer, you will let the dough rest it’s called autolyse. Cover the bowl with plastic and let sit for 20-30 minutes. When you see the dough after you have let it rest it will come together nicely when kneaded. Turn the mixer on and knead for at least 5 minutes, if the dough is too wet add a little more bread flour so it’s cohesive. You will know when the dough is ready by doing the windowpane test, grab a walnut size piece of dough and stretch gently with your fingers, if it doesn’t break it’s read, if it does break knead a little longer to develop the gluten.

Oil a very large bowl or 2 large bowls, plop the dough in, turn over so it’s oiled on top. Cover with plastic wrap and a tea towel and let rise until doubled. Once it’s risen you can take as much of the dough as you want and make some bread, put the other dough in the refrigerator to rest for up to 2 days.

Once risen, form your bread onto a parchment lined baking sheet, dust with flour and cover with a tea towel and let it rise for about an hour. To know if it’s ready it should have almost doubled in bulk and when you gently press your finger onto the dough the indent should stay not pop back.

While your bread is rising pre heat the oven to 450 degree’s. Slash the top of the bread approximately 1/2 inch deep, dust with flour and place in the oven, throw in some ice cubes and reduce the heat to 425 degree’s. Turn the pan around after 15 minutes and bake approximately 35-40 minutes depending on the size of the loaf or rolls. The bread should sound hollow when tapped and be a nice golden brown. Let cool completely before slicing.

IMG_4121

Grilled Cheese Sandwich – No recipe required

Grilled zucchini

arugula (optional)

sauteed shallot or onion

tomato or tomato jam

cheese (I used taleggio)

Butter

olive oil

bread

IMG_4156

Grill the zucchini and saute the shallot until nicely browned season with a little salt. Put it all together and grill in olive oil and butter until crispy golden brown and cheese is melty and gooey.