Skip to content

Archive for

Alice Medrich Cocoa Brownies- Food52 Genius Recipe

Brownies

Brownies

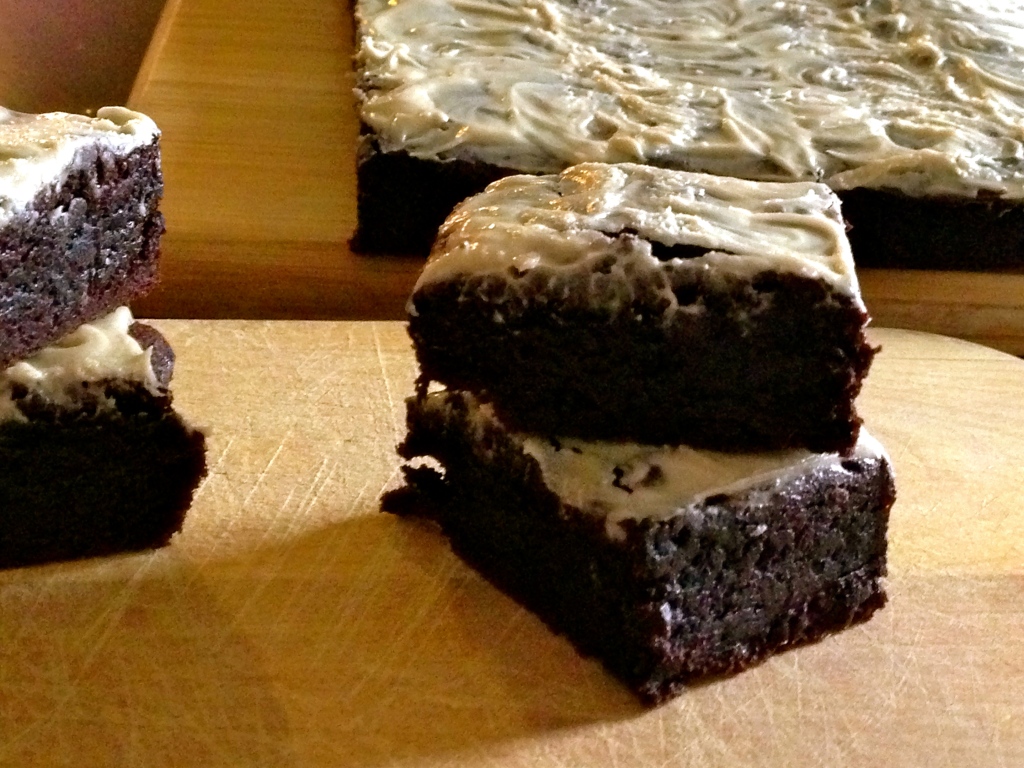
I talk about Food52 a lot, it’s a site I love, am active on and have met some really great people through. I previously posted the genius recipe for caramelized white chocolate, I really love that recipe. Today, Kristin Miglore one of the editors from Food52 posted a recipe for Cocoa Brownies by the great Alice Medrich. I immediately set out to make these brownies, you see I have been wanting to find a brownie recipe for quite a while that just uses cocoa powder, well here it is, and I am very excited.

The recipe is simple to make and yields a moist, rich brownie, I thought that a glaze would be nice, I  didn’t want a thick icing, just a hint is all thats needed, so I mixed some Kahlua with butter and confectioners sugar, chocolate and coffee are a very happy match in my opinion, Well these brownies are tremendous and if you are a fan of chocolate and brownies you will love this recipe and I wanted to share this you. I am including the headnote with the recipe. Enjoy!!

This recipe is one part of a master brownie recipe Medrich designed to use whatever chocolate you have in the house — but the best version happens to be the one that only requires cocoa powder. By taking out the chocolate, with its inevitable fat and almost-inevitable sugar, Medrich was able to control and fine-tune the proportions of both. When she added back in the fat (via butter), the middles stayed softer. When she added back in granulated sugar, the crusts were shinier and more candy-like. Any cocoa will work, but natural (not Dutch process) will taste more richly of chocolate. Recipe adapted slightly from <strong><a title=”Amazon: Bittersweet” href=”http://www.amazon.com/Bittersweet-Recipes-Tales-Life-Chocolate/dp/1579651607/?tag=food52-20“>Bittersweet</a></strong> (Artisan, 2003)

Makes 16 large or 25 smaller brownies

  • 10 tablespoons (1 1/4 sticks) unsalted butter
  • 1 1/4 cup sugar
  • 3/4 cups plus 2 tablespoons unsweetened cocoa powder (natural or Dutch-process)
  • 1/4 teaspoon salt
  • 1/2 teaspoon pure vanilla extract
  • 2 cold large eggs
  • 1/2 cup all-purpose flour (unsifted, measured by stirring briefly, spooning into the measuring cup until it’s heaped above the rim, then leveling it with a straight-edged knife or spatula — it should weigh nearly 5 ounces)
  • 2/3 cups walnut or pecan pieces (optional)
  1. Position a rack in the lower third of the oven and preheat the oven to 325°F. Line the bottom and sides of an 8-inch square baking pan with parchment paper or foil, leaving an overhang on two opposite sides.
  2. Combine the butter, sugar, cocoa, and salt in a medium heatproof bowl and set the bowl in a wide skillet of barely simmering water. Stir from time to time until the butter is melted and the mixture is smooth and hot enough that you want to remove your finger fairly quickly after dipping it in to test. Remove the bowl from the skillet and set aside briefly until the mixture is only warm, not hot.
  3. Stir in the vanilla with a wooden spoon. Add the eggs one at a time, stirring vigorously after each one. When the batter looks thick, shiny, and well blended, add the flour and stir until you cannot see it any longer, then beat vigorously for 40 strokes with the wooden spoon or a rubber spatula. Stir in the nuts, if using. Spread evenly in the lined pan.
  4. Bake until a toothpick plunged into the center emerges slightly moist with batter, 20 to 25 minutes. Let cool completely on a rack.
  5. Lift up the ends of the parchment or foil liner, and transfer the brownies to a cutting board. Cut into 16 or 25 squares.

Glaze:

1 tbs softened unsalted butter

1/2 cup confectioners sugar

1 tbs Kahlua

Mix the butter and sugar together, add the kahlua and mix to combine, spread on cooled brownies. You can add a little more Kahlua if you like, I did, just watch that the glaze doesn’t get too thin. You can play around with it, add a little less of one ingredient and more of another. It’s fun to play!

Super Sweet Award!!

Super Sweet Award

Super Sweet Award

Thank you so much to my super sweet friend Bec who has a gorgeous blog, Daisy and the fox for awarding me the Super Sweet Blogger Award. I am honored and thrilled to receive this. Aren’t we all lucky to be a part of such a great community, I know I feel very lucky to know each and every one of you even if it is a virtual friendship. Please click on the link and check out Bec’s blog you will be blown away by the amazing photography and recipes. Thank you again!

The Rules:

  • Give credit to the person who chose to nominate you
  • Answer the “Super Sweet” questions
  • Nominate a “Baker’s Dozen” (13!) blogs

~Super Sweet questions~

  1. Cookies or Cake?  Cake but I love cookies too!!
  2. Chocolate or Vanilla? hmmmmm….. chocolate
  3. What is your favorite sweet treat? Ice cream, chocolate, apple pie warm with ice cream!! 
  4. When do you crave sweet things the most? Well I guess after dinner would be it.
  5. If you had a sweet nickname, what would it be? I have no idea maybe something referring to chocolate

Nominate a “Baker’s Dozen”:

Culinary Flavors

Fig And Quince

Table of Colors

Weights And Measures

Easybaked

The Healthy Epicurean 

Taste of Wintergreen

petite 4 chocolatier

fleur de sel

Food Thoughts To Share

Canapes And Chocolate

The Best Dressup

Food And Forage Hebrides


Chicken And Sausage Paella, A Guest Post-Wine Pairing

Paella

Paella

I am so excited about this post, not just because I have made paella, one of my favorite dishes but because I have collaborated with a wine expert who graciously paired wine specifically for this dish. I contacted Stefano a certified sommelier and asked him if he would lend his expertise, choosing wine that would compliment the paella. He accepted, and I am so pleased to bring you his choices. Stefano is a brilliant photographer and sommelier and his blog Clicks & Corks recently launched. He previously posted with his wife Francesca on her beautiful blog Flora’s Table. I love their posts, the food, wine and photographs are amazing. I enjoy wine, drinking and cooking with it but I am not an expert, I rely on my local wine merchant to help me pick wine based on what and how I cook and drink. I know what I like but ask me to tell you about it and I become verklempt. Clicks & Corks has a wealth of information regarding wine, there is a glossary full of interesting and helpful information. I sent Stefano what I was making along with the ingredients and based on that he was able to choose 2 wines specifically for this dish. My favorite wine purveyor, Brian who owns Gnarly Vines in Brooklyn did not carry the exact wine that Stefano recommended but went above and beyond for me and found both wines, I was thrilled. Here is a link to the ISA guidelines for wine pairing that was posted on Flora’s table, it’s fascinating. I chose to drink the Soave Classico “Calvarino” with the meal and loved it, this wine paired perfectly with the paella, it’s clean and light and very smooth, there is a minerality that is very distinct, I could tell the soil in which the grapes were grown is rich and produces exceptional grapes. The wine complimented the paella so well, the crisp clean white wine offset the richness of the dish. Stefano knows what he is doing when he chose this wine. I haven’t opened the other wine yet but have no doubt that it will also be amazing. This wine will pair perfectly with seafood also, in my non expert opinion.

This paella is pretty simple, I chose to use chicken thighs and sausage and no seafood, it’s easy to make and isn’t as finicky as paella that contains different types of seafood. I love to drizzle it with aioli, now aioli is traditionally made with raw garlic, oil and an acid. Because I am not a fan of raw garlic I roasted it, used both olive and vegetable oil and added saffron building on the flavors in the paella.

Roasted garlic, saffron,lemon aioli

Roasted garlic, saffron,lemon aioli

The Aioli:

  • 3-4 large cloves of garlic (3 if you want it subtle and 4 for stronger garlic flavor)
  • 1/2 teaspoon Sea Salt
  • 2 Egg yolks
  • 1/4 cup Freshly squeezed lemon juice
  • 1 teaspoon Lemon Zest
  • Freshly ground white or black pepper
  • 1/2 cup Vegetable Oil (Canola works well)minus 2 tbs
  • 1/4 cup + 2 tbs olive oil.
  • A generous pinch of saffron
  1. Preheat your oven to 350 degrees, while oven is heating peel 4 large cloves of garlic place on aluminum foil and drizzle with olive oil and make a packet. Place on sheet pan and bake for 15 minutes or until garlic is soft.
  2. Let garlic cool, while it’s cooling squeeze and zest the lemons. Add the generous pinch of saffron to the lemon juice and let sit for approx. 10-15 minutes the lemon juice will turn a lovely vibrant yellow.
  3. In your blender place the garlic cloves,egg yolks, lemon juice w/saffron, lemon zest, salt and pepper. Blend until garlic is completely incorporated it doesn’t take long as the garlic is soft.
  4. With blender running, slowly add the oil, the mixture will become thick. Adjust seasoning if you desire. Refrigerate while you make the Paella. This can be made in advance it keeps for 2-3 days in refrigerator.

Paella with saffron rice:

  • 3 cups long grain white rice
  • 6 cups chicken stock to cook the rice heated.
  • 1 small sweet onion chopped
  • 2 tablespoons Butter
  • 2 tablespoons Olive Oil + plus more for chicken and tomatoes
  • 6 chicken thighs (bone in and skin on)
  • 1/2 pound Italian sausage (sweet or hot)
  • 1 cup frozen peas
  • 1/14 cup chicken stock for paella
  • A generous pinch of saffron for the rice.
  • 12 cherry or grape tomatoes
  1. First make the saffron rice. Heat the olive oil and butter in large saucepan, add onion and cook until soft and translucent, add the rice and stir to coat. Add the saffron to the heated stock and add to the rice, let it come to a boil, reduce heat, cover pan and let cook for approx. 15 minutes. Remove cover and fluff the rice with a fork. Set the rice aside.
  2. Season the chicken thighs with salt and pepper and place in baking pan, drizzle with olive oil and bake in 450 degree oven for 20 30 minutes. Don’t discard the pan juices, pour some onto the rice when you are putting the paella together.
  3. Reduce oven temp to 375 degree’s, lay a piece of parchment on baking sheet and place tomatoes on parchment, drizzle with olive oil, salt and pepper and bake until tomatoes become soft and start to caramelize. It takes approximately 15- 20 minutes. Remove from oven and set aside.
  4. Heat a fry pan(use the large pan you will use for the paella) coated with a little olive oil and brown the sausages. Remove from the pan and set aside covered. Don’t drain the oil (it won’t be much) or pan juices you will use this same pan to cook the paella). Slice sausage just before assembling the paella.
  5.  If you have a paella pan thats wonderful but if you are like me and do not use a large (14″) fry pan with a lid. Using the same fry pan you used for the sausage, turn flame to medium/high. Add the saffron rice and peas mix to incorporate the peas with the rice, then start layering. Add the chicken thighs and sausage.  Pour the 1 1/4 cups of chicken stock over the paella, spoon some of the pan juices from the chicken on top cover and cook for 15 minutes, approximately 3 minutes before its done add the tomatoes, put the lid back on and cook for the remaining time.  Remove from heat. Garnish with chopped parsley and drizzle with the aioli.
Fantastico!!

Fantastico!!

Wine Pairing:

By Stefano Crosio-Clicks & Corks

In order to pair well with Suzanne’s delicious paella, the wines that we are going to pick need to have good acidity, a good extent of smoothness, quite intense nose-mouth flavors and decent structure, as in a medium to full bodied wine. The reason why these characteristics (and not others) are desirable to achieve a pleasant food-wine pairing is the result of application of the wine pairing criteria codified by the Italian Sommellier Association, which I will discuss in a future post on Flora’s Table.

Based on the above guidelines, I am going to recommend two wines that I have recently tasted at the Vinitaly/Slow Wine trade fair in New York: they both possess the desired characteristics to be good companions to Suzanne’s paella and they both have particularly impressed me when I tasted them. Clearly, these two wines are by no means the only ones that go well with Suzanne’s paella! However, on the one hand their descriptions, coupled with the general guidelines provided above, should point you in the right direction should you wish to consider different alternatives and, on the other hand, if you are going to give either or both of these wines a try, they might introduce some of you to two Italian wines that are maybe not so “mainstream” or widely known in the US market and that yet are excellent and showcase the treasure chest of indigenous grape varieties that constitute the backbone of centuries of Italy’s wine culture.

I will now leave you with my tasting notes for the two recommended wines, plus the certainty that you will enjoy Suzanne’s delicious paella dish and the hope you will get to drink some good wine with it!  🙂
 
Option 1: Soave Classico, from the Veneto region
 
Pieropan [http://www.pieropan.it/en/], Soave Classico “Calvarino” 2010 DOC: a very good Soave made of a blend of 70% Garganega and 30% Trebbiano di Soave grapes which literally hits you in the nose with an exhuberant minerality and aromas of apple, citrus and white flowers; in the mouth a lively acidity and distinct minerality are balanced by a good extent of smoothness – long finish. ABV: 12.5% VOL. If interested, here [http://www.pieropan.it/en/index.php?id=73] is the winery’s technical sheet for this wine. Retails in the US for about $28.
 
Grape varieties’ quick facts: Garganega is a grape variety that is indigenous to the Veneto region, where it has been cultivated since at least the XIII century. Wines made of Garganega grapes are generally acidic and spicy.For more information about the Trebbiano di Soave grape variety, please refer to the quick facts about Verdicchio in option 2 below.
Option 2: Verdicchio dei Castelli di Jesi, from the Marche region
Marotti Campi [http://www.marotticampi.it/index.php?var=], Verdicchio dei Castelli di Jesi Classico “Salmariano” Riserva 2009 DOC: a very good varietal wine made of 100% Verdicchio grapes, with a nice bouquet of white flowers, peach, citrus and minerals; good acidity and a long finish. ABV: 14% VOL. If interested, here [http://www.marotticampi.it/catalogo-vini.php?var=tab7] is the winery’s technical sheet for this wine. Retails in the US for about $20.
 
Grape variety’s quick facts: Verdicchio grapes are also known as Verdicchio Bianco, a grape variety which, although it has been cultivated in the Marche region since the XVI century, was said to originate from Veneto. It is interesting to notice that DNA profiling has confirmed this theory, indicating that Verdicchio as a grape variety is identical to Trebbiano di Soave, a grape variety that is widely planted in Veneto and that we have just come across describing the wine in option 1. Verdicchio wines tend to have marked acidity and good structure.
 

Cupcake Therapy

Cupcakes

Cupcakes

I see so many beautiful cakes and cupcakes I decided I want to start honing my piping skills, I have never been very good at this and want to do better. I will experiment using different tips and techniques. These cupcakes are pretty basic, I used my recipe for white cake and Hershey’s cooked frosting (because it was easy). I love making swiss meringue buttercream frosting but the egg whites and all that butter on a practice run are not really practical. I have a long way to go before my piping skills look effortless. I have Carpal Tunnel Syndrome and had surgery 2 years ago, my right hand is still weak and I still have nerve damage so this is difficult but good therapy.

Makes 24 regular size cupcakes or 12 jumbo
  • 4 large egg whites at room temperature (1/2 cup egg whites)
  • 1 1/2 cup sugar divided
  • 2 1/4 cups cake flour
  • 3 teaspoons  baking powder
  • 1 teaspoon  salt
  • 1/3 cup  + 1 tbs vegetable oil
  • 1 cup whole milk at room temperature + 1 tbs heavy cream
  • 1 1/2 teaspoon pure vanilla extract

Pre-Heat oven to 350 degrees. Place cupcake liners in the cupcake tins

In stand mixer fitted with whisk attachment beat egg whites until frothy, add  1/2 cup sugar, 1 tbs at a time beating after each addition. Continue beating until egg whites are thick and glossy. They should be stiff enough that when the beater or whisk is lifted they stay on the beater and don’t drop off.

In large mixing bowl sift flour, remaining 1 cup sugar and salt. Add the vegetable oil, milk,cream,and vanilla, beat with hand mixer on medium high speed for 2 minutes. Gently fold in the egg whites.

Pour into prepared pans and bake for 15=20 minutes or until lightly browned and cake tester comes out clean. Let cool in pan for 10 minutes and invert onto cooling rack. Cool completely before frosting.

Frosting:

Recipe from Hershey’s

1 stick (4 oz) butter (I used salted)

2/3 cup natural cocoa (I used Hershey’s)

3 cups powdered sugar

1/3 cup milk (divided)

1 tsp vanilla extract

1 tsp orange zest (optional)

Melt butter in saucepan, add the cocoa and powdered sugar and optional orange zest, mix with hand held mixer, add half the milk and vanilla and continue mixing until the frosting is smooth add the rest of the milk if you feel the frosting is too thick. If you are going to pipe the frosting you will need to cool the frosting first, I put in the refrigerator for 1 hour.

Hearty Kale Salad With Kabocha Squash,Pomegranate Seeds And Toasted Hazelnut And An Award

Kale Salad

Kale Salad

I love healthful food, I really do but my style of cooking isn’t really super healthy. I try, I really do but unfortunately I fall short most of the time. Incorporating raw foods, salads into my diet is challenging sometimes. A friend and I hosted a dinner party the other night and we wanted to do a low carb, healthful meal. I found this recipe on Food52, Gena Hamshaw is vegan and has some amazing, balanced healthful dishes. I took one look at this salad and knew it would be on the menu that evening. What does it contain? Lots of super foods, Kale, pomegranate, hazelnuts and Kabocha squash. The kale is massaged with a little of the dressing to soften, then you toss with the rest of the light lemon dressing. It’s delicious, honestly, really really good. I had everything for the salad except the squash so I subbed sweet potato which I prepared in exactly the same way as you would the squash.

Serves 4-6

  • 1 Large bunch curly kale, stems removed and discarded, torn into bite sized pieces, washed, and spun dry
  • 1 Small kabocha squash (Japanese pumpkin), halved and seeded and cut into 1.5 inch pieces ( I used 1 medium size sweet potato using the same method as described in step 1)
  • 4 tablespoons Olive oil, divided into 1 tbsp and 3 tbsp
  • 3/4 cups Pomegranate seeds
  • 1/2 cup Skinned hazelnuts
  • 1 teaspoon Dijon mustard
  • 2 tablespoons Lemon juice
  • 1 teaspoon Maple syrup
  • 1/4 teaspoon Sea salt
  • Black pepper to taste
  1. Preheat the oven to 375 degrees. Toss the squash in 1 tbsp olive oil and season with salt and pepper on a baking sheet. Roast for 30-35 minutes, or until golden, stopping halfway through to stir.
  2. While squash is roasting, place the hazelnuts in a shallow baking dish (or a pie pan) and toast in the oven for 4-6 minutes, or until they are golden. Check them frequently and remove them the moment they start to get brown. Once they’ve cooled a little, chop them roughly and set aside.
  3. Whisk together the remaining olive oil, mustard, lemon, maple syrup, sea salt, and pepper. Pour 3 tbsp over the kale to begin with, and “massage” the kale well with your hands, till it’s coated in the dressing and taking on a soft, almost wilted texture. Add the remaining dressing as needed and according to tastes. Add pomegranate seeds and hazelnuts.
  4. Once the squash has finished cooking and has cooled for 10-15 minutes, add it to the salad and serve.

I am so thankful that Cambios de humor nominated me for the Shine On Award. Thank you so much, I am so honored to have been included in your list of nominee’s. Please visit her blog, you will love the honesty and humor in her posts.  Thank you again!!

shineon1

Stuffed Pears en Papillote

Baked Pears

Baked Pears

I made this over a year ago and posted on Food52, it’s a light and delicious dessert and thought it was a good idea to re-visit and post here. Baked pears remind me of the fall and winter.  For this dish I used forelle pears, they are very small and you will need 2 pears per serving I stuffed them with walnuts that I toasted with butter, cinnamon and brown sugar and added dried cranberries, then I slathered them with softened butter and rolled in turbinado sugar. I wanted to try a different method to bake them and I decided to try baking in parchment. The result is a tender pear steamed in its own juices its sweet and buttery. Delicious on its own or served with some ice cream, whipped cream,mascarpone, soft cheese or creme anglaise. You can use the pear of your choice for this recipe.

Serves 4

The filling:

  • 1/4-1/2 cup walnuts (depending on the size of the pears)
  • 1/4-1/2 cup dried cranberries (depending on the size of the pears)
  • 1-2 tablespoon salted butter melted
  • 1 tablespoon brown sugar packed
  • 1/4 teaspoon cinnamon
  1. Pre-heat oven to 350 degrees. Line a small baking sheet with parchment. Melt your butter. In bowl add the walnuts and pour melted butter on the nuts toss to coat, Add the brown sugar and cinnamon toss again to make sure the brown sugar and cinnamon coat each walnut.
  2. Pour onto baking sheet and spread out. Bake for 5-8 minutes careful not to burn the nuts. Remove from oven and let cool. When they are cooled give the nuts a rough chop and add the cranberries, toss to combine and set aside.

The Pears and baking:

  • 8 forelle pears cored and peeled
  • 3 tablespoons butter softened (use more or less as needed)
  • 1/4-1/2 cup turbinado sugar(start with 1/4 cup add more if you need it)
  • parchment paper and butchers twine
  • walnut and cranberry mixture
  1. Pre-heat oven to 375 degrees. Wash and core your pears from the bottom leave the stem intact. Peel the pear. Stuff each with the walnut and cranberries. Rub each pear generously with the softened butter, roll the pear in the turbinado sugar.
  2. Tear off 8 generously sized pieces of parchment, place the pear in the middle and gather up around the stem and tie off with butchers twine if there is too much on top trim with scissors, Place on baking sheet and bake for 20-25 minutes. If you use larger pears the baking time will increase to 35-40 minutes approximately. Enjoy alone or with ice cream,whipped cream or cheese.

DSC02121

Happy Valentines Day- Caramelized White Chocolate Ice Cream, Chocolate Madeleines And Chocolate Caramel Sauce

Valentines Day

Valentines Day

Happy Valentines Day everyone, I felt I must make something chocolate for today, but didn’t want anything too heavy. This has 3 components, a chocolate madeleine, caramelized white chocolate ice cream and a chocolate caramel sauce. I built this around the caramelized white chocolate that I made, at first I was going to do a mousse but decided on ice cream, after searching the internet I found David Lebovitz recipe and saw that he took a chocolate course that Valhrona offered and made this very same thing. I am therefore crediting the great Mr, Lebovitz for the ice cream recipe. The chocolate caramel sauce is my own creation and is amazing, I sort of winged it having only made caramel sauce for the first time a few weeks ago.  I used the same recipe and simply added dark chocolate to the cream, it worked out perfectly.  I hope everyone has a wonderful day!

Madeleines

Madeleines

Chocolate Madeleines:

A recipe by Gale Gand

Makes 2 dozen

  • 1/2 cup, plus 4 tablespoons unsalted butter softened, for buttering madeleine molds
  • 3 large eggs
  • 1/2 cup granulated sugar
  • 2 tablespoons packed dark-brown sugar
  • 1 cup cake flour (not self-rising)
  • 1/4 cup cocoa powder, preferably Dutch-processed
  • 1 1/2 teaspoons baking powder
  • 1/8 teaspoon salt
  • 1 tsp vanilla extract
  1. Preheat oven to 325 degrees. Brush madeleine pans well with 4 tablespoons softened butter; refrigerate 5 minutes.
  2. In a small heavy-bottomed saucepan, melt remaining 1/2 cup butter over medium heat. Continue to cook until butter turns golden brown, being careful not to let the butter burn. Remove from heat and strain through a fine mesh sieve into a small bowl; set aside.
  3. In the bowl of an electric mixer fitted with the whisk attachment, whip eggs with granulated and brown sugars until light and thickened, 3 to 5 minutes. Add flour, cocoa powder, baking powder, and salt, and stir on low speed until combined. Add vanilla and reserved browned butter; mix just until blended.
  4. Insert a 1/2-inch plain tip into a pastry bag and fill with batter. Pipe mounds of batter into prepared pans until each mold is full, mounding batter in the center of the molds but not filling to the edge. Alternatively, you can use a teaspoon to fill the molds with batter (which is what I did). Bake until madeleines are firm and a little mound is puffed up in the middle, 10 to 12 minutes. Madeleines are best eaten the same day they are baked.

Chocolate Caramel Sauce:

1 cup granulated sugar

6 tbs salted butter (yes salted) cut into tbs size pieces

2 oz bittersweet chocolate chopped (I used scharffen berger 62%)

1/2 cup heavy cream

1 tsp vanilla extract

Put the heavy cream in a glass measuring cup and microwave on high for 45 seconds, add chocolate and microwave another 30 seconds Stir until its smooth, set aside so that it will cool before adding to the caramel.

In large saucepan add the sugar, turn heat to med/high and let sit until it starts to liquify. Start stirring with a heat proof spatula, the sugar will crystalize but thats alright keep stirring until its all liquid. Stop stirring and let it cook until it turns amber in color, now add the butter, stir to combine. Remove from heat and add the chocolate cream. Stir until its incorporated in the caramel. Store in container at room temperature until ready to use. Note: If you make this ahead of time, simply place the bottle or jar in hot water to warm the caramel so it’s pourable.

Ice Cream

Ice Cream

Caramelized White Chocolate Ice Cream:

A Recipe by David Lebovitz

Makes about 1 quart (1l)

Make sure the caramelized white chocolate is warm when you mix it with the cream. You can reheat it in a bowl set over a pan of simmering water, or in a microwave on low power, stirring until smooth.

8 ounces (240g) caramelized white chocolate

1 cup (250ml) heavy cream

2 cups (500ml) whole milk

1/2 cup (100g) sugar

1/8 teaspoon sea salt

5 large egg yolks

1. Mix the warm caramelized white chocolate in a large bowl with the heavy cream, and set a mesh strainer over the top.

2. In a medium-sized saucepan, heat the milk, sugar, and salt.

3. Whisk together the egg yolks in a small bowl and gradually whisk in half of the warm milk, then scrape the warmed yolks back into the saucepan.

4. Cook over moderate heat, stirring constantly with a heatproof utensil, until the mixture thickens and coats the utensil.

5. Immediately pour the custard through the strainer into the white chocolate mixture and stir until smooth. Put the bowl in an ice bath, and stir until cool.

6. Chill thoroughly in the refrigerator, then freeze in your ice cream maker according to the manufacturer’s instructions.

This is the best ice cream I think I have ever had, it’s so creamy and the perfect consistency, thank you Mr, Lebovitz for a wonderful recipe.

Note: In step one I deviated slightly, I heated the cream in the microwave to warm it for 30 seconds, I then added the chocolate and put it back in the microwave for another 20 seconds. It melted the chocolate and made a ganache. It was easier to combine with the custard when it was already melted.

Dessert is served

Dessert is served

img_a2632312aa1

Caramelized White Chocolate-Food52 Genius Recipe

Caramelized White Chocolate

Caramelized White Chocolate

I am a frequent, well I guess daily visitor to the Food52 site. I have been active there for almost 2 years now. In case you don’t know about Food52 it the brainchild of Amanda Hesser and Merrill Stubbs. Home cooks as well as professionals are all welcomed to the site and it is a treasure trove of recipes from the community as well as the founders. One of the features is Genius Recipes and last week they posted a recipe for caramelized white chocolate. I am a die hard dark or milk chocolate lover, I always keep white chocolate in my pantry but it sadly sits there waiting for the occasional recipe that I might dream up. I like it but honestly, I don’t love it. When I saw this post I was intrigued, it seemed as though a bland and lonely piece of the white stuff had been transformed into something complex and delicious, and I knew that I had to try it.

Last night, before Downton Abbey I took all the white chocolate that I had and started the process. It’s labor intensive, not in a wear you out sort of way, but you do have to watch and stir for about 45 minutes. You bake your chocolate in a low oven (266 degrees) stirring every 7-10 minutes until your white chocolate becomes a molten mass of amber colored goodness.

Here is the link to the post on Food52. After I finished I poured it into a small loaf pan to set and voila, a bar of caramelized white chocolate. It’s incredibly delicious and fair warning this could be addictive!

I already know what I am going to do with it, you’ll see on Valentines Day!

Vanilla Bean White Chocolate Rose Scented Pot de Creme #Bake Together

Pot de Creme

Pot de Creme

I have to say that I was so excited about this months Bake Together with Abby Dodge, she challenged us to put our own twist on one of my favorite desserts, Pot de Creme. I have to confess, up until now I only had chocolate never vanilla so this was a bit of a departure for me but I am up for a challenge. This recipe was inspired by a dear friend of mine, a chef in Montana, Cynthia who has a lovely blog “The Solitary Cook”. she created this recipe for a contest on Food52 and I loved the flavors so much I thought it would make a wonderful pot de creme. Her creation was rose petal ice cream scooped into balls and covered in white chocolate. Delicious right? I took Abby’s brilliant recipe for Vanilla Bean Pot de Creme and tweaked it a bit, adding white chocolate and a hint of rosewater. It is delicious, you can’t really go wrong when your base recipe is genius and I am thankful for that. The rosewater is barely there, just a hint and paired with the white chocolate in a creamy dessert its heavenly. I topped with raspberry whipped cream. NOTE: I used a dropper for the rose water, I put 3 drops in, starting with 2, I am cautious and flavor it gingerly so it doesn’t get soapy. You determine how strong or weak you want it to be depending on your personal taste.

For the pots of heaven:
1 vanilla bean split
1 3/4 cup half & half
5 large egg yolks
2 Tbs granulated sugar(I used vanilla sugar)
1/8 teaspoon table salt
1 tsp vanilla paste
2-4 drops Rose Water
2 oz white chocolate chopped
 

To make the pots:

1.Measure the half and half in a 2-cup glass measure.

2. Position the vanilla bean on a cutting board and, using the tip of a sharp knife, split the bean lengthwise down the middle. Slide the edge of the knife down the cut side of each piece of the bean to release the seeds. Add the seeds and vanilla bean pieces to the half & half. Heat the mixture in the microwave until very hot, 2 to 3 minutes. Let steep for up to 2 hours to intensify the vanilla flavor.

3. Position the oven rack on the middle rung. Heat the oven to 325°F. Arrange four 6-ounce ramekins in a baking pan with 2-inch high sides. I use my 8-inch square baking pan.

4. In a small saucepan, whisk the yolks, sugar and salt until well blended.(Don’t let them sit or the eggs will begin to break down.)  Uncover the half & half and, whisking, slowly pour the half and half (with the vanilla bean pieces) into the yolk mixture. Whisk until well blended. Cook over medium-low heat, stirring constantly with a spoon or heat-proof spatula, until thickened and coats the back of a spoon or spatula (170-172°F on an instant read or candy thermometer), about 4 to 5 minutes. Place white chocolate in the 2 cup measuring cup, pour hot custard over white chocolate, let sit for approximately 2 minutes or until chocolate is melted and very smooth.

5. Fish out the vanilla bean and scrape any custard from the pod back into the custard. Stir in vanilla paste and rosewater stir to combine. You can pour into a sieve if you like to remove any errant pieces and  ensure that it’s totally smooth (I recommend you do). Pour the custard into the ramekins  Carefully fill the baking pan with hot tap water to come halfway up the sides of the ramekins and cover the pan loosely with foil.

6. Bake until the pot de crèmes wiggle like jello when nudged, 35 to 45 minutes depending on thickness of the ramekin walls. Transfer the baking pan to a rack let cool completely. Remove ramekins from baking pan and cover with plastic wrap and refrigerate at least 4 hours or up to 2 days before serving.

 
Raspberry Whipped Cream
 
1/2 cup heavy whipping cream very cold
1/4 cup fresh raspberries
1-2 tbs powdered sugar
1/2 tsp vanilla extract
 
In cold bowl with cold whisk or beaters whip the cream  and sugar until it becomes thick and billowy, fold in crushed raspberries. Place a dollop on each pot de creme. If using frozen raspberries drain well before adding to the whipped cream.
Yum

Yum

Pasta Piselli

Pasta Piselli

Pasta Piselli

I first tasted this when I lived in Naples Italy, it was served as a first course at a friends house where I went for lunch. Lunch in Italy lasted 2 or 3 hours and was the main meal of the day. There were several courses and it was eaten leisurely over the space of about 2 hours. Very different from the quickie lunches we have here in the US.  I watched my friends Grandmother make this soup and was taken first by it’s simplicity, only a few ingredients but there was something about it that was so warm and comforting and delicious. My recipe is basically the same as what I observed the only thing that I do differently is that I add a pinch of lemon zest, it brightens the flavors and adds so much to the dish IMHO. I like to use fresh pasta but you can use dried it’s perfectly fine and works just as well. Feel free to use whatever type of pasta you like, for this I like long pasta, linguine is my favorite. You can also feel free to use parmigiano instead of romano if you like or mix them. It’s all good!!

Serves 2-4 depending on serving size

32 oz chicken broth or stock

1 cup fresh or frozen peas

1/2 pound fresh or dried pasta

1 large egg at room temperature beaten

1/2 cup grated pecorino romano cheese

salt and pepper to taste

Pinch of lemon zest (Optional)

Bring your broth or stock to a boil in a large saucepan, add the peas and cook for 3 minutes, add the pasta (If using fresh it only takes about 3 minutes to cook, dried takes longer 8 minutes approximately) NOTE: If using dried pasta it takes much longer to cook and you don’t want to over cook the peas. Dried pasta depending on the type can take 8-10 minutes so add the peas the last 5 minutes of cooking.

Beat the egg and add the grated cheese to the egg, combine. Remove pot from the heat and pour the egg in slowly stirring as you add. Add salt and pepper if you like, I like to add a pinch of lemon zest also, its optional. Serve with more cheese grated on top.