Skip to content

Posts from the ‘Vegetables’ Category

Flank Steak With Chimichurri

IMG_0353

These last few weeks have been really kind of crazy busy. With the Continuing Ed classes I had to take, my work schedule and community work, I barely had time to breathe. With all that I discovered I am not great at multi tasking, that I am the type that does one thing at a time and when there is too much to do instead of going with the flow and tackling the multitude of tasks I become flustered and end up not doing anything well. During all this hoopla I felt bad about not blogging and made a cake which was a HUGE flop, so bad it ended up in the trash. At that point I decided to concentrate on my courses and I neglected not just my blog but all of yours as well and I am sorry about that. I had to focus and thankfully it paid off I finished the course and some of the planning for a big community meeting, as well as scheduling a block association meeting (another group I neglected). I feel like I am getting back on track, Percy is a dream dog, so well behaved and such a sweetheart, because he is so easy going it allows me time to do the things I need to do.

IMG_0323

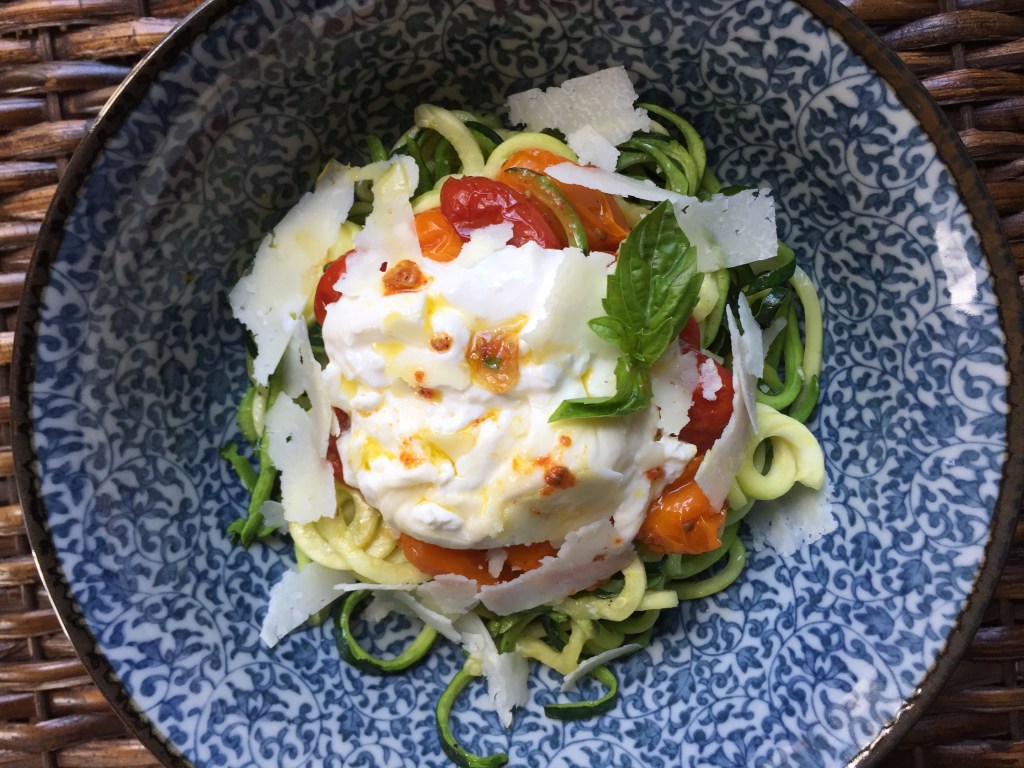
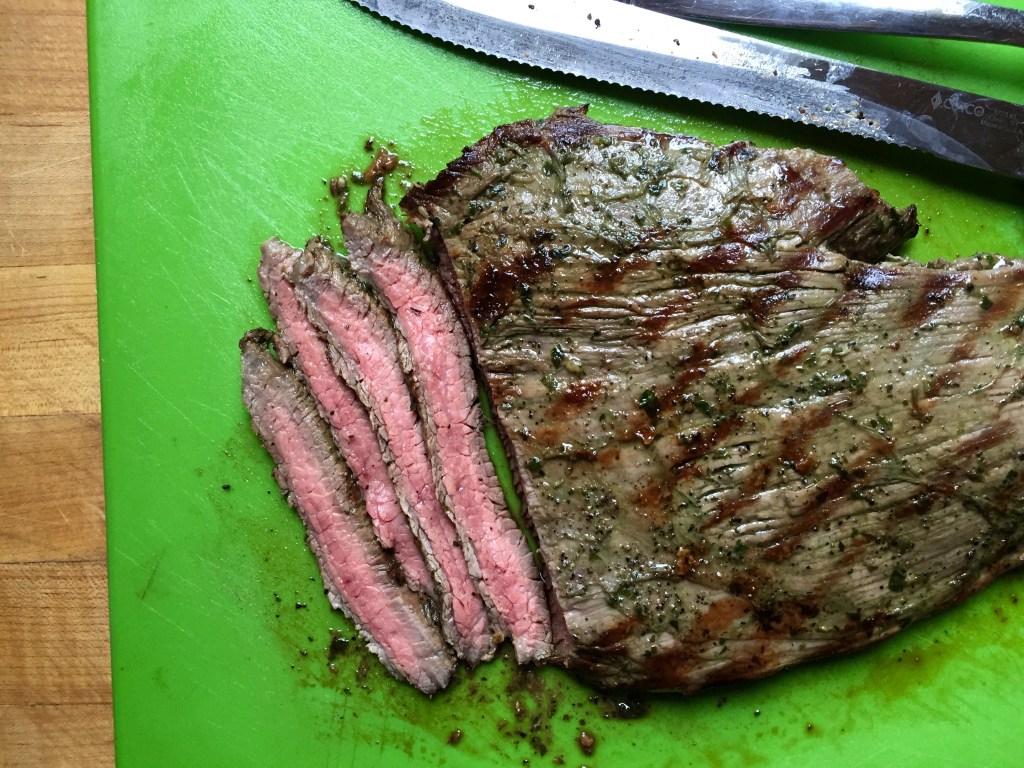
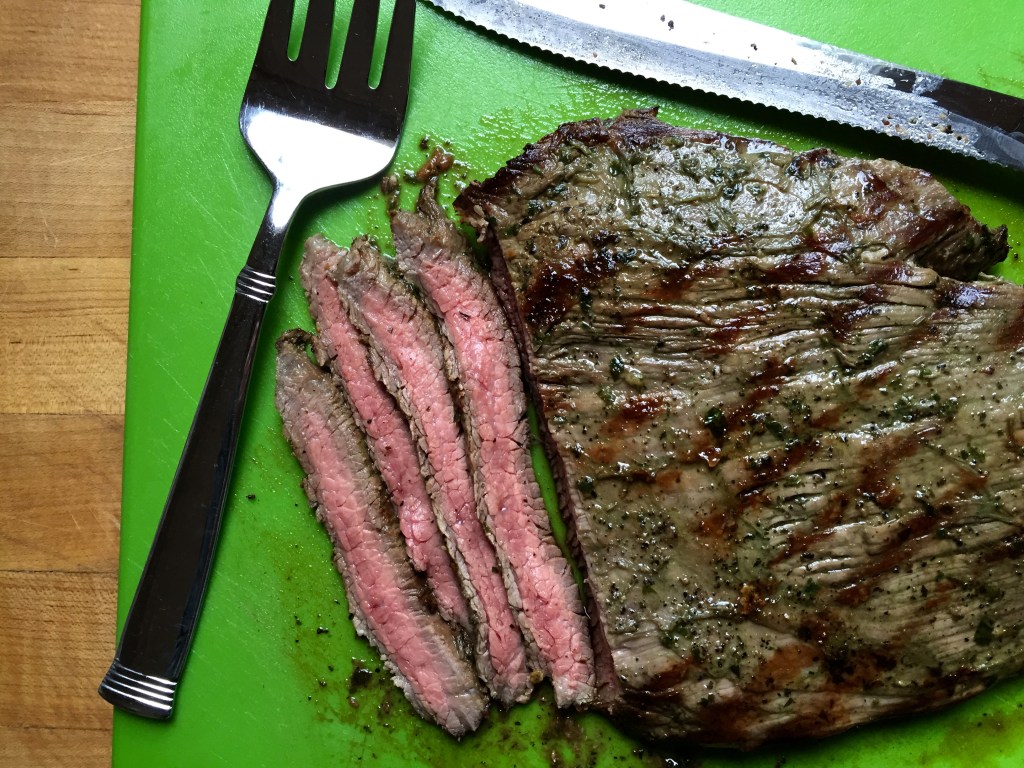
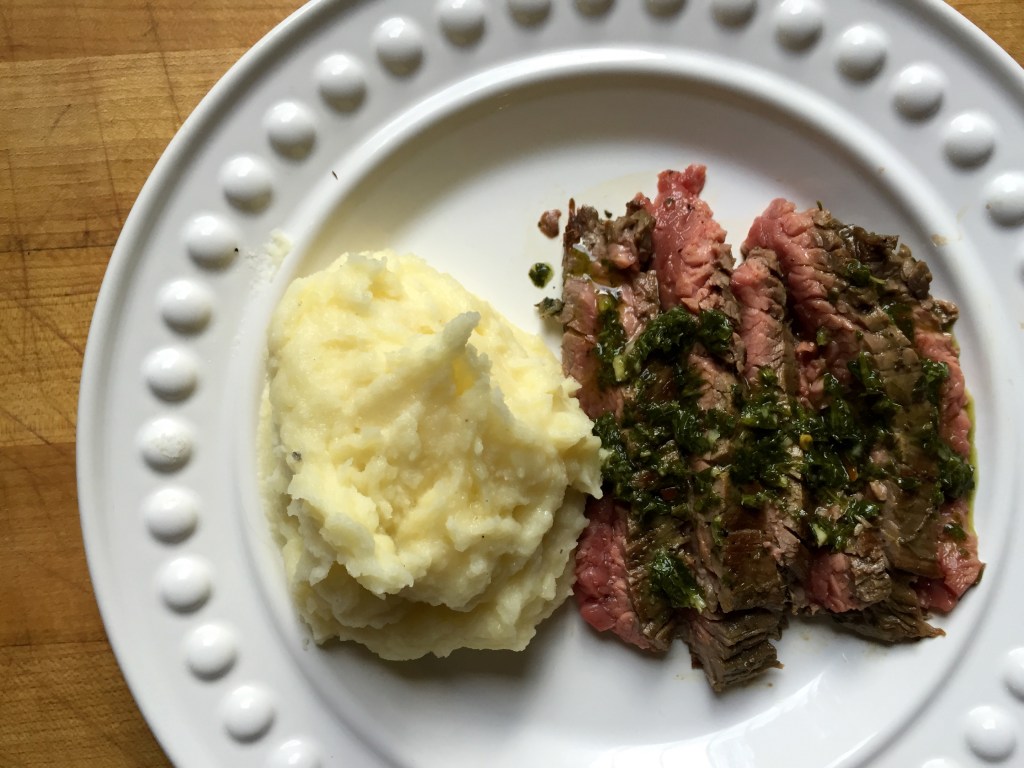
I don’t eat a lot of meat, I am not vegetarian but my choice of food for the most part is meatless, however when I want meat this is one of my favorites. The chimichurri is taken from a recipe I developed for Food52 back when I first joined their site. It was my first contest win and this recipe was added to their second cookbook. I made a sandwich using thick cut brioche buttered and grilled, marinated flank steak, tomato, mayo mixed with chimichurri. It’s a really good sandwich, big and juicy and thick, my Flank Steak On Texas Toast With Chimichurri was what I wanted but I did not want the calories/carbs from that thick bread so I just made the steak marinated in chimichurri and served with mashed potatoes and salad.

I like to let the steak rest in the marinade overnight, the flavor is pretty incredible when it sits that long in the chimichurri. My steak was uneven in thickness, thin in some parts and quite thick in others. I let it cook almost 5 minutes on each side. The thickest part was a nice medium rare.

IMG_0327

The chimichurri and flank steak:
1 1 1/2 to 2-pound flank steak
1 cup flat leaf parsley cleaned and large stems removed, finely chopped (by hand or use food processor)
1/2 cup baby arugula, finely chopped (by hand or use food processor)
2 cloves garlic, minced (you can add to parsley and arugula in food processor)
1/4 teaspoon dried oregano
1/4 teaspoon crushed red pepper flakes
1/2 cup + 2 tablespoons olive oil
2 tablespoons red wine vinegar
salt and pepper to taste
For chimichurri, place the parsley, arugula, garlic, oregano, red pepper flakes, olive oil and red wine vinegar in the bowl of the food processor, pulse until everything is chopped and somewhat homogenous, when done scrape into a bowl.  Cover both sides of the steak with some of the chimichurri, put in ziplock bag and refrigerate for one or two hours or overnight. Cover and refrigerate the rest of the chimichurri.

Remove steak from refrigerator approximately 30-45 minutes before you are going to cook it. Scrape off some of the chimichurri, salt the steak and let rest. To sear the steak: First with a paper towel pat the steak to remove any excess moisture. In a very hot fry pan lay steak, let it sear without disturbing it. Cook approximately 3-5 minutes on each side for a medium rare steak. (You will have to judge exactly how long to sear based on the thickness of the steak.) Remove from pan, lay on cutting board, pepper the steak now, let rest 5-10 minutes.

IMG_0361

Mashed Potatoes

4 large yukon gold potatoes peeled and cut into thick slices

sour cream- full fat (approximately 1/3-1/2 cup)

Butter (approximately 4 tbs)

Snipped chives to garnish optional

salt and pepper

Place potato slices in cold salted water and bring a boil. Continue to boil until the potatoes are fork tender. You can mash however your preferred method is. I use a food mill scooping out the cooked potatoes and grinding in the food mill using the finest disc. I don’t like lumps unless I choose a rough mash. Add the butter first to the potatoes stir to make sure butter is melted, now add the sour cream. Season with salt and pepper. I keep the potatoes in a warm oven covered with foil until ready to serve.

Spoon some of the chimichurri that you didn’t used for the marinade onto the steak and enjoy!!


A #Not Recipe With Zoodles And The Real Deal At Food52 Pasta Night

Zoodles

Zoodles

This a #not recipe. I’m having fun posting on Food52’s new app and decided to share this, it’s really more of an idea than a recipe I guess you could say.

It started with zoodles, you know zucchini noodles, some oven roasted tomatoes, burrata and shaved parmigiana. Simple right?

Heat some olive oil in a skillet, add some garlic sliced thinly and cook until garlic is softened but not brown. Add the zoodles, season with salt and pepper and may be a little crushed red pepper and toss them around in the olive oil and garlic until the zoodles are warmed, I let them cook about 5 minutes. Remove and place in your bowl or on your plate.

If your burrata is not room temperature put in the microwave for about 20 seconds. In the same pan heat your tomatoes if they have been refrigerated or if you made the tomatoes and they are still warm just spoon on top of the zoodles. Take some of the lovely burrata and place on top of the tomatoes,  spoon some of the tomato juices that are mixed with olive oil on top of the burrata. Shave some parmigiana or romano on top and enjoy.

Make sure each layer is seasoned with salt and pepper.

This dish is low carb, delicious and nutritious and also really quick and easy to put together.

Pasta Night

Pasta Night

Last night I went to the Food52 HQ in Chelsea to enjoy an evening of great food and company. First of all the offices that house Food52 are incredible, light filled, lofty and beautiful. The space is designed so well, it works beautifully and gives the feeling of home rather than office. I could not get any photo’s of the completed pasta dishes for ambiance the light was very dim and it just didn’t work with my iphone. The tables were set up communal style, the dishes and flatware were exactly what you will find in the food52 shop, beautiful. Their kitchen is a dream, so beautiful and practical at the same time.

Filming for snap chat

Filming for snap chat

Menu, drool worthy food

Menu, drool worthy food

Gorgeous kitchen

Gorgeous kitchen

Food and drink

Food and drink

IMG_2751 IMG_2752

My fizzy aperol cocktail

I love everything but for me the star of the show was dessert, so simple but the combination was amazing. Olive oil gelato, crumbled biscotti, beautiful sliced oranges all of this drizzled with good olive oil and chiffonade of basil. Profoundly delicious. I begged for the gelato recipe and Amanda said it is a community recipe that will be in the new Ice Cream cookbook. Really it’s the best olive oil gelato I have ever had.

IMG_2781


Guest Post- Falafel By Elaine From Foodbod

Beautiful Elaine and her sweet Bob

I love this photo of beautiful Elaine and her sweet Bob

I feel so very lucky to know so many lovely and talented people. When I think about some of the exceptional cooks/bloggers that have agreed to do guest posts here I am honored and so very happy to present them to all of you that stop by for a read. This blogger/cook and amazingly talented woman is one of my favorite people, she can make a die hard vegetable hater a veggie lover. Elaine’s gorgeous blog Foodbod is one that I have followed for a few years now, I love her recipes like this Middle Eastern Aubergine or her wonderful sourdough bread.  She inspires with her creativty, amazes with her talent and I like to call her the vegetable whisperer, she can coax incredible flavor from the most humble of vegetables by adding a little of this and that and when she pulls that tray out of the oven you know the master has done her magic I know most of you know her and if you don’t please visit her blog and read about Elaine and how her mission to eat healthful and delicious food came about, you will love it as much as I do, I guarantee it. Take it away Elaine…..

What can I say about the lovely Suzanne that hasn’t already been said by her previous guest posters?? Nothing really, they’ve said it all so beautifully, I’ll just be repeating things..but hey, who cares?!

Suzanne is such a constant, supportive and complimentary food blogger; she always has time to visit and comment on people’s posts, and is always positive and interested in what people have cooked, asking questions, giving suggestions and being a lovely friend. And Suzanne is such a gifted cook that I always feel honoured when she likes my food, so I was happily surprised, and honoured, when she asked me if I would like to put together a guest post for her…I hope she likes it, and that her readers do too 🙂

The fact that we share a love of dogs only makes me like her more xx

I wanted to push myself and create something new for Suzanne so I bring you:

the joy of a homemade falafel mix..

img_1534

Falafels are a middle eastern ‘pattie’, typically made with dried soaked chickpeas and they tend to be deep fried; they are very much middle eastern street food. I love falafels and, in particular, I love the flavours in the mix of ingredients and like applying it to other dishes. On this occasion I decided to experiment with fava beans, which are dried broad beans, in place of dried chickpeas – whichever you choose, do not use the cooked or canned versions; the success of falafels comes from using dried & soaked pulses, that all adds to their crunch. I have also oven baked my falafels which I think works well, but that’s not all, read on…

The mix:

Ingredients

250g dried split fava beans, placed in a large bowl of water and soaked overnight

1 medium red onion, peeled and roughly chopped

2-3 garlic cloves, peeled

1 bunch flat leaf parsley

1 tsp ground coriander

1 tsp ground cumin

1/4 cayenne pepper (optional)

Juice of 1 lemon

Salt to taste

Flour of your choice as needed

Method

Wash and drain the fava beans

Put everything EXCEPT the flour in a blender and chop to a chunky crumb

At this point I stored the mixture in a wrapped bowl in the fridge and let the flavours develop, then started to make things with it over the next few days. You could use it immediately depending on your plans.

My first use of the mixture creates a lovely brunch, lunch or dinner..a falafel crunch with spinach and eggs..

img_1464

Put about a quarter of the falafel mixture in a pan with melted coconut oil, over a medium heat. As you cook it, turn it all over every so often, and it becomes lovely and crunchy and browned.

Once cooked, add a handful of baby spinach leaves, and once that is cooked without becoming mushy, make some spaces in the mix and cook eggs into the mix.

A sprinkle of grated cheese finishes it all off perfectly.. I ate mine directly from the pan – saves on washing up!!

img_1461

For a other idea, how about a falafel quinoa goodness bowl?

First, spoon about a quarter of the falafel mixture again into a pan with olive oil over a medium heat.

img_1467

Start to cook it through then add several spoons of cooked quinoa.

img_1469

Cook the mixture until the fava beans are cooked and the mixture starts to crisp slightly.

This creates a lovely dish of tasty goodness on its own, perfect for me for lunch with some homemade dips.. …

img_1473 img_1476 img_1478

or you could use it as a side dish or in place of something like rice. Or again add some eggs to the dish, or your choice of meat or fish.

And finally..the actual falafels..

img_1537

These falafels are oven baked; I’ve never deep fried my falafels so I can’t tell you how well it does or doesn’t work, but I can tell you that they are very good when baked..

A quarter of the mixture formed 6 falafels

Add 1-2 tablespoons of flour (I used spelt flour but any all purpose plain flour will do) and bring the mixture together with your hands, it will create a ‘dough’

I use a falafel press to create my patties but you could easily split the mixture into 6 and create balls then flatten them to discs

Brush olive oil on both sides and place on parchment paper on baking tray

Bake at 200C for 10 minutes then turn them all over and bake for another 10 minutes

img_1547

They come out lovely and crunchy 🙂

I enjoyed mine wrapped in lettuce leaves with tahini sauce and homous.

img_1544-1

In the Middle East falafels would typically be served in flat bread wraps with salad and tahini sauce so the lettuce formed my ‘bread’.

I hope you like my falafels and other ideas for the mix. I think it could also be utilised as a ‘crumble’ topping over a lovely dish, or as a crumb on a piece of fish or meat. The possibilities are endless!

Thank you again to Suzanne for inviting me to appear on her lovely blog, I hope you all enjoyed a bit of my world 🙂

Roasted Carrot, Golden Beet And Goat Cheese Tart With Dukkah


IMG_0984

Recently while browsing in the neighborhood bookstore I broke down and bought “Plenty More” a brilliant and beautiful cookbook which really is an homage to vegetables by the amazing Yotam Ottolenghi. Everything in the book looks wonderful and I want to make it but the recipe that stuck out is the roasted carrots. Now it’s odd that this recipe attracted me since I really dislike cooked or roasted carrots, I only eat them raw.  There is something about this simple dish that I find so appealing.  The carrots are glazed with honey, olive oil, crushed toasted coriander and cumin and salt and pepper. They are then roasted in a hot oven until tender. I had some golden beets that I needed to use so I peeled and quartered them, slathered them with the same glaze and roasted them as well. The carrots were quite delicate and slim so I started with the beets roasting for 15 minutes then placed the carrots on the same pan and continued roasting for another 20 minutes.

The vegetables are wonderful on their own but I decided to make a savory tart filled with goat cheese and topped with the roasted vegetables. To add a little crunch and make the tart more interesting I made dukkah from nuts, seeds and spice and sprinkled on top. My photo’s are horrible so disregard,  it poured rain all day, and there was no sunlight. It makes it very difficult to get a decent photo in bad weather,

I used the rest of my saffron pastry dough that I had left over from the lamb pot pies.  I think it made the tart even more interesting . The carrots and beets are only slightly sweet from the honey and nicely spiced,  it goes perfectly with the tangy goat cheese and flaky pastry, the dukkah has the same spice as the carrots along with seeds and nuts. It’s a great combination, easy to put together and makes a lovely presentation. If you are a fan of roasted carrots, beets, goat cheese and Ottolenghi I think you will really enjoy this tart.

I am bringing this tart to Fiesta Friday #108. Angie is such a great hostess and this week the co hosts are me, yep I am co hosting and the lovely Zeba@Food For The Soul

Join in, you are all invited, bring something delicious, see you at the party!!

Roasted Carrot, Golden Beet, Goat Cheese Tart With Dukkah

Makes one 9 inch rectangular or round tart

Roasted Carrots and beets

8 carrots peeled and cleaned and left whole (I used rainbow)

3 small golden beets peeled, cleaned and quartered

3 tbs honey

2 tbs olive oil

2 tsp toasted coriander seeds crushed (use mortar and pestle)

2 tsp toasted cumin seeds crushed

1 tsp salt

several grinds of pepper

3 or 4 sprigs fresh thyme

Pre heat oven to 425 degree’s. Line baking sheet with parchment. Toss the vegetables in the glaze. Place the beets on the baking sheet first with a sprig or two of thyme and roast for 20 minutes. Remove from oven, turn the beets over place carrots and remaining thyme sprigs on the pan and roast for another 30 minutes gently turning them at least once while they are roasting. Set the vegetables aside.

Blind bake the pastry in a 400 degree oven weighted with pie weights until golden brown approximately 25-30 minutes.

Goat Cheese Filling

10.5 oz soft goat cheese softened and at room temperature

2-4 tbs whole fat buttermilk or créme fraîche

Mix the softened goat cheese with buttermilk or créme fraîche a tbs at a time until you reach a spreadable consistency. I used the full 4 tbs.

Dukkah

1 tbs coriander seeds

1 tbs cumin seeds

1 tbs white sesame seeds

1/4 cup toasted pistachio’s

sea salt and pepper to taste.

Toast the spices and  seeds, first the coriander and cummin and then the sesame. I like to use a fry pan. Toast until you can smell them shaking the pan frequently. I used toasted pistachio’s if yours are not toast in the oven for about 15 minutes.

Add the spices, seeds and nuts to a spice grinder and pulse until broken up but not completely pulverized, alternately you can use a mortar and pestle. You want it to have some texture. Season with salt and pepper.

IMG_1015

Serving the tart

Spread the goat cheese in the baked pie shell, arrange the vegetables on top, brush with some of the leftover glaze and sprinkle with dukkah.

IMG_1047

fiesta-friday-badge-button-i-was-featured1

A Trio Of Bruschetta

IMG_0171

I participate in a cooks collective headed up by Sonal from simplyvegetarian777, you all know Sonal. She will ask those that participate in this Facebook event to come up with a recipe and link it to the Facebook page. This time, since the Superbowl is around the corner she asked us to prepare super bowl appetizers or snacks. This was right up my alley since lately I have wanted food that is simple to make, takes very little time to cook, is snack size and delicious. I have made multiple loaves of this Rustic Italian Bread, I wrap it and freeze it and it is just as good as the day I bake it after some time in the oven to crisp and thaw.

There is really no recipe here, I am sure you have all had bruschetta, so simple to make and you can have an endless variety of toppings.. I made three different types all taking almost no time at all to prepare. They are wonderful as a starter or even a meal. You can make the tomatoes and squash and pesto ahead of time and refrigerate, I like to do that because putting these together will be quick and simple. There is really no recipe for this you can make them as you like and to suite your taste. The Super Bowl challenge must be vegetarian or vegan, this is a meat free zone. I love the idea of bruschetta with varied ingredients and flavors.

The Bruschetta

Ricotta, roasted tomato and basil

Parsley,basil,garlic and pine nut pesto with tomato, shaved parmigiana drizzled with balsamic vinegar

Oven roasted butternut sqush with sage and ricotta drizzled with honey..

You will need the following:

Start with a loaf of good rustic, peasant bread

Garlic 2 cloves – 1 for the pesto and the other to rub on the bread

olive oil

sea salt and pepper

Tomatoes – enough for oven roasted and sliced on top of the pesto

herbs, I like basil and parsley and dried sage for the squash

Ricotta

Cheese, romano and parmigiana

butternut squash cut into bite size pieces.

honey

pine nuts-toasted

Pre heat oven to 375. Toss the butternut squash with olive oil, sprinkle with dried sage and season with salt and pepper. Roast in the oven for 30 minutes. You can roast the tomatoes at the same time. Cut in half and drizzle with olive oil, season with salt and pepper takes approximately 30 minutes in the oven.

Make your pesto: In the food processor add a handful of Italian flat leaf parsley a couple of basil leaves, a clove of garlic, toasted pine nuts and grated cheese. Process until it’s chopped and then add 1/4 cup olive oil while the processor is running.

rustic italian bread

rustic italian bread

Slice your bread in approximately 1/2 inch thick slices diagonally.  For the ricotta and roasted tomato and pesto bruschetta rub the bread lightly with a clove of garlic, brush with olive oil, sprinkle with the tinest amount of salt and place in the broiler just until it starts to toast, don’t let it get dark. Spoon some ricotta on a slice, arrange some roasted tomato, sprinkle some grated cheese and return to the broiler for a minute or so, just to heat it, it will get a little browned on top. Before serving drizzle with olive oil and place some basil leaves on to garnish.

Spread the pesto on the bread, add some sliced tomato and shaved parmigiana, drizzle with olive oil and balsamic vinegar.

For the Butternut Squash bruschetta, spread some ricotta on a slice of bread, place some of the roasted squash on top and place in the oven on broil for about a minute just to heat it and get slightly browned. To serve drizzle with some honey and sprinkle a few flakes of sea salt and some ground pepper.

More Bruschetta ideas

More Bruschetta ideas


Chicken And Vegetable Roast For Fiesta Friday #104

Chicken and vegetables

Chicken and vegetables

This was a quick meal I made for yesterday’s dinner using what I had on hand, this really isn’t a recipe, you know how it is when you don’t really know what exactly to make and start putting things together.  I used boneless skinless chicken breasts, red micro potatoes, shallot, baby orange, red and yellow peppers, cherry tomatoes and garlic and before serving finished it with a parsley/garlic/lemon gremolata of sorts. Because I used boneless skinless breasts I made everything separately rather than roasting the vegetables in with the meat the entire time. You have to be careful how long you cook those breasts as they can dry out rather quickly and I wanted the vegetables to brown and caramelize. You can change the vegetables to suit your taste, add some spice if you like, harissa would be delicious, use chicken with skin and bones if you like. The whole meal took me about an hour and a half from start to finish and because I did most of it in the oven I didn’t have to babysit a pan on the stovetop.

For a change I thought I would bring a main course rather than dessert to Fiesta Friday. Join in, bring a dish and remember to link to Fiesta Friday, Angie’s old blog The Novice Gardener is no more it’s all in one place now. Angie and her lovely co hosts this week are  Mila @ milkandbun and Hilda @ Along The Grapevine

See you at the party!!!

Chicken and vegetable roast

Serves 3 or 4

3 boneless skinless chicken breasts

1 lemon

3 small cloves garlic smashed

12 micro potatoes cleaned and cut in half

6 baby peppers of assorted colors halved, seeds and membranes removed

12 cherry tomatoes cleaned and cut in half

1 shallot cut in half

1 cup chopped parsley

Pre heat the oven to 375 degree’s. Line a sheet pan with parchment paper and place the tomatoes, peppers and shallot, drizzle with olive oil, season with salt and pepper and roast in the oven for 30 minutes. Remove and set aside. Place another sheet of parchement and add the potatoes, drizzle with olive oil, season with salt and pepper and roast for 30 minutes. Set aside.

Heat oven to 425 degree’s. Rub the chicken with olive oil, season with salt and pepper and thyme. Heat cast iron skillet or heavy pan on stove top, get it good and hot. Add some olive oil and the chicken breasts, sear until lightly browned. Remove from heat source. Add the garlic cloves, squeeze half a lemon onto the chicken, cut the lemon half in two and throw in the pan. Roast the chicken for 15 minutes remove from the oven, and take the lemon quarters and garlic out of the pan, set the garlic aside and discard the lemon, (NOTE: If there is a lot of liquid or oil in the pan remove all but a few tablespoons before adding the vegetables) add the potatoes and other vegetables and arrange arround the chicken breasts. Return to the oven and roast for another 15 minutes, the internal temperature of the chicken breast should be 165 degree’s. While the chicken and vegetables are in the oven chop the parsley, cut the soft garlic and add, squeeze the juice of the remaining half lemon on and season with salt and pepper.

When ready to serve, garnish with the parsley mixture.

Guest Post-Curried Eggplant Steaks With Chickpeas From Simply Vegetarian777

A picture is worth a thousand words…. it really is and all you have to do is look at the pictures for these incredible recipes and words become insignificant. My very dear friend and fellow blogger Sonal from Simply Vegetarian777 graciously agreed to do a guest post and I was thrilled that she said yes. I admire her so much, her skill in cooking, writing and photographing and her kindness. I have mentioned before how she has sent me spices. I follow her on FacebookPinterest  Twitter @simplyveg777 and on Instagram ( simplyvegetarian777). I am constantly amazed at her talent. I also have to note that she does a series of posts with Diabetes friendly meals every Thursday, I have sent some to my Mom and it inspired her to change her diet. Sonal you are amazing thank you so much and take it away my dear….

Curried Eggplant Steaks with Chickpeas

image1

It’s a great honor for me to do a guest post for Suzanne. She is such a great support system to me and to many others who are connected to her via blog. Her approach and enthusiasm towards food is unmatchable.

I think I first met her through fiesta Friday, over an year ago, and since then I have been spoiled by her through her ever encouraging comments and constant presence. Thank you Suzanne for being there. I really appreciate it :).

image3

I was very confused as to what to bring for a guest post for her blog. I wanted to create a dish which was Indian origin but at the same time, something which has an international appeal and an easy to implement recipe.

Curried Eggplant Steaks with Chickpeas

Curried Eggplants

image4

Kitchen Equipments Required

A non stick or hard anodized pan, chopping board, knife, flat spatula, small bowl

Ingredients

Eggplant – 1 large
Oil – 1 tbsp
Turmeric – 2 fat pinches
Red chili powder – 2 fat pinches
Cumin powder – 2 fat pinches
Dry mint – 2 fat pinches (optional)
Salt – 2 fat pinches

Method

1. Mix turmeric, red chili powder and salt together in a small bowl.
2. Wash and cut the eggplant in 4-5 thick and long slices.
3. Sprinkle and rub the spice mixture on both sides of the eggplant slices.
4. Heat oil in the pan. Place the slices in the hot oil. Reduce the flame to medium. Cook from both the sides for approximately 2&1/2 to 3 minutes each till tender and slightly crispy.
5. The Curried Eggplant Steaks are ready.

image5

Serve these with the Quick and Easy Chickpeas Curry.

Chickpeas Curry

image2

Kitchen Equipments Required
A sauce pan with lid, stirring spoon, chopping board, knife, blender.

Ingredients

Chickpeas, boiled – 1&1/2 cups. I used 1 can.
Onion – 2 tbsp, chopped
Tomato – 2 medium
Ginger – 1 small piece
Garlic – 1 big pod
Oil – 1 tsp
Coriander powder – 1/2 tbsp
Turmeric powder – 1/4 tsp
Red chili powder – 1/8 tsp
Cumin powder – 1/2 tsp
Garam Masala – 1/2 tsp
Salt to taste
Cilantro leaves for garnish
Water – 1 cup

Method

1. Add tomato, onion, ginger and garlic to the blender. Purée it fine.
2. Heat oil in the pan. Add the purée and all the spices to the pan. Reduce the flame to the medium low.
3. Cover with lid and let the purée cook till all the water is evaporated and it thickens.
4. Add the boiled chickpeas to the sauce along with 1 cup of water. Mix them well. Cover with lid again and cook till it thickens again.
5. Garnish with cilantro leaves.

Serving Suggestion

1. Curried Eggplant Steaks can be served as is and taste great as snack.
2. The chickpeas curry can be served with rice or naan.
3. The eggplant steaks and chickpeas curry can be served as a complete meal along with some warm basmati rice.

I hope you had a good time reading the recipe. I had a great time creating it for all of you :).

Cheers,
Sonal

Recipe Redux Bread From The Solitary Cook

IMG_8955

Next Week it will be 4 years since I started the blog and I want to feature just a few recipes from my first week of blogging,  this recipe was posted on January 22 of 2012,  Rustic Italian Bread, the recipe comes from my friend Cynthia whose lovely blog The Solitary Cook has been around about as long as mine, we have known each other longer through Food52 which is where we met. I have linked the recipe and did not copy it into this post, Cynthia is a teacher, a chef and a real artisan, her recipe explains everything involved in making a loaf of bread, it’s a tutorial so click on the link above to see the recipe on her site. Before Cynthia, making bread scared me. Her gentle and comprehensive recipes helped me overcome my fear of failure when it came to yeast breads. Note: Here is the link for the preferment which will need to made before you make the actual bread dough.

I love this bread, it’s simple to make and the result is a lovely loaf with crisp crust and soft pillowy inside. It’s delicious!!

One of my favorite ways to enjoy a slice of this crusty delicious bread is so simple. Good butter, watermelon radishes, sea salt and honey. I get most of my produce which is sourced locally from Farmigo, I have talked about them before, it’s an a la carte CSA, love it!! The radishes and butter are from local farms and the honey was a gift from a friend it is sourced in Manhattan, Hells Kitchen, there is actually a bee keeper in a community garden there. The honey is amazing.

Love local food

Love local food

IMG_9241

Or for breakfast, fried bread, lightly buttered pan fried in olive oil, oven roasted gold tomatoes and a medium soft egg. Quick and easy and hey who doesn’t love fried bread.

IMG_9291

Happy New Year, Some Favorites And 2015 in review

Taken from Pinterest

Taken from Pinterest

I wish each and everyone of you an amazing, healthy, happy, joyous and prosperous 2016. I want to thank you all for being such great friends, for leaving such uplifting and kind comments and for being my source of inspiration. Below is the report compiled by the WordPress helper monkey’s. I don’t really keep track of the stats, but do appreciate the work that WordPress puts into these reports, thank you to the good people at WordPress!! Both 2014 and 2015 were hard years for me, harder than I can even express. The start of a new year brings with it hope and we also reflect on the past year, the good and the bad, the sad and the happy, triumphs and failures. Life can sometimes be like a rollercoaster ride.

Going into my 4th year of blogging in January is quite momentous for me. I can’t believe I am still doing this,  have made such great friends and learned so much. Hope you all have a wonderful time on New Years Eve and joyously welcome 2016, peace, love and joy to all. Below are some photo’s I compliled with some of my favorite dishes both sweet and savory.

Savory favorites

Savory favorites

Baked, desserts and the epic biscuit!

Baked, desserts and the epic biscuit!


The WordPress.com stats helper monkeys prepared a 2015 annual report for this blog.

Here’s an excerpt:

The concert hall at the Sydney Opera House holds 2,700 people. This blog was viewed about 37,000 times in 2015. If it were a concert at Sydney Opera House, it would take about 14 sold-out performances for that many people to see it.

Click here to see the complete report.

Brussels Sprout And Bacon Frittata For Fiesta Friday #97

Frittata

Frittata

I bought the Huckleberry cookbook months ago and never got around to making anything from it, life got in the way and the book sat on my shelf with the other cookbooks I’ve meant to use. I do have a method to my madness I mark the recipes with a bookmark and place them on the top of my book case not in the shelves so I see them constantly and am reminded that this book has a recipe I need to make. Huckleberry has multiple book marks, the food looks gorgeous and sounds delicious and I am tempted to cook my way through the entire book but honestly don’t have time and I certainly can’t eat my way through the book. How many of you have cookbooks you bought (because you love them) but have not made anything from them? I would venture to guess at least of few of you fall into this category along with me.

IMG_7459

This recipe for a bacon and brussels sprout frittata immediately jumped out at me. I am a huge fan of eggs and frittata’s in general but adding the sprouts and bacon and cheese just made me happy.

I normally would not publish a recipe in a cookbook unless it has already been widely published online, thats the case with this recipe. It is wonderful, but then all the recipes in Huckleberry Cookbook are great, drool worthy, beautifully written and photographed.

I am bringing this delicious frittata to Fiesta Friday this week, Angie, get some rest you have been burning the candle at both ends, thank goodness she has some help this week with two amazing co hosts Johanne@French Gardener Dishes (who is co-hosting for the first time) and Liz@spades, spatulas & spoons. Thank you Ladies!!

Brussels sprouts and bacon frittata

From Huckleberry Cookbook, serves 6

Filling

8 slices thick bacon, chopped

1 tbs olive oil

1 tbs unsalted butter

1 onion chopped

1 tsp kosher salt

2 sprigs fresh thyme

2 cups brussels sprouts thinly sliced plus 1 cup leaves from the sprouts

1/2 tsp black pepper

Custard

10 eggs

2 tbs creme fraiche

2 tbs grated parmesan

1 tbs chopped fresh parsley

2 tbs unsalted butter

2 tbs grated gruyere

Pre heat oven to 475

In large saute pan over medium high heat saute the bacon in 2 tsp of olive oil and the butter until browned. Add the onions 1/2 tsp salt and the thyme and saute until soft, should take about 1o minutes. Add the sliced brussels sprouts and saute for another 5 minutes longer until soft. Transfer the vegetable mixgture to a bowl and set aside.

Toss the brussels sprout leaves in the remaining 1 tsp of olive oil, 1/2 tsp salt and pepper. Set aside.

In a mixing bowl whisk together the eggs. creme fruit, parmesan and parsley and set aside.

In a 10 inch cast iron or oven proof saute pan melt 2 tbs butter over medium high heat. Pour the custard into the pan and stir, lightly scrambling the eggs. Slowly add the vegetables to the custard and continue to scramble. When the eggs are about 30% set sprinkle the brussels sprout leaves and sprinkle the gruyere on top. Transfer to the oven for 8-10 minutes. If it is not browned on top place under the broiler for 2 minutes but watch it like a hawk.

Immediately transfer to plate or serving piece by running a spatula around the edges and underneath to free the frittata from the pan. Serve hot or at room temperature.

Mine did not brown on top for some reason, even under the broiler, probably too far from the heat source but it doesn’t matter, the frittata is perfect and delicious albeit a bit pale.

Delicious

Delicious

fiesta-friday-badge-button-i-was-featured1