Skip to content

Posts from the ‘Vegetables’ Category

Valentines Day – The Basics: First Course – Part 1 Leek And Potato Soup And Variations

Leek, potato and watercress soup

Leek, potato and watercress soup

With Valentines Day fast approaching I decided to  break the meal into separate posts,  3 recipes, first course, entree and dessert. Two of the recipes will be in line with my basics posts. The first is from Julia’s Kitchen Wisdom.

Julia Child calls this a primal soup, a basic soup that is uncomplicated and adapted into many variations. Leek and Potato soup is your most basic soup, it is elegant and delicious and wildly popular for many years. This recipe has withstood the test of time and has many variations. I am making the basic soup and adding watercress, this adds a little green, a peppery bite and if you are a fan of watercress you will love it. I made it exactly as written, you can add a little butter if you wish while pureeing. It’s delicious as is and is vegan friendly by simply omitting the sour cream or creme fraiche garnish.

The Basic Recipe for Leek and potato soup:

Makes 2 quarts or approximately 6 servings

3 cups sliced leeks, the white and tender green parts, cleaned thoroughly to remove any sand and grit.

3 cups peeled and roughly chopped “baking” potatoes (I used russet)

6 cups water

1 1/2 tsp salt

1/2 cup creme fraiche or sour cream

Bring all ingredients to a boil in a 3 quart saucepan. Cover and simmer 20-30 minutes or until vegetables are tender.  Adjust seasoning. Puree and serve with a dollop of the sour cream or creme fraiche.

Variations:

Onion and Potato – substitute onion for the leeks

Cream of leek and potato soup – After you puree whisk in 1/2 cup heavy cream

Watercress: Add a bunch of watercress during the last 5 minutes of simmering, Serve with a scattering of fresh watercress.

Cold Soup – Vichyssoise- puree any of the above, add 1/2 cup heavy cream and serve chilled. Top each bowl with minced fresh chives, parsley or watercress leaves.

Red Kuri And Butternut Squash Soup

Prepped squash

Prepped squash

I just love creamy squash soups, butternut is probably the most well known and it’s delicious. I found some red kuri squash and loved the way it looked, I have never had it before but after quickly googling on my i phone (I love that I can find info in a flash on my phone) I decided that I wanted to try it. Now I love making squash soup, but HATE cutting it, I don’t care how sharp your knife is it’s so hard to cut, serious tough skin. I trim the ends, cut in half and bake in the oven until it’s soft. I don’t have the strength or patience to peel squash.

Red Kuri Squash

Red Kuri Squash

Red Kuri squash is great, the flesh is sweet and when baked has a lovely soft consistency. It is not quite as dense as butternut squash, it’s closer to pumpkin.

The soup takes almost no time at all to prepare since the squash is already cooked. I don’t add spice only salt and pepper. It would be good with spice I am sure, it’s just that I am partial to it straight up with only aromatics (I use onion).

Serves 4-6 depending on Serving size

1 butternut squash cut in half, seeds removed

1 red kuri squash cut in half seeds removed

1 onion (I used yellow onion) diced

1 tbs brown sugar(optional)

2-3 cups broth (chicken or vegetable)

1/4 cup heavy cream or full fat coconut milk

2 tbs butter

splash of apple cider

salt and pepper to taste ( I used a blend of 5 peppers)

Heat oven to 375 place squash cut side down on baking sheet and bake until soft it takes approximately 45-60 minutes. Remove from oven, let cool a little and scoop out flesh into food processor or blender. Puree until very smooth and set aside.

In saucepan or soup pot add butter and melt on medium high, add the onion and saute until soft and translucent add the optional tbs of brown sugar and continue to saute for another minute or so. Add the broth or stock and simmer for approximately 20 minutes. Add the squash puree, splash of cider and salt and pepper and simmer for 10-15 minutes. Add the heavy cream and continue to simmer for 5 more minutes. Serve hot.

Soup and Salad

Soup and Salad

Loobiya Pollo

Loobiya Polo

Loobiya Polo

I love Persian/Iranian food, I used to make it all the time but have sadly fallen out of practice on many dishes that were staples in my kitchen repertoire. Loobiya (green bean) Pollo (rice) was one of them that I made frequently years ago, I actually forgot how to make it and didn’t have my original recipe, it was somehow lost. Thanks to great blogs like Fig and Quince and Fae’s Twist and Tango I have been able to piece together and actually remember many dishes and how I made them. It’s kind of like riding a bike, you never really forget, it is in the recesses of your mind. Azita from Fig and Quince gave me her recipe for Loobiya Pollo and after reading it, the memories started flooding back.

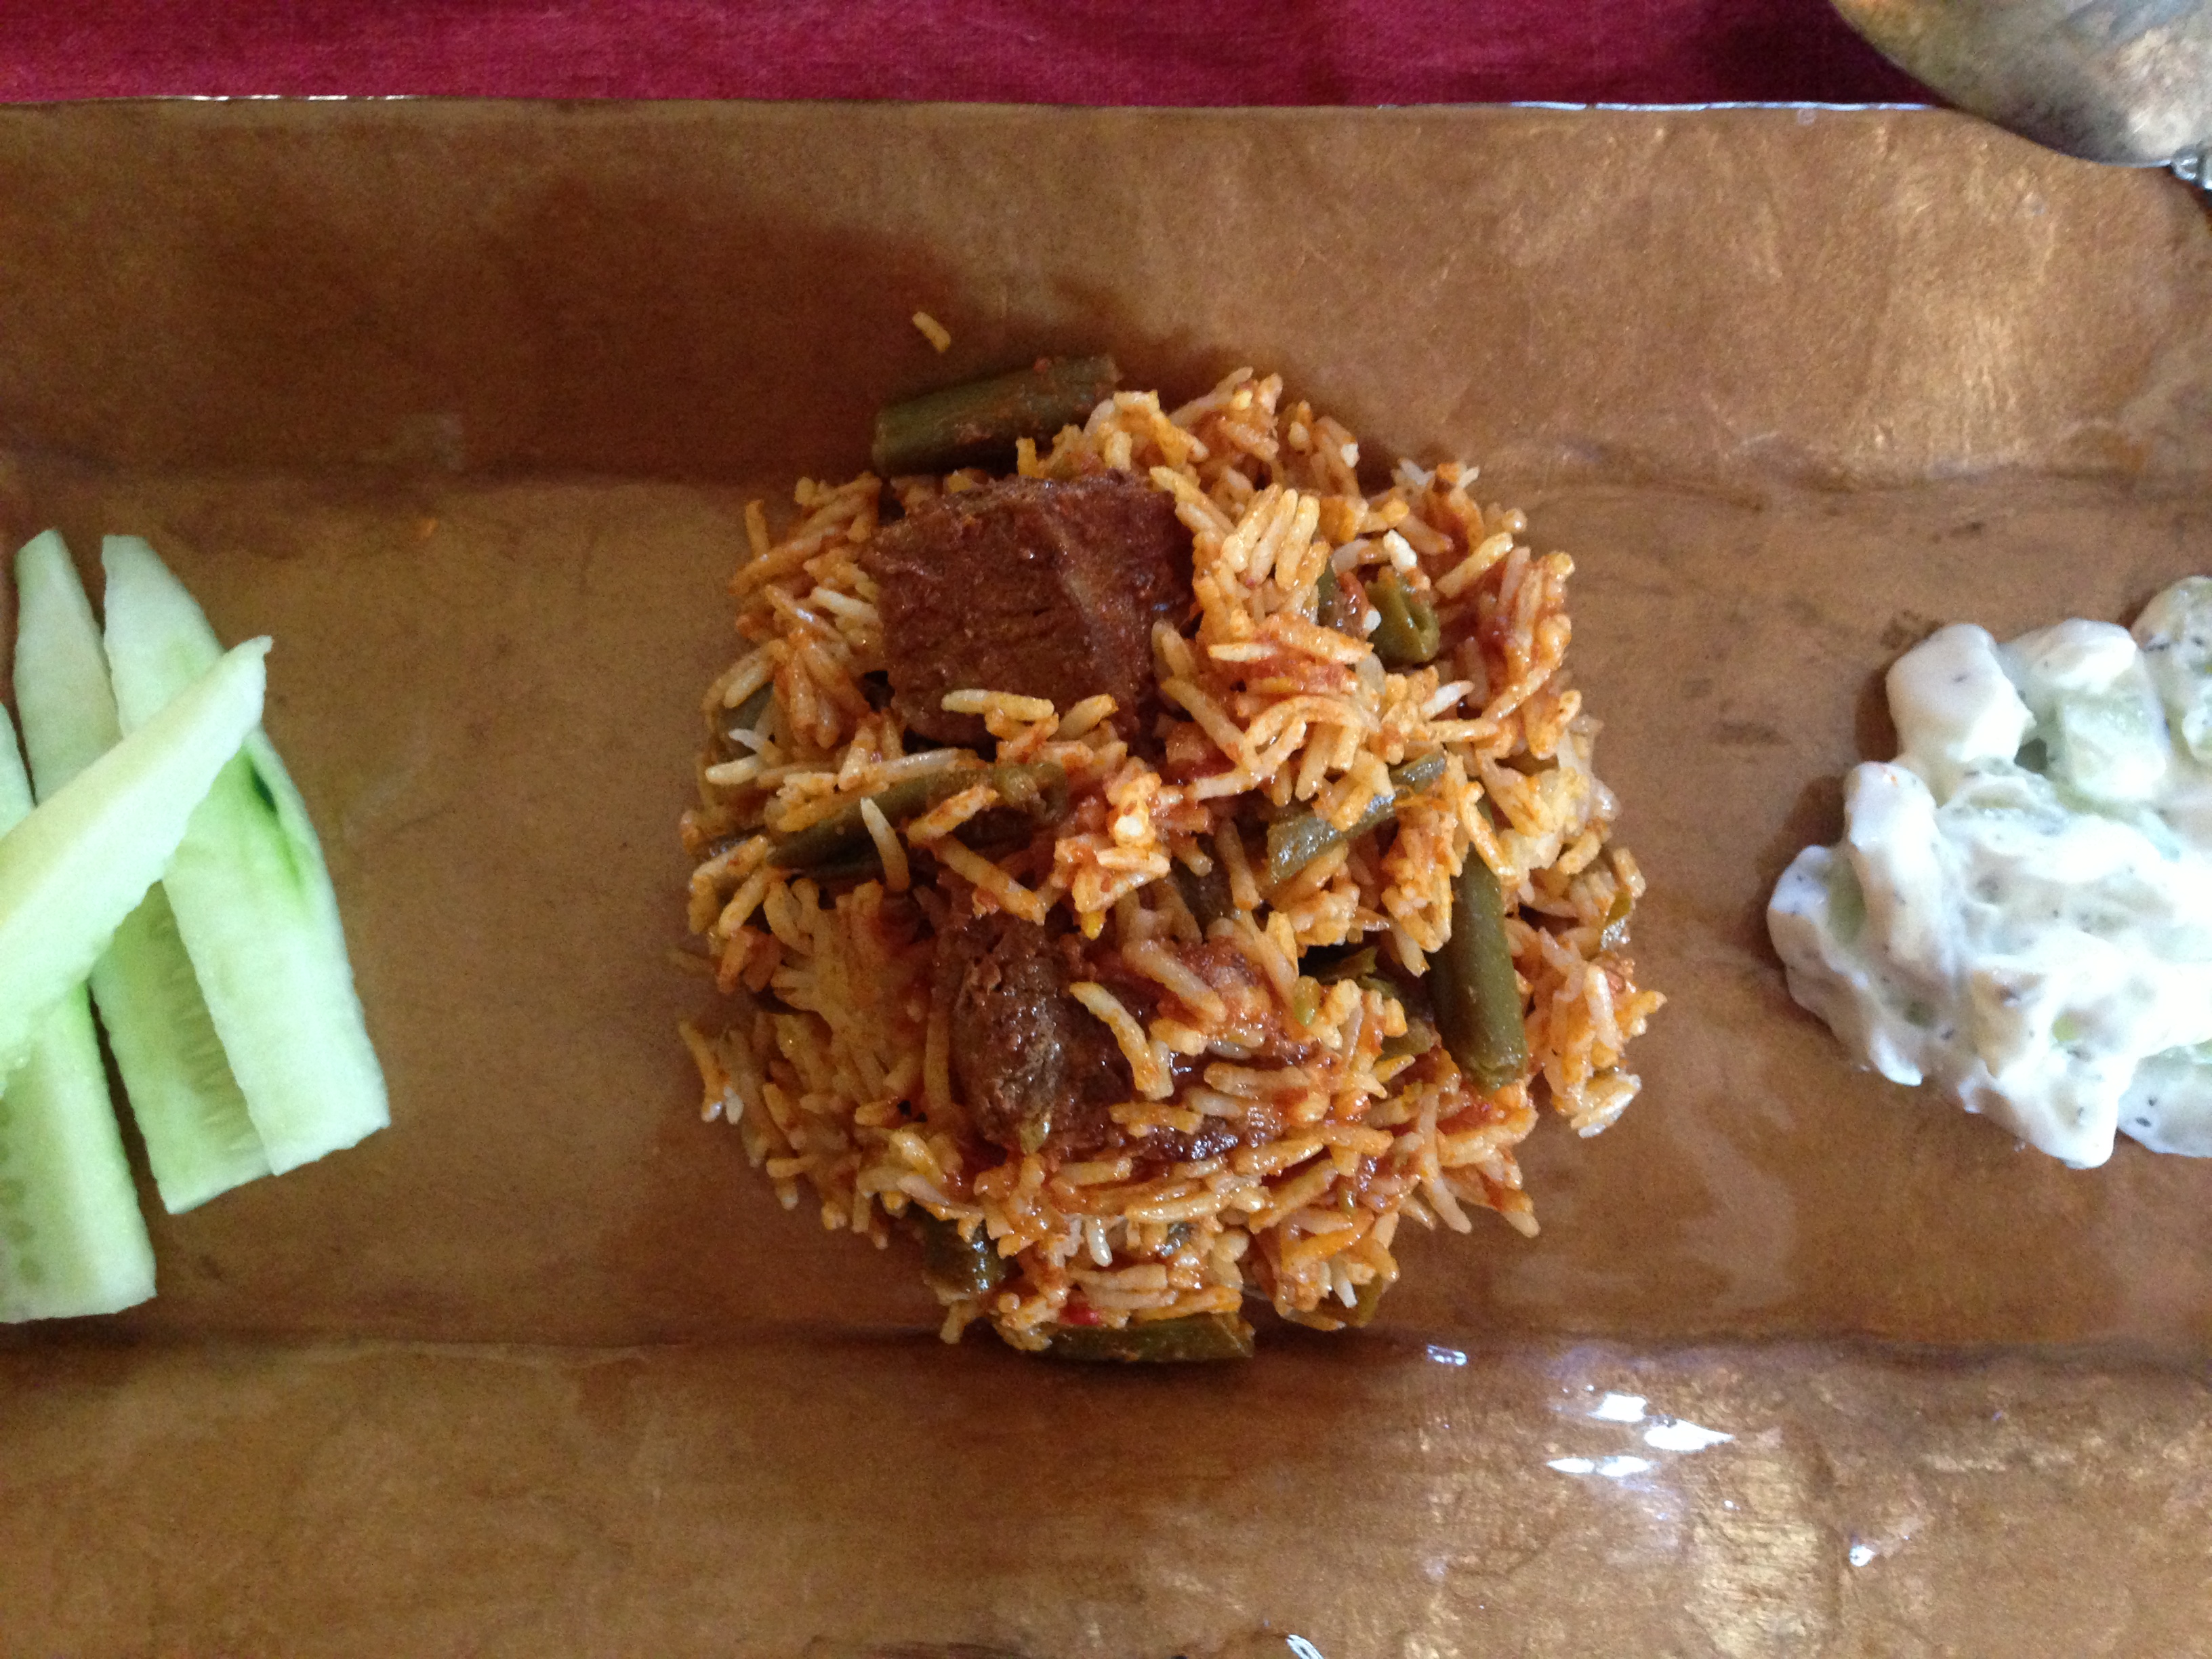
Loobiya Pollo is very simple, you make a stew using meat (beef or lamb or even chicken)  that is braised in a tomato based sauce spiced with turmeric, cinnamon and saffron, you add caramelized onions and green beans and let it cook together slowly. The stew is layered with basmati rice and steamed. It’s absolutely delicious. One of the best parts of the dish is the Tahdig, crunchy rice that forms at the bottom of the pot. The rice mixed with the rich tomato sauce is so wonderful.

I have to confess I don’t really follow a recipe exactly and don’t really measure when I make these dishes. I season to taste, eyeball consistency so results may vary. I will try my best to approximate the amounts for you though.  I like to serve this dish with crisp cucumber strips and plain yogurt mixed with dried mint, diced cucumber and a little lemon.

I always  make this with meat but it translates beautifully into a vegetarian or even vegan dish, simply omit the meat, you can add different vegetables and layer and steam with the rice.

Loobiya Pollo

Serves 4-6 depending on serving size

For the stew:

1.5 lb stew meat (lamb or beef)

1 yellow onion chopped (divided, reserve a small amount to saute with green beans)

approximately 4 oz tomato paste

1 (15 oz) can tomato sauce

2 whole fresh ripe tomatoes peeled and chopped

3/4 lb green beans, stem end removed, blanched and cut into bite size pieces

turmeric (approximately 1/2 tsp)

cinnamon (approximately 1/4 heaping tsp)

saffron (a pinch)

salt and pepper to taste

Rice

Approximately 2 cups basmati rice

oil for pot

pinch of saffron (in 2 tbs water)

1 tbs of butter (I like to use salted butter)

Heat a saute pan coated with oil (I used olive oil)  on med/high and add the onions, saute until soft and caramelized (takes 15-20 minutes) remove from pan and set aside. Add a little more oil and add the meat, sprinkle with salt, pepper and turmeric, sear the meat until browned, remove from pan and set aside. Add the tomato paste to the same pan, stir frequently and caramelize, add the onion and meat to the pan with the tomato paste, now add the tomato sauce and chopped fresh tomato, add the cinnamon and season with salt and pepper. Cover with lid slightly ajar and simmer on medium heat. It will take at least an hour and a half for the stew to cook and the meat to become tender. Check frequently you may need to add a little water if it looks like the stew has cooked down too much, stir occasionally. Taste as it cooks and adjust seasoning, I found that I needed to add a dash more cinnamon to get the flavor just right.

While this is cooking start preparing your rice. Rinse rice with cold water until the water comes out clear. Add the rice to a bowl, cover in cold water and add salt (approx 2 tsp) let rice sit in the salted water until you are ready to boil.

Heat saute pan with a little oil, add the reserved raw onions and saute until soft, add the green beans and a pinch of turmeric and a little salt and pepper and cook for approximately 2 minutes just until the green beans are lightly sauteed. Set aside.

When meat is tender but needs another 30 minutes or so add the green beans and finish cooking add a pinch of saffron, stir to combine.

Put large pot of water on to boil, add about a tbs of salt. When water is a full rolling boil, drain the rice that has been sitting in the water and add to the pot. Stir to separate each grain and let par cook, this takes about 10-12 minutes, the rice will be hard in the center of the grain. Drain into sieve and rinse with cool water. While rice is draining, put your pot back on the stove, dry it and add a little oil to the bottom of the pot, let it heat on med/high heat until good and hot. Add enough of the rice to cover the bottom of the pot about 1 inch thick, now add a thin layer of the stew spread evenly on the rice, now you will layer, add some rice topped with stew, you will end with plain rice, add 1 tbs butter and drizzle with the saffron water. Cover the pot with tea towel  or paper towel and place cover on pot so that it is a tight fit. Turn heat up to high for 5 minutes so steam will build up in the pot then lower to medium and let it steam undisturbed for 45-60 minutes depending on how much rice you have made. Don’t open it while it’s steaming but keep your nose at attention, if you smell it burning remove from heat immediately.

To remove from pot and serve:

I like to use a non stick pot to make my rice, the tahdig can stick to the bottom of the pot and having a non stick surface makes it easy to get out in one piece. When the rice is finished cooking put a couple of inches of cold water in your sink and place the pot in the water, let sit for about 30 seconds.

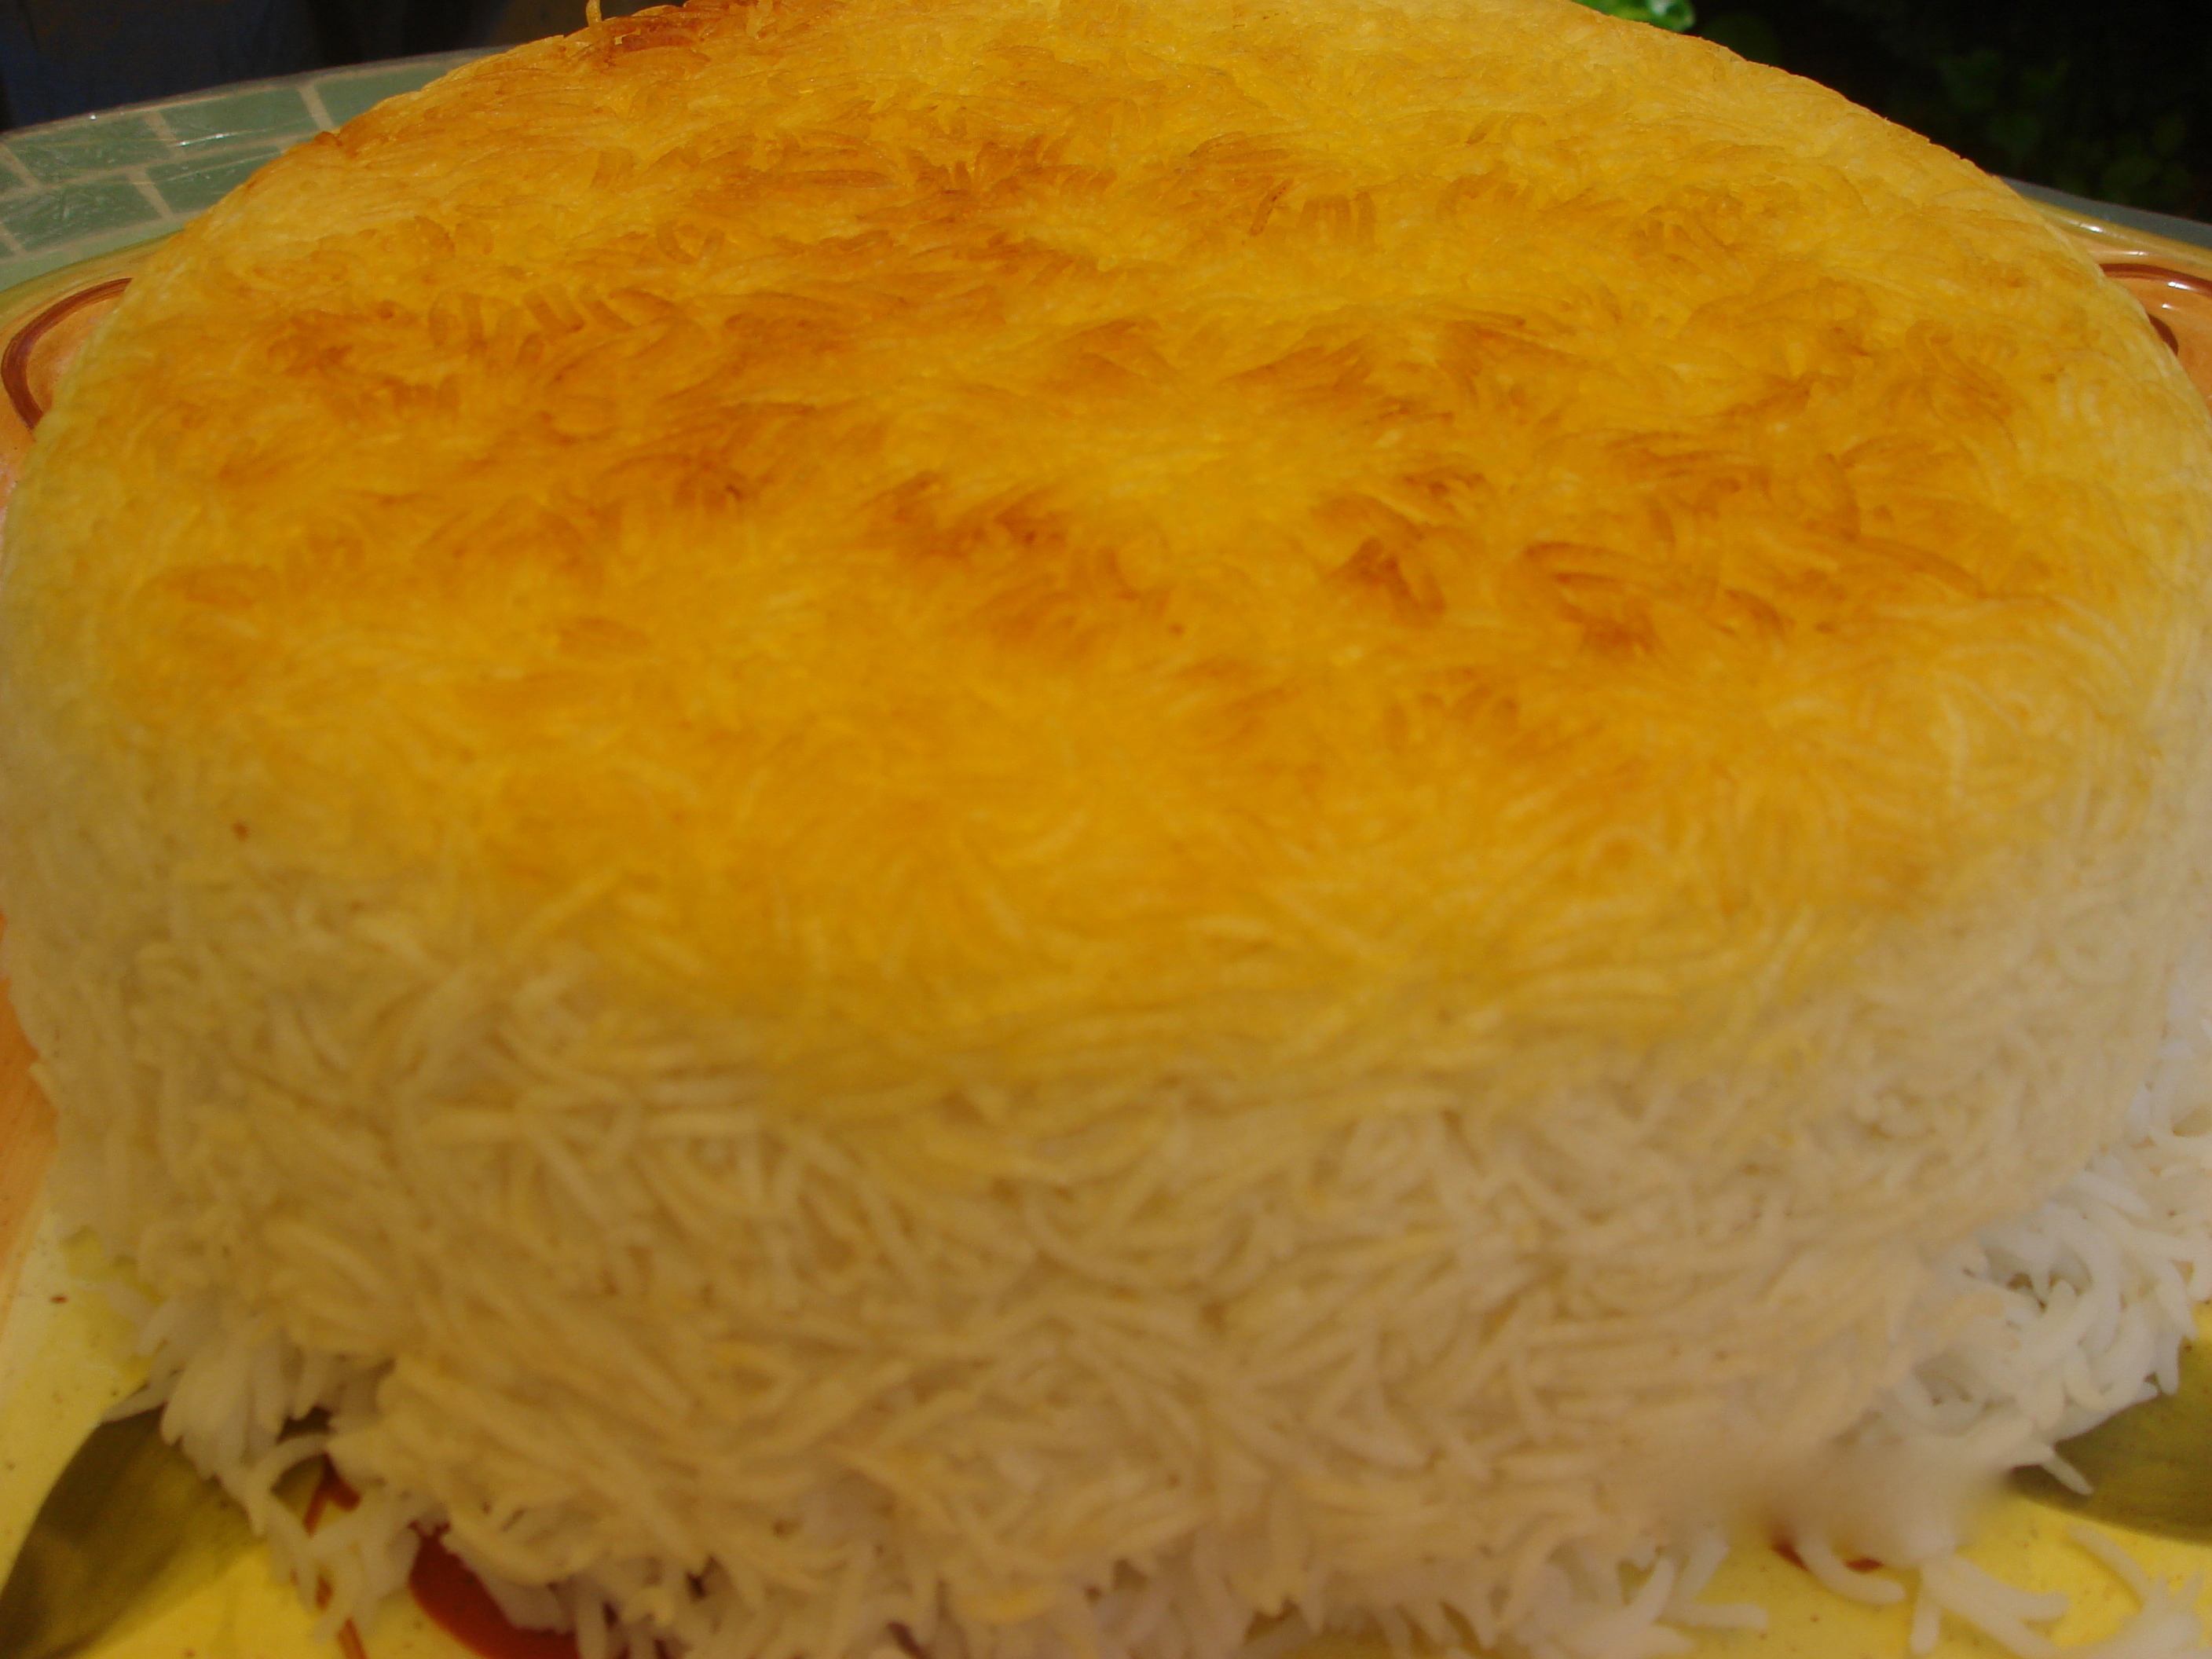
Place serving dish over the pot and invert. The rice should come out in one piece (looking like a cake). The tahdig (bottom of the pot) should be nicely browned and crisp) it’s so delicious and underneath is tender totally separate rice. Serve hot.

An example of how rice will look when it comes out of the pot, this is not the loobiya dish but a plain basmati rice with tahdig, I didn’t get a picture of the loobiya pollo.

Persian Rice with tahdig

Persian Rice with tahdig

Rigatoni With Roasted Mushrooms And Eggplant And Wine Pairing

Rigatoni with mushrooms and eggplant

Rigatoni with mushrooms and eggplant

So here is the dish I decided to make with those beautiful roasted mushrooms and eggplant from the last post. It’s insanely simple, takes only minutes and is very tasty. It looks pretty boring, shades of cream and brown (those beautiful purple eggplant turned a homely brown) but it’s far from boring in the taste department You don’t really need a recipe per se for this, make as much as you need for your meal.  I didn’t really  measure anything estimated the amounts, you can judge by eyeballing it, it will feel right.

Serves 2-4 depending on serving size

Ingredients:

Roasted eggplant, mushrooms, shallot and garlic

1/2 cup chopped flat leaf parsley (a nice handful)

1/4 cup good white wine or a nice glugg, preferably what you will drink with this dish

olive oil to coat pan

Rigatoni  (1/3-1/2lb)

Goat cheese and mascarpone (use equal amounts of each)

Parmigiano Reggiano grated

Instructions:

Bring a large pot of water to a boil, add a tbs of salt and when it’s a vigorous rolling boil add the rigatoni. Stir occasionally and let boil for approximately 10 minutes or follow instructions on the package.

While your rigatoni is boiling, heat a saute pan with a little olive oil on medium/high, add the mushrooms,eggplant, shallot and garlic (remove the sprigs of thyme first) and a splash of white wine (about 1/4 cup). Cook just long enough to heat the vegetables, with strainer or spyder add the rigatoni to the vegetables. toss to combine and cook for a minute or two adding a little of the pasta water if it’s too dry. Add the chopped parsley. I topped this with  grated parm and a heaping spoonful of goat cheese and mascarpone that I whipped I used equal amounts of goat cheese and mascarpone and simply beat with my electric mixer. This will also be used for dessert, refrigerate what remains.  Hey you can never get too much goat cheese and mascarpone, right?  Stay tuned for dessert.

Wine Pairing courtesy of Stefano Crosio

I asked Stefano from Flora’s Table  and Clicks And Corks  to lend his expertise and  to pair wine with this dish. Here are his recommendations, and I would advise to find these wines, Stefano knows whereof he speaks. His recommendations are always spot on:

Given the characteristics of the ingredients of your dish, a proper wine to pair with it would have good acidity, tannins (or fairly robust ABV), intensity of flavors, tastiness and medium body.  A not overly structured Barbera, such as Coppo, L’Avvocata, would be a good wine for your dish at a very interesting price point (~$15). Otherwise, another good option in white would be Donnafugata’s Chiaranda’ (a Sicilian Chardonnay that retails for about $35.

Roasted Chanterelle’s, Baby Eggplant And Shallots

Ready to Roast

Ready to Roast

The other night I went to visit a very good friend of mine, her little pug had just had surgery and I wanted to visit and see how she was doing. When you go to the hospital to visit a sick friend you usually bring flowers, for this sweet little pug I brought a piece of pork tenderloin, she was happy with that.

While visiting they asked me if I would like some mushrooms and eggplant, they are friends with a Long Island Farmer and were given a windfall of delicious fresh chanterelle mushrooms and baby purple eggplant. Of course I said YES thank you!!

The mushrooms are beautiful and fresh and the eggplant is tiny, a couple of bites and you are done with it. I decided to oven roast, we all know oven roasting adds so much flavor to just about anything. So quickly cleaned the mushrooms removed the stems (kept them for stock) and eggplant, cut the little eggplant in half lengthwise, tossed in some olive oil, sprinkled on sea salt and generously peppered, added garlic cloves, shallots and some thyme sprigs. Baked in a 400 degree oven for 20  minutes stirring occasionally, remove from oven, cover with foil turn off the oven and put them back in, let sit for 15 minutes,  et voila!

I already have an idea of how I will use these lovely roasted beauties. Stay tuned!!

Roasted

Roasted

Re-Purposing Leftovers-Salmon,Asparagus And Whole Wheat Pappardelle

A Bowl of pasta

bowl of pasta

I refuse to waste food and love re-purposing leftovers. It’s a challenge to try to come up with a creative and delicious dish that puts a fresh spin on your leftover food. I had a small piece of salmon and a few stalks of asparagus left over from dinner the other night, I also have some whole wheat pappardelle in the pantry that I bought (by accident) and need to start using (not a fan of whole wheat pasta). This dish came together in a flash and was really delicious, all I did was saute some shallot in a little olive oil, add a little white wine, then some heavy cream, a little dijon mustard, lemon zest, salt and pepper and reduced until it started to thicken. At the end I added the asparagus and salmon and the cooked pappardelle. This is not the type of dish that needs precise measuring, I basically ad libbed, a little of this and that until it came together. Use what you have, peas come to mind, chicken, or without any meat or fish. The pasta in the cream sauce with vegetables is wonderful on it’s own.

The amounts are approximate

Serves 1-2

1 lobe of a shallot chopped

Olive oil for pan

1/4 cup white wine

1/2 cup heavy cream

1/2 tsp lemon zest

salt and pepper to taste

1 small salmon fillet

4 stalks asparagus

Pappardelle (small handful)

Fill large pan with water add salt and bring to a rolling boil. Heat olive oil in pan, add the shallot and saute until translucent. Add the wine and reduce by half. Now add the cream, dijon,lemon zest, salt and pepper and cook until it’s reduced by half. It should be nicely thick. While the cream sauce is reducing add the pasta to the boiling water, now I used whole wheat pappardelle, it took a good 10 minutes for an al dente pasta.

When the cream sauce is reduced add the asparagus and salmon, toss in the pappardelle and gently stir until it is coated with the sauce. Serve immediately.

Happy Memorial Day- Grilled Short Rib Taco’s And A Heavenly Light Dessert

American Flag

American Flag

I want to acknowledge our heroes who have fought and died so that we can enjoy freedom. Memorial Day is the unofficial start of summer and a day when we gather to enjoy food, family and friends but it’s important that on this day we don’t forget those that served and are serving our great country in the armed forces. Lest we forget!

Memorial Day and our thoughts turn to grilling, its an American tradition. I decided to make something a little different than burgers and hot dogs, a little south of the border flavor peppered with a NYC flair. I love taco’s, they are easy to make and eat and you can add whatever fixings you like, tailoring to your taste. For these taco’s I made some beef short ribs slathered with the most delicious BBQ sauce made by my friend Bevi, I tested her recipe for A Cup Of Coffee BBQ Sauced Steak for Food52 and believe me this sauce is amazing, Now I usually braise short ribs in the oven or on the cooktop until they are fall off the bone tender, but because I wanted to uphold the american tradition of grilling on Memorial Day I did both. First I marinated the short ribs in the BBQ sauce for 2 hours, then I braised  them covered in the sauce and some water in the oven for 2 hours at 325 degrees, they should be fork tender but not falling off the bone, slathered more BBQ sauce on and finished them off on the grill. It may sound like a lot of work but it really wasn’t, the time in the oven was great because they could be left unattended and the grilling only took about 3 minutes to get a nice char. I then shredded the meat, grilled a flour tortilla and there it is, a short rib taco made with a wonderful spicy BBQ sauce.

I wanted something a little different to top the taco’s so I made a sweet corn salad using raw sweet corn, avocado,red onion and  cilantro or parsley and dressed simply with a buttermilk lime vinaigrette. The fresh crunchy salad on top of the rich tender shredded short ribs was really good! Add whatever fixings you want, queso fresco crumbled on top would be delicious, or eat the corn salad separately and top the meat with whatever you like.

I hope everyone has a wonderful day!

taco

taco

A Cup Of Coffee BBQ Sauced Steak

Makes enough sauce for 2 big steaks

  • 1 cup brewed coffee
  • 1 dried ancho chile, stem and seeds removed
  • 2 tablespoons brown sugar
  • 2 tablespoons tomato paste
  • 1 tablespoon Worcestershire sauce
  • 1/4 teaspoon kosher salt or sea salt
  • 2 tablespoons Meyer lemon juice (use a regular lemon if Meyers aren’t available)
  • 1/4 cup fresh orange juice
  • Dash cayenne pepper
  • Two 1 1/2-inch thick steaks, prime sirloin
  1. Place the ancho chile in the hot coffee and allow to steep for about 20 minutes. Add the rest of the sauce ingredients. Simmer on low heat for about 20 minutes. Turn off the heat and allow to cool slightly.
  2. Place all ingredients in a blender or food processor, and process until the ancho chile is pulverized and the sauce is a nice, thick texture.
  3. Return the sauce to the stovetop, and simmer for another 5 minutes. Turn off the heat and allow to cool slightly.
  4. Place the steaks in a large ziploc bag, and add about 1/2 cup of the sauce. Squish the steaks around so they are well covered by the sauce. Place in the refrigerator for at least a few hours, or longer if possible. Bring steaks to room temperature before grilling.
  5. Slather more sauce on both sides of the steaks. Place steaks on a hot grill, and grill to your liking. We turn the steaks over after about 4 to 5 minutes, first slathering sauce on the steak, to grill for a total of 10 minutes.
  6. NOTE: I used lime instead of the meyer lemon and a strong dark roast coffee

Corn Salad With Tangy Buttermilk Dressing

2 ears sweet corn cut off the cob

1/4 cup finely chopped red onion

1/2 ripe avocado chopped

2 tbs chopped cilantro or parsley

1/4 cup buttermilk

juice of 1 1/2 limes

zest of one lime

1/2 tsp dried mint

pinch of salt

generous grinding of black pepper

Mix the buttermilk, lime juice, zest, mint, salt and pepper in the bowl you will be using to serve the salad, stir to combine. Add the corn, onion, avocado, chopped cilantro or parley and toss so that it’s throughly mixed with the dressing. Refrigerate covered until ready to use.

Parfait

Parfait

I can’t forget about dessert, I have been on a diet so no cake or pie for me. I found this recipe also from Bevi on Food52, Coconut Crusted Mango Slices With Pineapple Sauce And Whipped Coconut Cream it’s light and delicious, to see the recipe click on the link. I made one little addition that wasn’t on the recipe, I added lime zest to the coconut cream, I think coconut and lime are so good together and also with mango, it was delicious!

Pizza In A Snap!!

Pizza

Pizza

I felt like pizza today, was really busy and didn’t have time to run to the store for ingredients so decided to use what I had on hand. I made my go to quick pizza dough early this morning, let it rise in the refrigerator, I had some beautiful fresh spinach, a little ricotta that needed to be used, parmigiano and pecorino romano cheese and thats all I needed. The pizza dough is so simple to make, it literally takes 5 minutes, its no knead dough. I sauteed the spinach in garlic, olive oil and red pepper flakes, sprinkled on a little sea salt and black pepper, topped the dough with the spinach, some ricotta and grated parm and romano cheese. To gild the lilly I poached an egg and put it on top. Voila, dinner in a snap!!

Quick Pizza Dough

2 1/2 cups flour

2 1/4 tsp instant yeast

1 tsp salt

1 cup warm water (about 110 degrees)

2 tbs olive oil

Mix all ingredients, place in oiled zip lock bag and place in the refrigerator for at least 4 hours or longer. If you don’t want to use the refrigerator method just place in oiled bowl, cover with plastic wrap and a tea towel and let rise for 1 hour in a warm place.

Before making your pizza remove dough from the refrigerator and let come to room temperature. Pre heat your oven to 500 degrees, oil your pizza pan or heat your stone. Take the dough out of the bag or bowl, dust with a little flour and work the dough for a minute or two until its smooth. Stretch onto your  pizza pan or peel. Brush with olive oil, add your toppings, in my case it was sauteed spinach, ricotta and the grated cheese. Bake until browned and bubbly.

Retro Recipe Redux-Chicken And Dumplings

Chicken And Dumplings

Chicken And Dumplings

Retro recipes fascinate me and this is one I have been meaning to re-create. Honestly, I never had it growing up but had heard about it and always thought it sounded delicious. When Food52 announced the latest contest, Your Best Cheap Feast, I felt this recipe fit perfectly. Chicken and Dumplings was created sometime during the Great Depression and was a great way to feed a family for very little. You basically have a big pot of chicken soup that you drop biscuit dough in and this creates a thick and hearty stew. I updated the dumplings by adding herbs and lemon zest, this gives another layer of flavor. There was leftovers, both the biscuit dough and the stew and I repurposed by making a couple of pot pies, I added some frozen peas, put in a ramekin and covered it with the dough, this was meal number two. The whole meal cost less than $20 and when broken down it’s less than $5 a person. Good food on the cheap!!

Serves 6-8 depending on serving size

The Chicken And Vegetables:

  • 1 whole chicken approx 3-5 lbs
  • 8-10 cups water (If you happen to have stock you can use that instead of water)
  • 2 carrots peeled and sliced into rounds or at an angle
  • 1 large onion chopped into small pieces
  • 2 stalks celery sliced
  • 1 parsnip peeled and sliced into rounds or at an angle
  • salt and pepper to taste
  1. Wash the chicken and place in pot or dutch oven, pour in water, season and bring to a boil on high, reduce heat to med/high and low boil until chicken is tender, it takes approximately 1-2 hour. Note: If using water I boiled the chicken for about 2 hours so that the broth is tastier.
  2. Remove chicken from pot and set aside to cool, pour broth into a container. Add a small amount of olive oil to the bottom of the pot, add the onion and saute until they soften, add the celery, carrot and parsnip and saute until the vegetables begin to soften. The onion will be translucent. Add the broth back in the pot and simmer for approximately 30-40 minutes, just until the vegetables are tender.
  3. While the vegetables are cooking in the broth remove the meat from the chicken, remove the skin also and set aside covered and start the biscuit dough.

The Dumplings And Finishing The Dish:

  • 2 cups all purpose flour
  • 1 tablespoon + 2 tsp baking powder
  • 1/4 teaspoon salt
  • 1/2 cup cold vegetable shortening
  • 2 tablespoons cold butter (I used salted but unsalted is fine)
  • 1 tablespoon snipped chives
  • 1/4 teaspoon dried thyme
  • 1/4 teaspoon dried marjoram
  • 1 teaspoon lemon zest
  • 1 cup milk (whole is preferable but 1 or 2% is fine)
  1. In mixing bowl combine the flour, baking powder, salt, herbs and lemon zest, cut in the vegetable shortening and butter until it resembles peas. Add the milk and mix just until combined. Turn out onto a lightly floured work surface, knead for a minute or two and pat into a disc approximately 1/2 inch thick. I use the smallest biscuit cutter or a cordial glass and cut into small round shapes.
  2. Bring the broth and vegetables to a boil and drop in the dumplings, Don’t over crowd as you don’t want the dumplings to absorb all the liquid (you can always bake the remaining biscuit dough or make pot pies from the leftovers). Boil the dumplings in the broth for approximately 10-15 minutes they will thicken the soup substantially and will partially break down a bit.
  3. Season to taste with salt and pepper, add the chicken and serve. I like to garnish with chopped parsley.
Chicken and dumpling pot pie

Chicken and dumpling pot pie

Hearty Kale Salad With Kabocha Squash,Pomegranate Seeds And Toasted Hazelnut And An Award

Kale Salad

Kale Salad

I love healthful food, I really do but my style of cooking isn’t really super healthy. I try, I really do but unfortunately I fall short most of the time. Incorporating raw foods, salads into my diet is challenging sometimes. A friend and I hosted a dinner party the other night and we wanted to do a low carb, healthful meal. I found this recipe on Food52, Gena Hamshaw is vegan and has some amazing, balanced healthful dishes. I took one look at this salad and knew it would be on the menu that evening. What does it contain? Lots of super foods, Kale, pomegranate, hazelnuts and Kabocha squash. The kale is massaged with a little of the dressing to soften, then you toss with the rest of the light lemon dressing. It’s delicious, honestly, really really good. I had everything for the salad except the squash so I subbed sweet potato which I prepared in exactly the same way as you would the squash.

Serves 4-6

  • 1 Large bunch curly kale, stems removed and discarded, torn into bite sized pieces, washed, and spun dry
  • 1 Small kabocha squash (Japanese pumpkin), halved and seeded and cut into 1.5 inch pieces ( I used 1 medium size sweet potato using the same method as described in step 1)
  • 4 tablespoons Olive oil, divided into 1 tbsp and 3 tbsp
  • 3/4 cups Pomegranate seeds
  • 1/2 cup Skinned hazelnuts
  • 1 teaspoon Dijon mustard
  • 2 tablespoons Lemon juice
  • 1 teaspoon Maple syrup
  • 1/4 teaspoon Sea salt
  • Black pepper to taste
  1. Preheat the oven to 375 degrees. Toss the squash in 1 tbsp olive oil and season with salt and pepper on a baking sheet. Roast for 30-35 minutes, or until golden, stopping halfway through to stir.
  2. While squash is roasting, place the hazelnuts in a shallow baking dish (or a pie pan) and toast in the oven for 4-6 minutes, or until they are golden. Check them frequently and remove them the moment they start to get brown. Once they’ve cooled a little, chop them roughly and set aside.
  3. Whisk together the remaining olive oil, mustard, lemon, maple syrup, sea salt, and pepper. Pour 3 tbsp over the kale to begin with, and “massage” the kale well with your hands, till it’s coated in the dressing and taking on a soft, almost wilted texture. Add the remaining dressing as needed and according to tastes. Add pomegranate seeds and hazelnuts.
  4. Once the squash has finished cooking and has cooled for 10-15 minutes, add it to the salad and serve.

I am so thankful that Cambios de humor nominated me for the Shine On Award. Thank you so much, I am so honored to have been included in your list of nominee’s. Please visit her blog, you will love the honesty and humor in her posts.  Thank you again!!

shineon1