My Mama taught me not to waste food, I had to clean my plate and sit at the table until either the food was gone or one of us, both stubborn by nature gave in. One day my Mom made liver and onions, bleh, hate it still do. I refused to eat it and literally sat at the table all night long with the food in front of me and still wouldn’t touch it. To this day I have not eaten liver and onions and won’t make it.
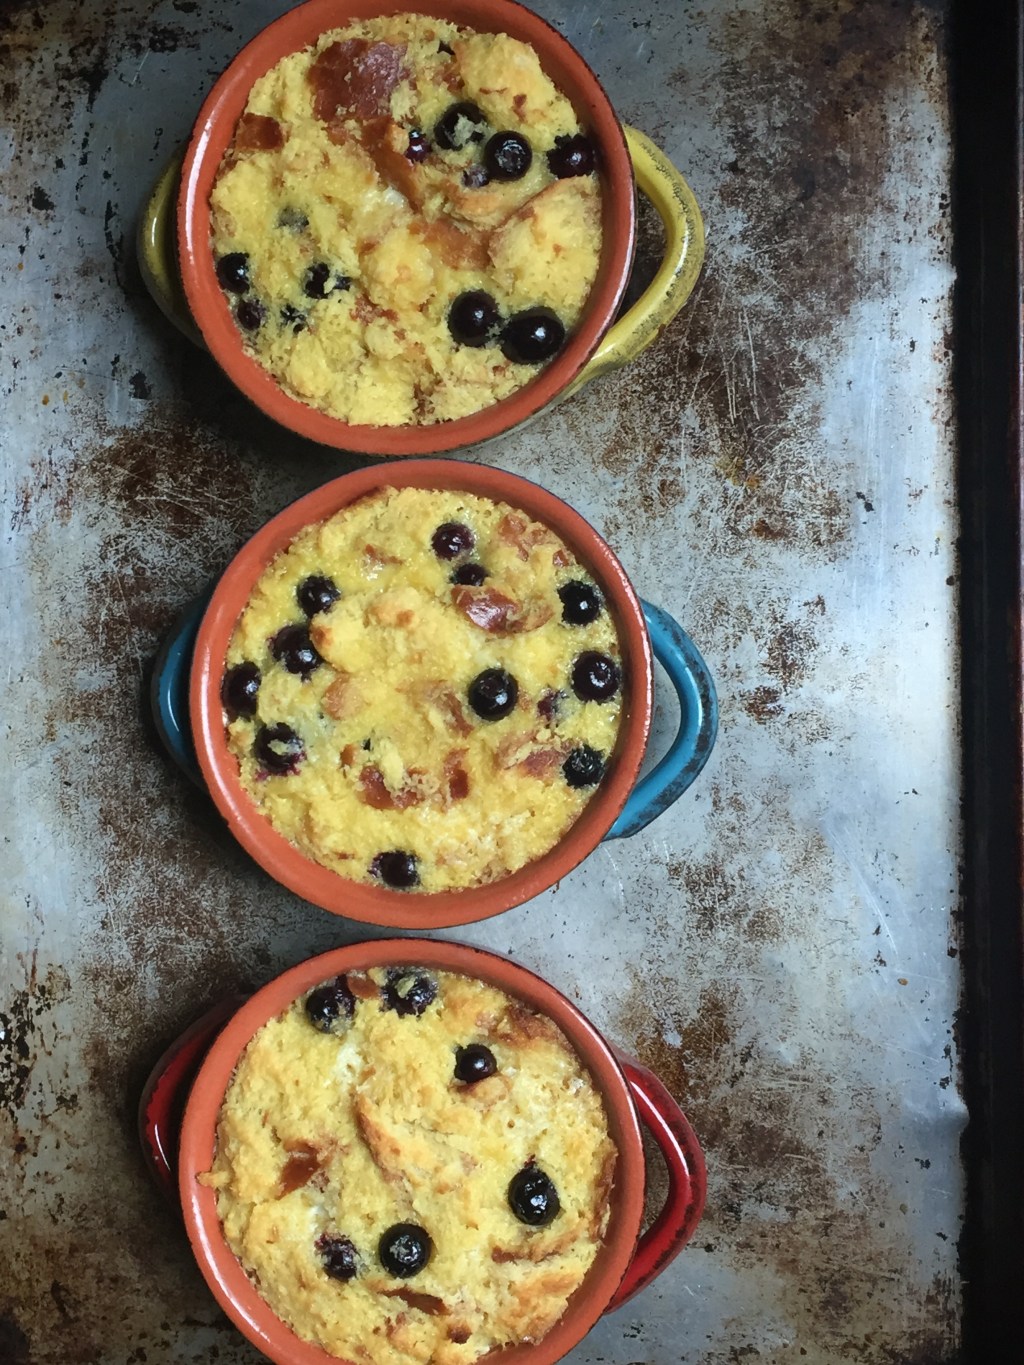
Honoring my wonderful Mother on this day I decided instead of baking something new I decided to repurpose leftovers and make this bread pudding. Here is what I had:
2 challah rolls (more than a day old but still good)
4 egg yolks (left over from my dacquoise)
peaches from the peach ice cream
1/2 container of blueberries
creme fraiche
With those ingredients I made bread pudding. Bread pudding is simple rustic down home fare. I remember Mom made bread pudding often and it was one of my favorite desserts. She was frugal and never wasted anything and would save bread that wasn’t eaten to make this pudding. This is not her recipe it’s mine but it’s equally as good as hers. Mom is a great cook, intuitive, creative and accomplished. I learned so much from her and wish that I were with her this Mothers Day!
Bread Pudding With Peaches and Blueberries
2 large challah rolls day old or older is best, brioche is also good
4 egg yolks plus 1 whole egg
1 cup whole milk
1 1/4 cup heavy cream
1/3 cup creme fraiche
1/2 cup sugar
1 1/2 tsp vanilla extract
dash of salt
Peaches (optional) chopped or crushed or even a peach jam or preserve
fresh blueberries (you decide how much to add)
Heat oven to 350 degree’s. Whisk the egg yolks and whole egg with the sugar in a mixing bowl. Add the milk, cream and creme fraiche and continue whisking until combined. Add a dash of salt and the vanilla and whisk just until mixed.
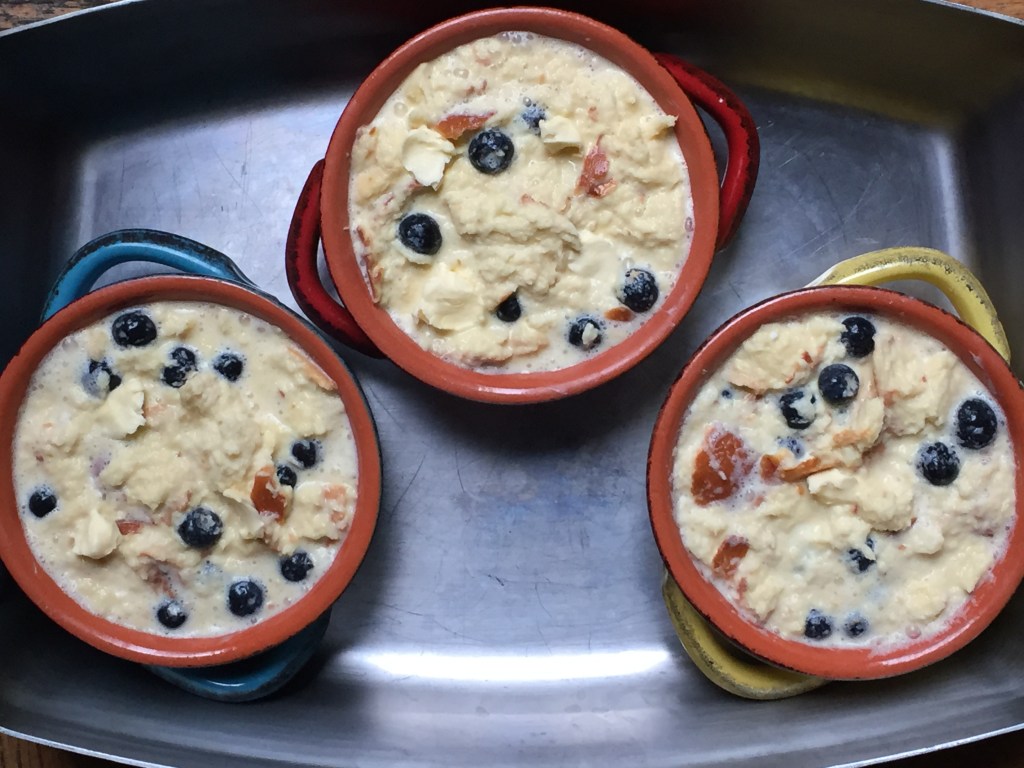
Add the torn bread and stir until the bread is completely immersed in the custard base, add the blueberries and fold them in.
Butter your ramekins or baking dishes, spread some peaches on the bottom and spoon the bread pudding mixture, dividing into 3 large or 6 small baking dishes.
Place the baking dishes in a large roasting pan or baking dish place into the oven and then add enough hot water so that it comes halfway up the sides of your dishes. Bake for 30-40 minutes or until set.
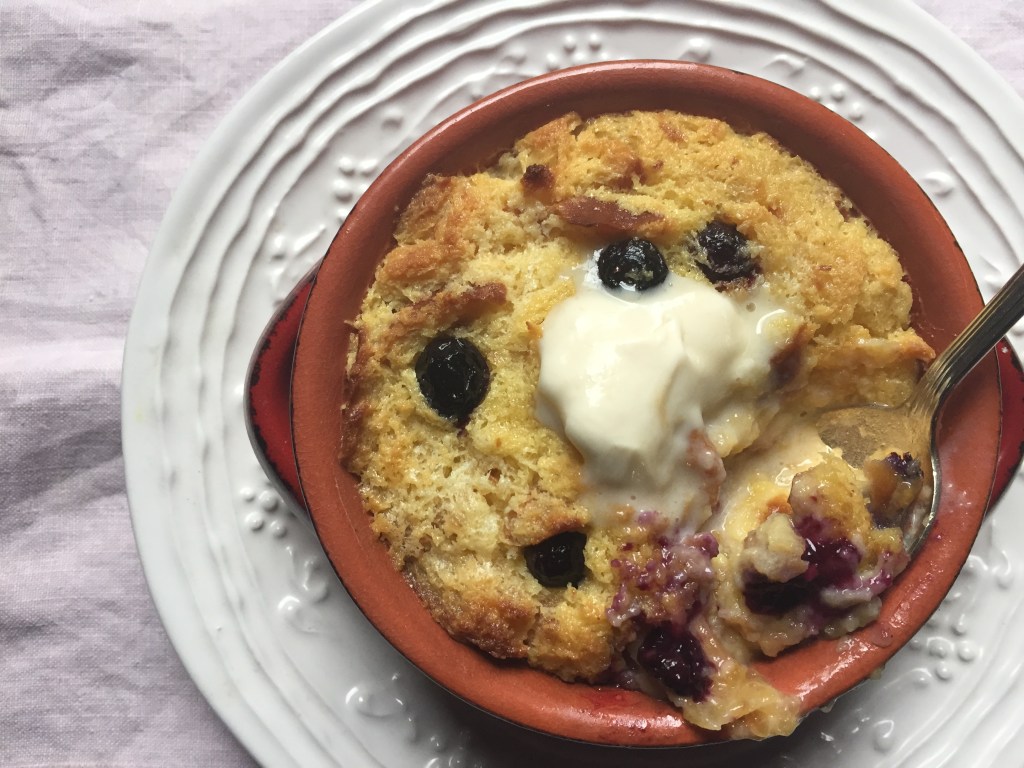
I served it with some creme fraiche gently sweetened with brown sugar. It’s fantastic and adding the peaches and blueberries make this dessert so good!
Happy Mothers Day to all of you whether you have children, fur babies, a classroom of children, do volunteer work with kids or just love them it’s a day to celebrate women and Mothers and caregivers. I hope you all have a wonderful day.
The other day I got an email from Saveur and there were 43 vegetarian recipes that celebrate Spring vegetables. Browsing through the recipes I was inspired to try 3 of them immediately, they were all so many appetizing and delicious it was hard to pick which ones to make but I decided on 3 for now. The first recipe is Turkish Stuffed Eggplant, Imam Bayildi. It’s so simple to make and chock full of wonderful vegetables it makes a great meal or side, you decide how you would like to serve it, for me with some greens and greek yogurt with dried mint.
Choose small eggplants, I found some beautiful grafitti eggplant, small and slender, I knew they would be tender and cook quickly. The recipe calls for green pepper, cauliflower, leeks, garlic and tomato as the stuffing. Because I like to add my own spin on a recipe and frankly I am a bit tired of cauliflower (yes I finally had my fill) I chose zucchini and tri color mini peppers. They say to grate the tomatoes, ummm I don’t think so, I envisioned parts of my finger mixed with the tomatoes as all I had were small (cherry) tomatoes. I did a fine chop and drained them of their juices in a sieve. The eggplant is cut in half and roasted cut side down in the oven until soft and slightly caramelized. This is so easy to make it’s almost ridiculous and the results are delicious. The recipe calls for Aleppo or Marash pepper but I didn’t have, you can use that if happen to have it on hand instead of the sumac.
I am bringing these little gems with me to Fiesta Friday #171, egad, sweet Angie has been hosting 171 parties. She is amazing folks. Happy Mothers Day Angie!!
Turkish Stuffed Eggplant- Imam Bayildi
Recipe from Saveur (adapted by me)
2 small eggplant, cut in half with stems on
6 small tri color bell peppers or 1 medium bell pepper cleaned, seeds and veins removed and chopped
1 small zucchini chopped
1 leek, light and white parts only cleaned very well and cut in thin rounds
3 cloves garlic minced
1 cup chopped (or grated if you are brave) tomato drained of juices
salt and pepper
dried oregano (just a little)
Sumac small amount to garnish or if you have Aleppo or Marash pepper
crumbled feta (as much as you like)
olive oil
Heat oven to 375 degree’s put the eggplant cut side down on a sheet pan lined with parchment and brushed with olive oil, rub some olive oil on each eggplant half as well. Roast for approximately 25 minutes or until soft and the cut side is slightly caramelized. Remove from oven and set aside.
Add a few tbs of olive oil to your sauté pan and cook the leeks until softened. Add the bell pepper, garlic and zucchini and sauté until tender and cooked through. Remove from heat and add the tomato, season with salt and pepper to taste.
Turn the eggplant over cut side up and spoon some of the filling on top about 1/2 cup for each half. Sprinkle a little dried oregano on top, drizzle with olive oil and put back in the oven for about 15 minutes until hot.
To serve, add the crumbled feta, sprinkle a little sumac and drizzle with a little olive oil.
Dacquoise is a layered cake comprised of layers of meringue and ground nuts (like a macaron) filled with buttercream. I usually try to keep my posts consise, short, but this one requires a lot of explanation so in advance let me apologize. This was quite an ordeal, the cake did not turn out exactly like I wanted, there were a few bumps in the road, as a matter of fact I had to keep changing things as I went along. The fillings were a disaster, I originally had the idea to use a Mocha Mousse as one of the fillings which sounds good in theory, but in practice not so much. When I put the mousse on the bottom layer and placed another layer on top of it and gently pressed down it oozed out all over the sides, it was not firm enough. The meringue layers although they feel firm in reality are fragile, very fragile. The French Buttercream was a disaster. I beat the egg yolks until tripled in volume and were thick and light in color. I brought the sugar syrup to 265 which is really past the hard ball stage on the thermometer, with the mixer running drizzled the hot syrup down the side of the bowl as directed, two problems with this 1. the sugar syrup when it hits the side of the bowl hardens so I moved it away from the side of the bowl and 2. the beater flung hardened sugar strands everywhere. OMG, it was a mess. I managed to make it adding the butter in pieces until combined. I had sugar candy stuck on the side of the bowl and sugar strands wound around the whisk from when the syrup hit it. Because the syrup was hard ball stage the buttercream was very stiff, which I guess is a good thing because it stays put unlike the mousse. Last minute I also made a buttercream recipe I saw on Food52 from Merrill Stubbs. It is a quick and easy version of a French buttercream using egg yolks, butter, powdered sugar and flavoring of your choice. It takes about 10 minutes to make is silky and thick and really a great frosting or filling. This went in as a filling, it wasn’t quite enough for a thick layer of filling but at this point it was ok. To cover up all the imperfections I frosted with the Chantilly but used my recipe for stabilized whipped cream frosting.
I tried the recipe from Saveur for the meringue layer and failed pretty badly, not exactly sure what happened. The batter was runny, the layers were like thin crisp mishapen sugar cookies. I know there is supposed to be a crispness but this was more cookie like. IMHO I think there is too much sugar in the recipe. It’s also possible I over processed the almonds and sugar. The batter spread and didn’t look anything like the photo’s (sorry no photo’s) and video’s I’ve seen of how to make a meringue for dacquoise and certainly didn’t look like the one in the Saveur video (the video is included in the link above). Humph… I decided to search for another recipe and found one from Fine Cooking that looked good. It seemed pretty simple, the proportion of the ingredients sounded right and loved that it used hazelnuts and almonds (love hazelnuts).
misshapen, flat and really crisp first attempt
Second attempt, instead of rounds I made a rectanglar cake. The recipe from Fine Cooking is wonderful, the batter is perfect, holds it’s shape when piped onto the baking sheet, I feel like this will be a success. The batter is super easy, and quick to put together. I have actually become quite good now at the dacquoise. Because one of the layers bit the dust, I quickly made a half a recipe which I can now make without even looking at the recipe and put it on top.
Final Analysis:
Perfect batter, ready for the long bake
The Meringue
From Fine Cooking
1/2 cup toasted hazelnuts
1/2 cup toasted almonds
1 1/3 cup powdered sugar
1/8 tsp kosher salt
6 egg whites
1/3 cup granulated sugar
French Buttercream
7 large egg yolks (about 1/2 cup)
12 oz- 3 sticks usalted butter softenend
2/3 cup strong coffee
1 cup (7 1/2 oz) sugar
Chantilly
2 cups heavy cream divided
2 1/2 tsp cornstarch
1/4 cup confectioners sugar
1 1/2 tsp vanilla extract
Buttercream
Recipe on Food52 by Merrill Stubbs
6 oz soft unsalted butter
2 egg yolks
2/3 cup confectioners or powdered sugar
1 tbs vanilla extract
Put all the ingredients in the bowl of the stand mixer fitted with the whisk attachment and beat until thick, silky and spreadable. Thats it, so easy!!
Instructions
making meringue
Pre heat oven to 225 degree’s and position a rack in the middle of the oven. Draw three 10×3 rectangles onto parchment paper, turn over and place on sheet pan spray with cooking spray, butter or oil and set aside.
Add the hazelnuts to food processor and pulse just until it is a fine powder, no longer otherwise it will turn to paste. Next pulse the almonds the same way. Place the nut flour in mixing bowl and sift the powdered sugar over and add the salt. Stir with rubber spatula to combine.
In stand mixer fitted with whisk attachement beat the egg whites for 3-4 minutes until there are soft peaks. Add the granulated sugar in 3 additions beating well after each addition and the egg whites are thick and glossy and hold a stiff peak.
Sprinkle the nut mixture on top and gently fold into the meringue until combined. The consistency will be thick and gooey. You can either use a piping bag with a 1/2 inch plain tip or spread the batter in the rectangles 3 inches apart as they will expand. Place in the oven and bake for approximately 2- 3 hours or until they are firm to the touch. Turn off the oven and let them sit with oven door closed for 6 or more hours. NOTE:Although the recipe does not say to, I rotated the pans every now and then to ensure even baking. I used 2 sheet pans because I was afraid they would run (they didn’t) and the pan on the lower rack browned more quickly.Also the dacquoise were done at just slightly over 2 hours, so I turned off the oven and let them sit for about 6 hours. After turning off the oven I waited about 20 minutes and then gently loosed them. Believe me, it helped greasing the parchment they gave way easily and there was no sticking.
French Buttercream
In a high sided saucepan over medium heat, add the coffee and sugar, set a candy or deep fry thermometer in the pan and cook until it reaches 265 degrees.
Meanwhile in the clean bowl of a stand mixer whip the egg yolks until tripled in volume and the color has lightened significantly, approximately 8 minutes.
Once the syrup has reached the temperature, remove and slowly pour the mixture into the yolks, whisking on medium low speed. Continue to run the mixer for 20-30 minutes, letting it cool completely. Once fully cooled, add the butter one tbs at a time, whisking until fully incorporated after each addition. The buttercream will thicken noticeably when all the butter has been fully incorporated.
Chantilly
To a small saucepan add 1/2 cup cream, whisk in the confectioners sugar and corn starch. Cook on medium heat until the mixture thickens. Immediately remove from the heat, scrape into a bowl and set aside, stirring frequently until cooled completely.
Place 1 1/2 cup cold heavy cream in mixing bowl and start beating using either whisk attachment on your stand mixer or hand held is fine also, add the cream cornstarch mixture and flavoring of your choice, continue to beat until thick and stiff peaks form. Cover and refrigerate until ready to assemble the cake.
Assembly
The layers were not even at all, some were smaller, some larger, there was some overhang and the layer that had the failed mousse attempt was cracked and broken. The meringue is very fragile so handle with care, it does well when filled, covered and refrigerated overnight or longer. Because the layers were uneven in size I trimmed them with kitchen shears as a knife just doesn’t cut it. The pieces and crumbs I pressed into the bottom layer that had some canyon size gaps, mixing with a little of buttercream from the sides of the cake. Talk about kitchen hacks, this cake was hacked every step of the way.
Anaylysis:
Will I ever make this again, maybe. The perfectionist in me wants to keep making it until I get it right but it literally was hours and days of work. The meringue I have down pat and it’s really not hard. I don’t think I will ever make the French buttercream again, it’s just not worth the effort and the results did not knock my socks off. I really like Merrill’s shortcut version of a French Buttercream, it tastes almost exactly like it, it’s fool proof, quick and easy. All in all I actually loved the challenge, it didn’t matter that it was a partial fail, I learned a lot and made something with a fair degree of difficulty and it was edible, I learned what to do and what not to do, what works and what doesn’t. Because of that I view this as a success for the simple fact that I did it! Tasting it though, it did kind of knock my socks off, the cake is delicious, the meringue retained its crunch kind of a melt in your mouth crunch and I am really glad I used hazelnuts. Ok maybe I will make it again.
The Winners
Selected by feeding everyone’s names into Random.org the winners of the cookbooks are and Annie@Give me meatloaf and Teagan@Teagans Books. Congratulations to you both. Watch for an email, I will need your mailing address so we can get those books out to you asap.
A quick NOT recipe in between my Dacquoise challenge. It is simple and delicious, filling and there is no meat involved. I used canned chickpeas (drained) because it’s all about keeping it simple. This takes about 20 minutes in the oven and you are ready to eat. I recommend mixing the chickpeas with everything a few hours ahead and let them marinate, overnight would work as well, they will be even more tasty. I used what I had on hand to make this and it turned out great. Served simply with some greek yogurt mixed with fresh diced cucumber and dried mint makes a nourishing and super tasty meal.
Roasted Chickpeas
serves 2-3
1 15 oz can of chickpeas rinsed and drained
approximately 10 cherry or baby heirloom tomatoes washed and cut in half
1 shallot peeled and diced
pine nuts a handful or about a scant 1/2 cup
olive oil
approximately 1-2 tbs harissa
dried mint (didn’t measure)
fresh parsley chopped (if I had to guess about 1/4 cup)
1 clove garlic minced or a couple of shakes of garlic powder
salt and pepper
Put everything in a bowl, mix it so it’s combined. Cover and refrigerate for about 2 hours or overnight. Pre heat oven to 375 and line a small sheet pan with parchment. Pour the chickpea mixture on the parchment and roast in the oven for about 20 minutes or until the tomatoes are soft and chickpeas are lightly browned.
Serve with greek yogurt mixed with chopped cucumber and dried mint.
Photo from Saveur found online at Saveur.com Mocha Dacquoise
Once a upon a time I was very active in recipe contests, they challenged me, inspired me and forced me to think outside the box. Food52 still has contests, not as often as before but they are still there and Whole Foods ended their contests a few years ago. Give me an ingredient and challenge me to come up with an original or semi original recipe using it and it excited me. Those days are but a memory now as I haven’t really participated in a while. Blogging is a challenge and I am afraid I have fallen short of my own expectations, don’t want to be too hard on myself but if we feel like we are failing it’s up to us to do something about it. When I post a recipe I want it to be something different, even if it’s a twist on a classic there should be a new and different technique or some ingredient that is not normally used when making it. Having a repertoire of classic recipes is something every cook should have in their archives, something you make all the time, it always comes out good, you can make it blind folded so to say, without looking at the recipe. I have recipes that I use all the time, tried and true, always good but thats not challenging. One thing that I think would help to keep this blog fresh is to try to make something I’ve never made before, a recipe that will challenge my skills and hopefully will yield a good result. I have a bucket list of things I have always wanted to make, croissant, puff pastry are two things on my list, another is a Dacquoise. I first read about this cake in Julia Child’s cookbook Baking With Julia, it kind of scared me, a lot of parts, some complicated instructions but the finished product is ethereal and delicious. Dacquoise is a cake made with almond and/or hazelnut meringue layers with different fillings, think of a macaron, it’s very similar in technique. The cake is light and if made well, a work of art. I tried making macaron and failed miserably and haven’t tried again, it is still on my list of things I must make.
In a few weeks it will be my birthday and this will be my birthday cake (God willing). I plan on taking a day off work and devoting the entire day to baking. It will be a challenge.They caution you to make the cake in advance of serving, as much as a week but at least 12 hours, the longer you let it sit in the refrigerator the easier it will be to get a clean cut. I found a recipe from Saveur for a Mocha Dacquoise. It looks beautiful and sounds delicious. The traditional almond meringue layers with a coffee buttercream and chantilly filling. I am very excited to try this recipe and scratch it off of my bucket list.
Now for the giveaway! I want to offer one lucky reader a copy of the Food 52 cookbook Ice Cream and Friends. All you will have to do is leave a comment and you will be entered. The winner will be chosen randomly using random.org. But wait, I am feeling generous so there will be a second winner who will get the other Food52 cookbook Mighty Salads. I am sorry that I cannot send the books outside of the continental US, it is open to residents of the US only. The contest will end on May 2nd and I will post my Dacquoise even if it is a fail along with the announcement of the winners. In an effort spice things up here, there is more in the works, giveaways and challenging recipes.
I also want to challenge you all to make something outside of your comfort zone, something you have always wanted to make but were hesitant to try. If you do make something comment here with a link to your blog and I will pick one or two recipes and re blog them. We all need to challenge ourselves and if cooking is your passion push yourself to make something new, exciting and different!
Friends came over for Easter dinner and I wanted to serve a special main dish that screamed Spring, what comes to mind is lamb and to accompany the lamb a variety of vegetables. I bought a boneless lamb shoulder roast weighing 3.65 pounds trimmed and tied. I really don’t cook or eat that much meat especially roasts and did a search online for some ways to prepare.A meal that was simple, no fuss and tasty was key. Jamie Olivers roast lamb shoulder sounded great, flavored with rosemary, salt, pepper and garlic and roasted until so tender it falls apart. The rosemary in my garden is still around, can’t believe it lasted outside all winter and I had just enough for this recipe. Mr. Oliver cranks up the heat in the oven as high as it goes, lays rosemary and unpeeled garlic cloves at the bottom of a baking tray or roasting pan, rubs the meat with salt and pepper, gives it a good dose of olive oil, puts more rosemary and garlic on top of the meat, covers and roasts. Once you put the pan in the oven you immediately lower the oven temp to 325 and leave it for about 3 1/2-4 hours. In the end you have a lovely tender and fragrant lamb roast. After roasting you make a gravy from the pan drippings. The meat was so tender I couldn’t slice it, it fell apart as I touched it that’s why it looks so sloppy. It really was so good and so easy to prepare, no fuss at all.
The vegetables I used are peas, carrots and asparagus. The carrots and asparagus were roasted in the oven and the peas steamed and smothered in butter. I also had some small yukon gold potatoes that I boiled then drained, put in a buttered oval casserole and oven roasted at 400 degree’s covered with foil until the potatoes just began to brown, approximately 45 minutes.
There were leftovers which I made into a shepherds pie, just mix leftover gravy with the meat and vegetables, mash some potatoes, spread on top and bake at 400 degree’s until the mash crust is browned and filling is bubbly.
Jamie Olivers Roasted Lamb Shoulder
One boneless lamb shoulder roast (Mine was 3.65 lbs)
1/2 bulb garlic peel on and gently smashed
2 red onions peeled and quartered
6-8 sprigs fresh rosemary
olive oil
salt and pepper
You will need a roasting pan with a lid or if you don’t have you can cover this with tin foil. Heat the oven as high as it goes which in my case was 550 degree’s. Drizzle a little olive oil in the bottom of your pan and lay several sprigs of rosemary and half of the garlic which you smashed peel and all. Rub some olive oil on the lamb and season with salt and pepper. Lay on the rosemary and garlic. Put another sprig or two of rosemary on top along with the rest of the garlic. Surround the meat with the onion quarters and put the lid on or cover tightly with foil. Place in the oven and immediately lower the temperature to 325 degree’s. Roast for 3 1/2 to 4 hours.
Remove from the oven and pick out the rosemary (discard), onion and garlic. Pour through a sieve, pressing the onion and garlic and pour into a pan where you will reduce by about 1/3. Make a slurry using 1 tbs of flour and add to the reduced pan juices along with some wine, broth or water, just a little. Whisk until it thickens. Serve along side the roast.
My favorite part of the meal is the spring vegetables, I wasn’t lucky enough to find them at the farmers market, there are still a few weeks left before they appear according to the farmers. I was able to get some incredibly fresh vegetables at the store and some frozen peas. No recipe required for the vegetables, the carrots and asparagus are oven roasted with salt and pepper and olive oil, the peas are steamed and then I put them all together on a platter with some good salted butter.
First of all I can’t believe how quickly time is whizzing by, already Easter and before you know it we will be enjoying summer with the warm weather and great produce. If it were up to me I would skip the warm weather and just go for the produce. For Easter I decided to have very good friends over for dinner and wanted to make a special meal. Since I love dessert I am going to post the recipe for the dessert before I post dinner, backwards maybe but I’ve always been someone who loves dessert especially when it involves ice cream. A few months back I saw a recipe on Johnny’s blog Kitsch n Flavors for profiteroles. I could have sworn I saved it to Evernote but could not find it, Johnny’s blog is now private and I couldn’t access the recipe so I used one from Saveur which I have to say turned out great. Choux pastry may sound and look imposing but it couldn’t be easier really. It takes literally minutes to prepare, bakes in no time at all and the resulting pastry is light as air and so delicious.
I have also been meaning to make Amanda Hesser’s recipe for Olive Oil Gelato, I tasted it for the first time when I enjoyed Pasta Night at the Food 52 headquarters in Manhattan. I was smitten, totally fell in love. Imagine a light and airy pastry shell filled with olive oil gelato and smothered in a deep rich dark chocolate sauce. Well, it sounded great to me so I set out to make this for my Easter dinner party. The olive oil gelato makes enough for 1 the way I like ice cream, really just a tiny amount and I planned to serve 2 profiterole per person and there was not enough, I ran to the store and found a bourbon butter pecan gelato so my guests will get one of each. If you plan on trying the olive oil gelato and need enough for more than 1 or 2 people you will have to double or even triple the recipe.
Happy Easter, Passover to everyone and I hope you all had a wonderful day!!
Olive Oil Gelato
Recipe by Amanada Hesser/Food52
3/4 cup whole milk
1/4 +2 tbs water
3/4 cup sugar
4 egg yolks
good pinch of salt
4 tbs really good olive oil
Put the milk, water, sugar and salt in a medium size sauce pan and cook until you see bubbles forming on the outer edge. While the milk and sugar are heating whisk the egg yolks until foamy. When milk is ready add in a slow steady stream to the egg yolks whisking constantly. Return to the pot and cook on low stirring constantly until the custard thickens and if using an instant read thermometer it should be 175-180. Place pot in ice bath and stir the custard until it cools. Transfer to a container with a lid and let sit overnight in the refrigerator. The custard will thicken, it takes a while but don’t give up. Remember to stir constantly and don’t let the egg scramble.
When you are ready to make the gelato whisk in the olive oil, it will be smooth and silky. Pour into your ice cream maker and follow manufacturers instructions. Spoon into a freezer container and place in the freezer for at least 4 hours or until scoopable.
I am going to make a recommendation, I plan on making this again because it really is good but I will make a couple of changes. I will increase the milk to 1 cup and the water to 1/2 cup leaving everything else the same, the olive oil doesn’t freeze and makes the gelato very soft, adding additional liquid IMHO will help it to be more scoopable and stay frozen a little longer. The gelato melts very quickly, trying to get a photo with it in the profiterole was challenging and I think that adding more milk and water will help.
Choux Pastry
Recipe from Saveur
1/2 cup whole milk
1/2 cup water
8 tbs butter cut into cubes
1 cup flour
pinch of salt
4 eggs at room temperature
Heat oven to 425 degrees. Put the water, milk, butter and salt into a medium size pot and cook on high heat until it comes to a boil. Add the flour and quickly stir to combine, keep cooking until it is cohesive and somewhat dry. Scrap into a mixing bowl and with hand held mixer add the eggs one a time beating until thoroughly combined. Line a sheet pan with parchment and using a small scoop 1 1/4 tbs size, scoop the choux batter onto the baking pan each one approximately an inch apart. Place into the oven and immediately decrease the oven temperature to 375 degree’s. Bake until golden brown for 20-25 minutes, remove from the oven and with a skewer poke one hole in each pastry, place back in the oven with the door ajar for 3 minutes. Let cool on the pan. You can use them right away or they can be stored up to 3 days in an airtight container, they also freeze beautifully.
Fudge Sauce
6 oz dark chocolate
1/2 cup heavy cream
1 tbs corn syrup (optional)
1/2 tsp espresso powder (optional)
1 tbs coffee liquor like kahlua (optional)
Heat milk to scalding, add the chocolate let sit for 5 minutes, stir until melted add the corn syrup, espresso powder and liquor, stir and enjoy! Best served slightly warm.
I have to mention the eggs you see here, found them in the supermarket they are certified humane from a small farm in New Hampshire. There is a video of the farm on you tube and this farm is truely humane, sustainable and the eggs are gorgeous. I used to watch Martha Stewart’s show all the time and wanted her gorgeous blue/green eggs and when I saw them in the store I couldn’t believe it. Seek out this brand it is carried in quite a few stores including Whole Foods. You can tell they are from happy chickens the yolks are almost orange and the flavor is incredible. Buying humane is very important to me and I look for the Certified Humane label on the dairy that I buy. I was in no way asked to write about Carols Eggs, I did this on my own to pass on information about a great product to you all!
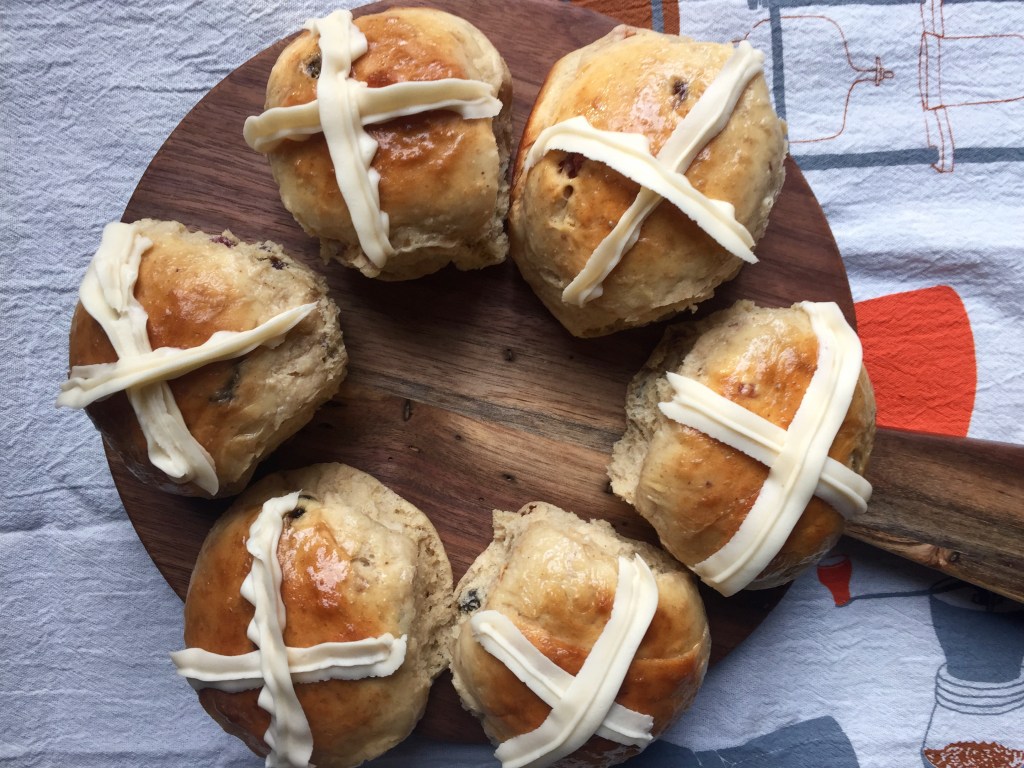
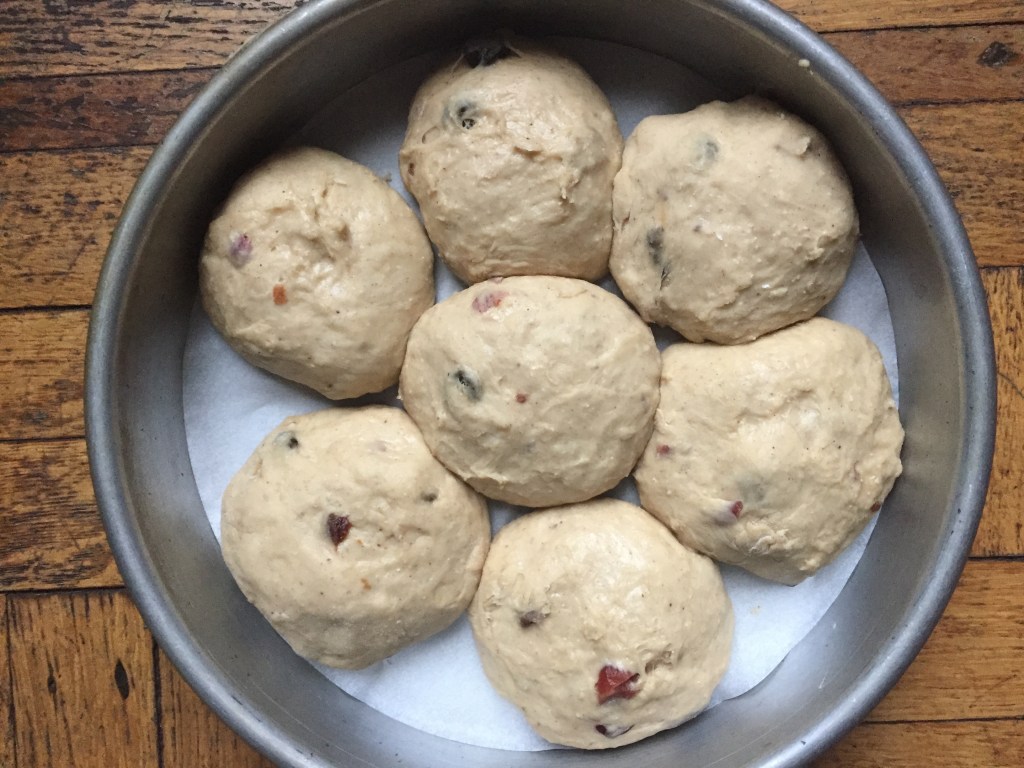
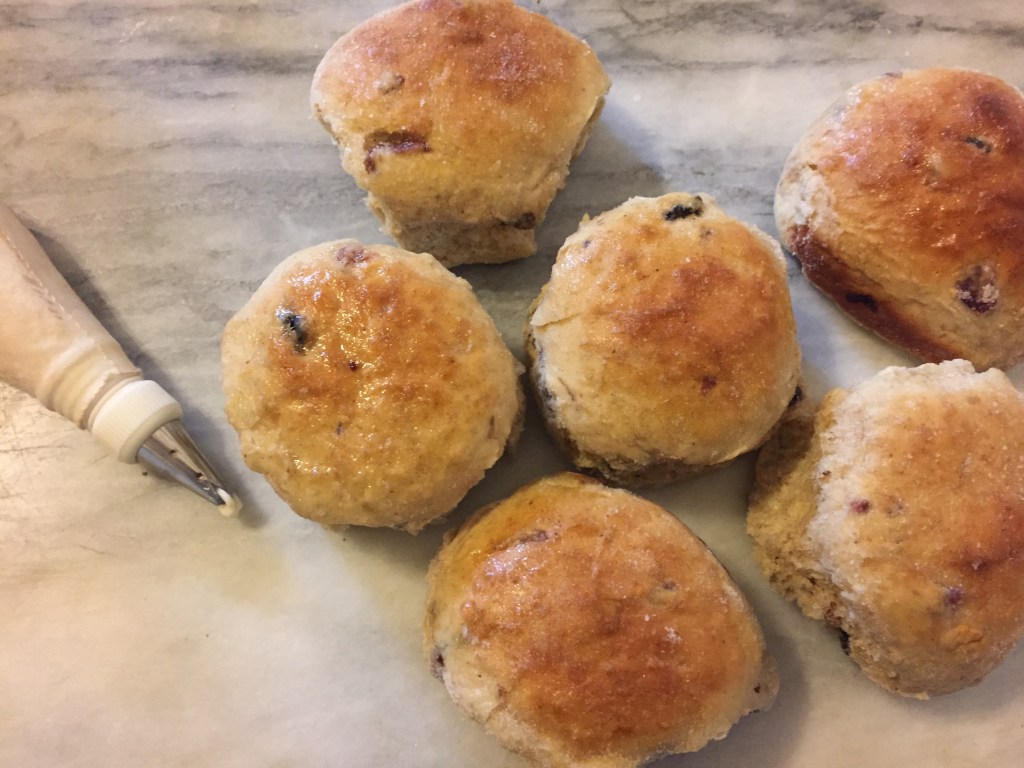
Last year I made hot cross buns, I liked them so much that they have become an Easter tradition. The recipe I made last year was really good, but I’m always on the hunt for one that could be better. I use King Arthur Flour and love their recipes. My go to dinner rolls are from their site and they are the best, last years hot cross buns were also a King Arthur recipe. In reading over this recipe I noticed that there is very little rising time involved, 45 minutes for the first rise and 20-30 minutes for the second rise, thats it. I chose to make them on a warm day to make the rise that much easier. The dough comes together quickly, it’s a very wet dough and now I know why they say to use a scoop and plop them in muffin tins, it does give the option of making them free form in a round pan (I chose that option). If you make them be warned the dough is hard to handle, it’s very sticky and soft. I first oiled my hands to try to form the balls and then changed to flour and let me tell you my hands were a sticky mess. I can deal with that but it makes forming the dough balls difficult. The recipe makes 18, I made them larger and it yielded 14. They also are not exactly round, sort of mishapen but they are very soft and fluffy.
Both recipe’s are similar in technique, I like the use of potato flour in these rolls, potato always yields a very soft moist roll, the flavor is good, however I liked the look of the other rolls I made more. Maybe I will play around with this recipe and see if I can’t get them to look better because they sure are delicious. So pillowy soft, a wonderful recipe and after tasting them I forgot about the sticky messy dough.
Ready to rise
Hot Cross Buns
Recipe from King Arthur Flour site
1 cup raisins, golden raisins or dried fruit (I used mixed dried fruit soaked in rum)
2 tbs rum or water
3 3/4 cup all purpose flour (Because the dough was so wet I added 3 tbs of flour to make it cohesive)
2 1/2 tsp baking powder
1 1/4 tsp salt
1/4 cup potato flour or potato flakes
1/3 cup sugar
2 1/2 tsp instant yeast
1/2 tsp cinnamon
1/2 tsp nutmeg (next time I will use 1/4 tsp nutmeg and 3/4 tsp cinnamon)
1/4 tsp allspice
2 large eggs
4 tbs melted butter
1 3/4 cup lukewarm water
Glaze (Optional but recommended)
1/3 cup sugar
4 tsp water
1 tbs vanilla extract
Icing for cross
1 1/4 cup confectioners sugar
2 tbs soft butter
1/2 tsp vanilla extract
1 tbs cream or milk
Mix together the raisins and rum or water in a non-reactive bowl. For best absorption, use a microwave-safe bowl, cover the bowl, and heat for 1 minute, or until the mixture is simmering. Remove from the heat, and set aside to cool to lukewarm.
Whisk together all of the dry ingredients in a mixing bowl.
Stir in the Princess Cake Flavor (if you’re using it), eggs, water, melted butter and the raisin mixture (including any remaining soaking liquid), then beat at high speed for 1 minute. The dough will be cohesive, but not smooth; that’s OK.
Cover the bowl and let the dough rest/rise in a warm place for 45 minutes; it’ll get a bit puffy, but won’t really increase much in size.
Preheat your oven to 400°F. Lightly grease 18 muffin cups. If you have just one 12-cup muffin pan, use aluminum foil cups for the remainder of the dough; or make free-form buns, and place them in an 8″ round cake pan.
To make the glaze: Stir together the glaze ingredients in a microwave-safe bowl, then heat in the microwave until the sugar dissolves when you stir the mixture. Set aside to cool for a couple of minutes.
Use a muffin scoop or 1/4-cup measure to fill the muffin cups; each should be about 3/4 full. If you have a scale, use about 77g (2 3/4 ounces) dough in each cup.
Brush the lukewarm glaze atop the shaped buns.
Let the buns rise, covered, for 20 to 30 minutes, until they’ve risen just over the top of the cups.
Bake the buns for 20 minutes, until they’re a light golden brown. Remove them from the oven, and quickly turn them out of the pans onto a rack; if you wait too long, the glaze will cause them to stick.
Allow the buns to cool for 10 minutes before icing.
To make the icing: Combine all the icing ingredients in a small bowl and beat until thick.
Use a pastry bag and tip to pipe thick crosses onto the buns. If you don’t have a pastry bag, fill a sturdy plastic bag with the icing, squeezing it down into one corner. Snip the tip of the bag off, and squeeze the frosting onto the buns.
Store, well-wrapped, for 2 days at room temperature, or freeze for up to a month.
Things have been crazy busy on my end and I have totally neglected the blog. I have ideas and things I want to do but simply have not had time to cook or bake except for charity auctions and you’ve seen all of that before, redundant posts are not something I like posting. I am planning another collaboration with Teagan which is always fun, I hope you all like those, I certainly do. Another giveaway is also in the works, and will be coming soon you may be able to guess what it is.
The food I have been making is pretty boring and not really blog worthy, there is nothing different or unique about it. I got back on track after Holiday food splurges with my change of diet and on the plus side have lost some weight which was important for me. I do a low carb low sugar meal plan with lots of vegetables and some protein. Work has been busy, that’s a good thing since I’m an Independant contractor and my livlihood is dependant on how much business I bring in.
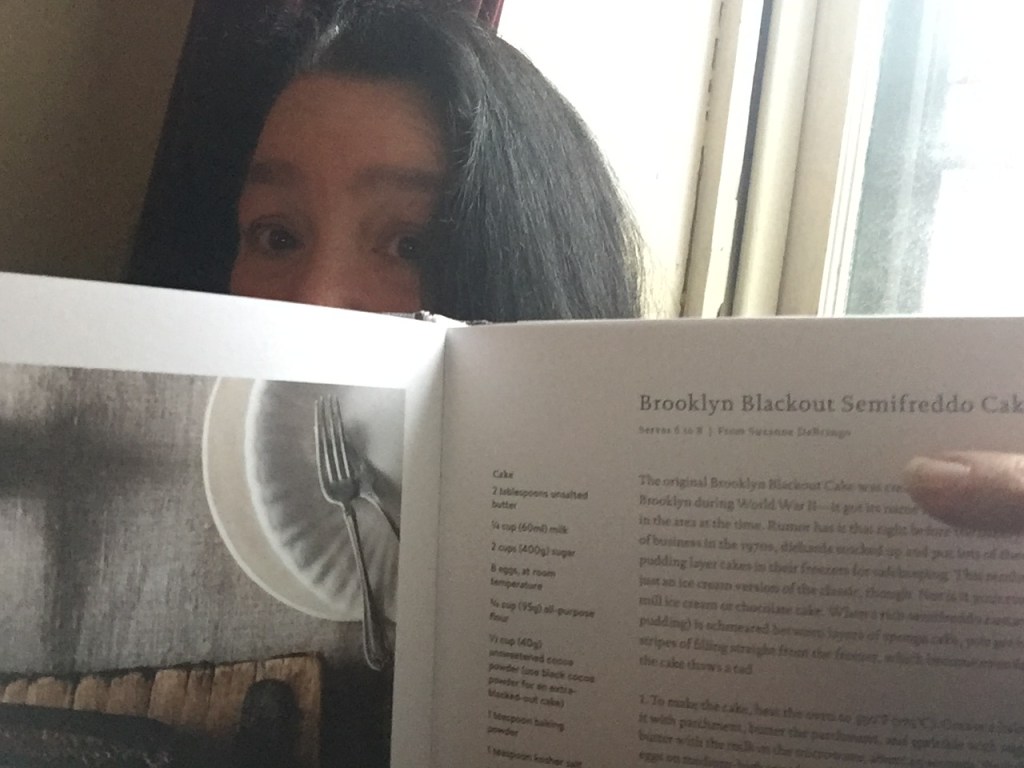
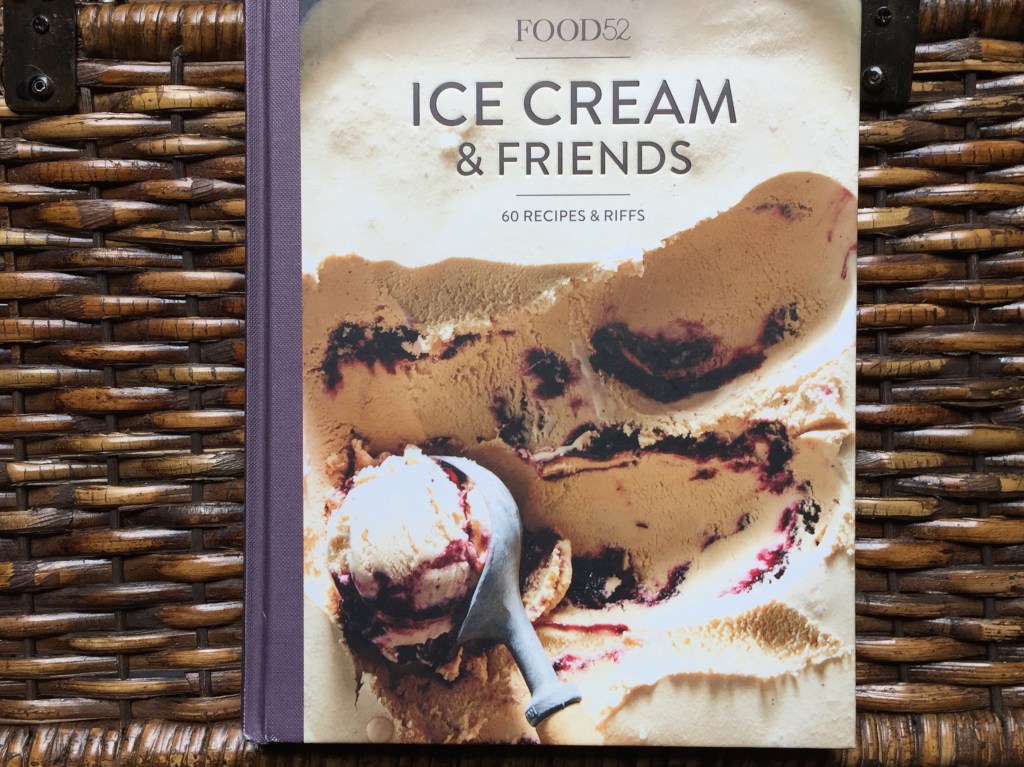
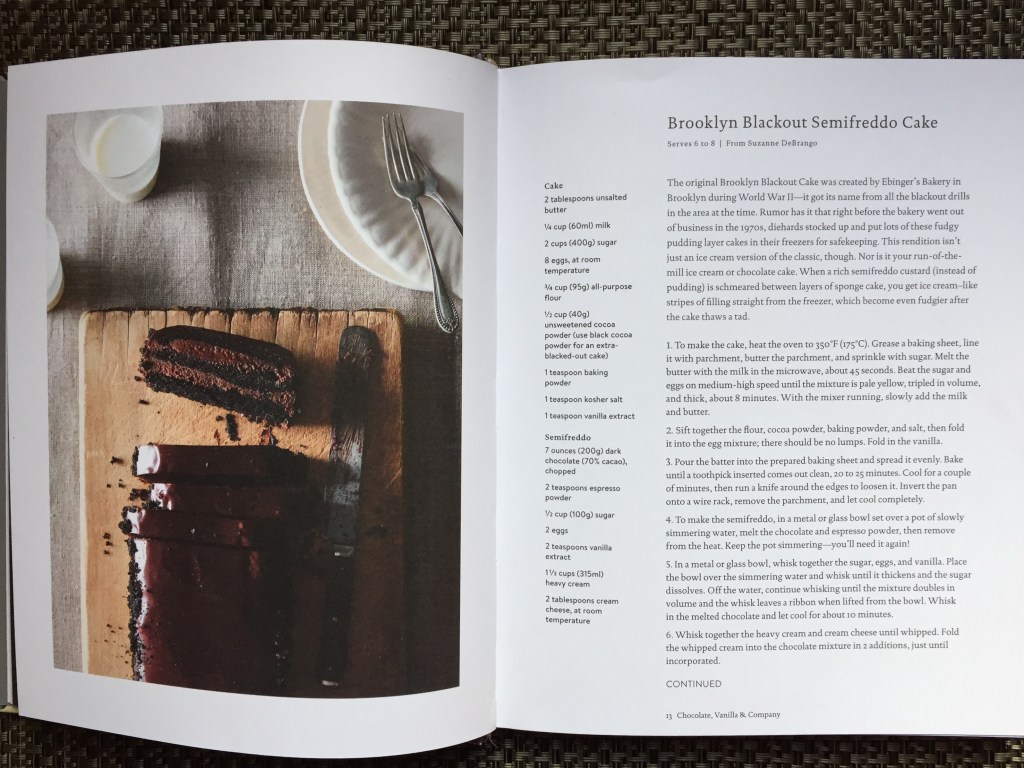
So in the interest of keeping my blog alive I decided to reach into the recesses of my collection of recipes and post something from the past. If I were asked what my favorite recipe is it would be hard to pinpoint but this one is right up there at the top. I posted this recipe on Food52 years ago and last year found out that they are including it in their new cook book Ice Cream and Friends. I received my copy about a week ago and I have to say it’s a gorgeous book with amazing recipes from the Food52 Community and the founders Amanda and Merrill. The recipe they included is Brooklyn Blackout Semifreddo Cake. I dreamed this one up for a contest, the theme was frozen desserts. This was my homage to the famous cake conceived at Ebingers Bakery right here in Brooklyn NY, sadly Ebingers went bankrupt in 1972 and the building is now condo’s but the cake lives on at bakeries and recipes can be found all over the internet. A Brooklyn Blackout Cake is chocolate x100 deeply rich chocolate cake, chocolate pudding filling used also to frost it and cake crumbs pressed onto the sides.
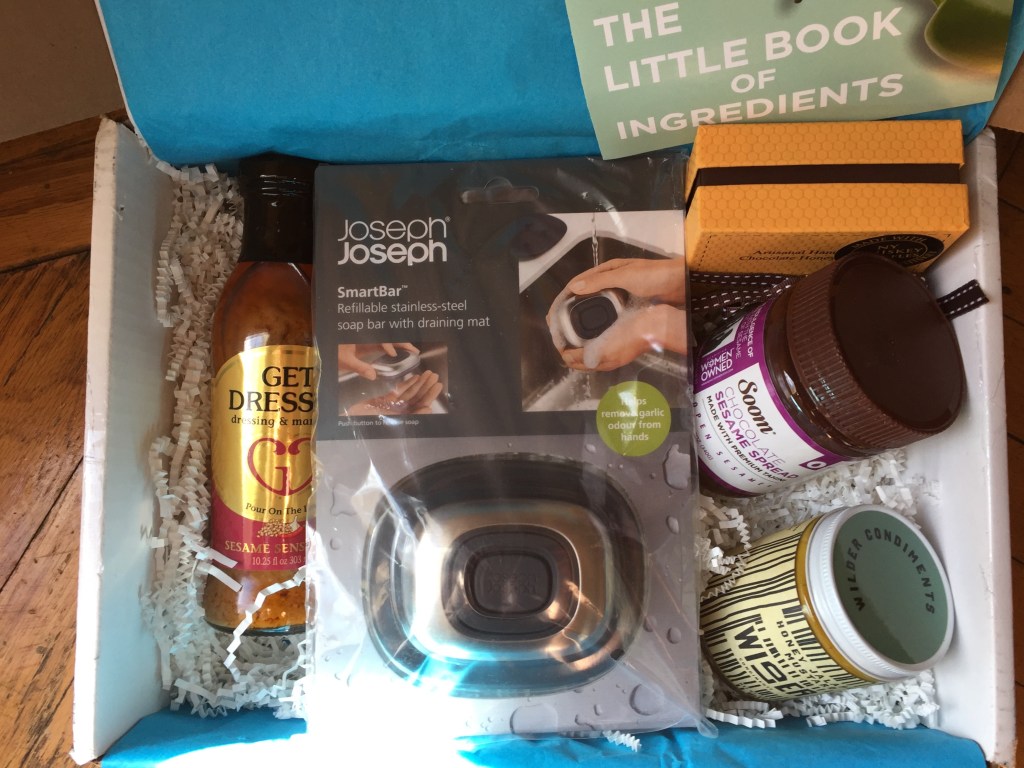
Last week I also received a Spring box from Mary Frances, you all know Mary right. Her blog Love The Secret Ingredient has some amazing recipes and she also has a thriving business Mary’s Secret Ingredient, a seasonal box of goodies is mailed to you and part of the proceeds are used to feed hungry children, Mary has heart along with some great recipes and a creative business sense. I will use some of the products to create a recipe soon but here is a peek at the box.
Mary’s Secret Ingredient Spring Box
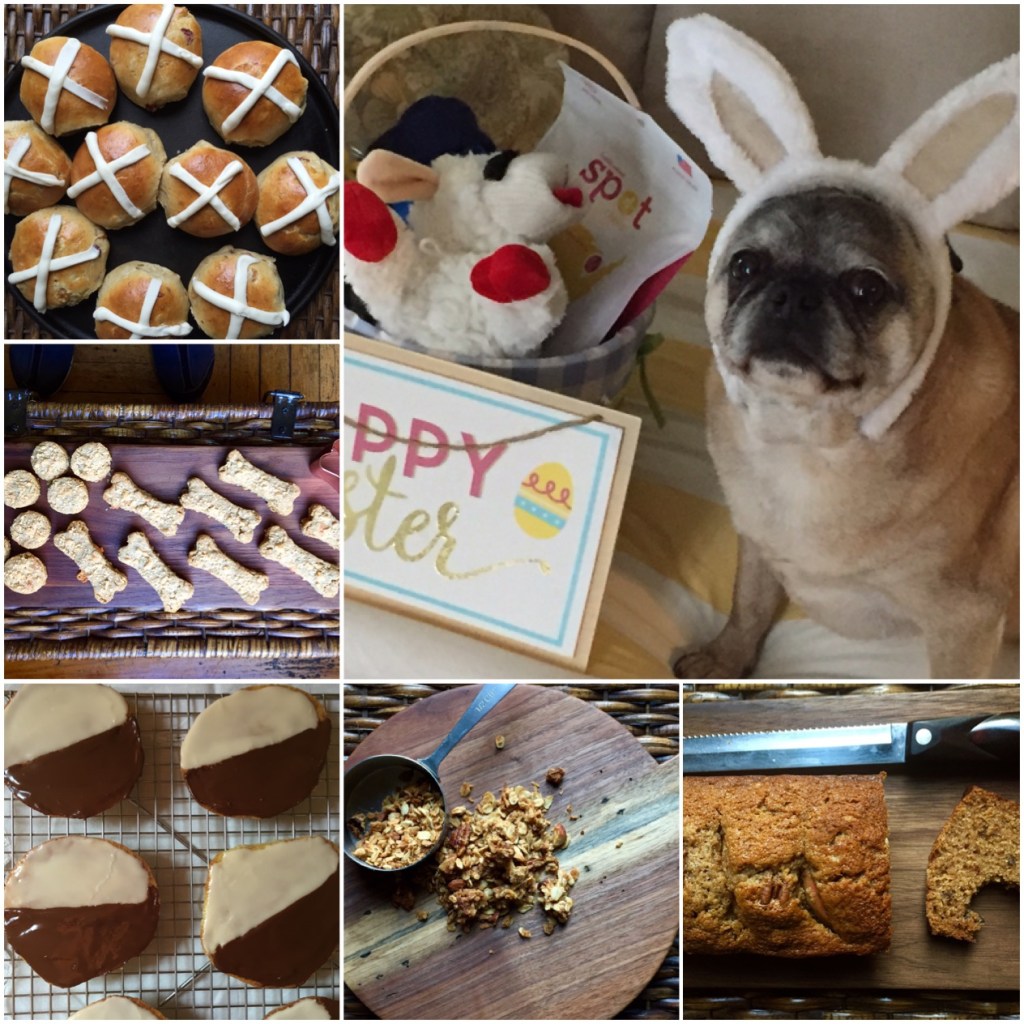
I will leave you with a photo of the goodies that were auctioned on Instagram, all the proceeds went to help a sweet little pug that needed life saving surgery, any of you that are pet parents know how expensive it is to take your dog or cat to the vet, no one should have to decide on whether or not their pet lives or dies because of money and we as a pet community on Instagram raise funds to help out those in need. I am currently finishing the baking and the box will get mailed this week. Full disclosure Easter Bunny Percy will not be included with the box of goodies. I think he makes a very handsome bunny!!