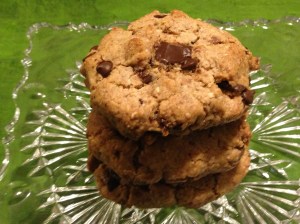
Super Sized Chocolate Chip Cookies
I made these amazing cookies and I have to share it with you, they are REALLY good. There are no eggs, no processed sugar, no butter or vegetable oil in them, virtuous, definitely, but oh so scrumptious. I follow Brandi’s blog The Healthy Flavor and am amazed at the fabulous recipes she comes up with. They are healthful, vegan and really really good!
The fat in these cookies comes from roasted pecan butter, it’s super simple to whip up, and is in my opinion is what makes them so wonderful. The list of ingredients is minimal, whole wheat pastry flour,cornstarch, maple syrup as the sweetener, chocolate, baking soda and powder, sea salt and vanilla. Thats it, simple, healthful and they come together in a flash. Full disclosure, I didn’t have whole wheat pastry flour so I used whole wheat flour with 2 tbs of AP flour, I also decided to use some of the chocolate in my pantry that really needed to be used so I combined, dark chocolate, dark chocolate with peanut butter and milk chocolate. To make this vegan don’t do as I did just use vegan dark chocolate. Enjoy these cookies with a nice cold glass of milk (I had almond milk) and they are especially good slightly warm. Visit Brandi’s blog and try her recipes, you will love them as much as I do. Thank you so much for creating such a wonderful recipe and allowing me to post it on my blog.
Recipe courtesy of Brandi, The Healthy Flavor:
Ingredients:
1 cup roasted pecan butter. Pecan butter is creamier and oilier than other nut butters, so I wouldn’t recommend subbing anything. I made them with peanut butter and the taste was good, but they were more dry and didn’t hold together as well)
1/2 cup whole wheat pastry flour
2 tablespoons cornstarch
1/4 cup plus 2 tablespoons pure maple syrup
1 teaspoon vanilla extract
1/2 teaspoon baking powder
1/2 teaspoon baking soda
1/4 teaspoon fine sea salt (depending on how much you added when you make the pecan butter, this may need to be adjusted)
1/2-3/4 cup vegan dark chocolate chips plus extra to stick on the top if desired
Tip: The key to getting these as chunky and thick is to follow the exact steps. You must chill the dough first and also only divide the dough into 12 cookies. If you make more than that, they won’t be as fluffy.
Directions:
After making the roasted pecan butter, make sure to measure 1 cup in case you made more than that in the food processor. Add it to a bowl with the syrup and vanilla. Stir until well combined. In a small bowl, sift together the flour, cornstarch, baking powder, baking soda and salt and whisk very well. Make sure there are no lumps. Stir the chocolate chips into the flour mixture. Now add the flour into the wet ingredients a small amount at a time, stirring until just combined. Put the bowl into the fridge for 20 minutes to chill only.
Pre-heat the oven to 375 degrees and line a sheet pan with parchment paper. Depending on how creamy you pulsed your pecan butter, your batter may be a bit crumbly. If so, just press the dough together roughly with your hands by large spoonfuls. Divide the dough into 12-14 cookies only, if you want them thick and fluffy. I added a few extra chocolate chips on top of the cookies too.  Do NOT flatten or spread out the dough, leave it piled high. They should bake high and fluffy as in the pictures. I made 3 batches and they all turned out fabulously fluffy. Bake for 11 to 12 minutes or until just starting to turn golden brown around the edges. Mine was perfect just after 11 minutes. Do not over bake!
Cool 10 minutes and transfer to cool completely on a cooling rack before handling…if you can contain yourself! After they have cooled, place them on a papertowel to drain any extra pecan butter.