Skip to content

Posts from the ‘Cookies’ Category

Chocolate Chip Cookies

Chocolate Chip

Chocolate Chip

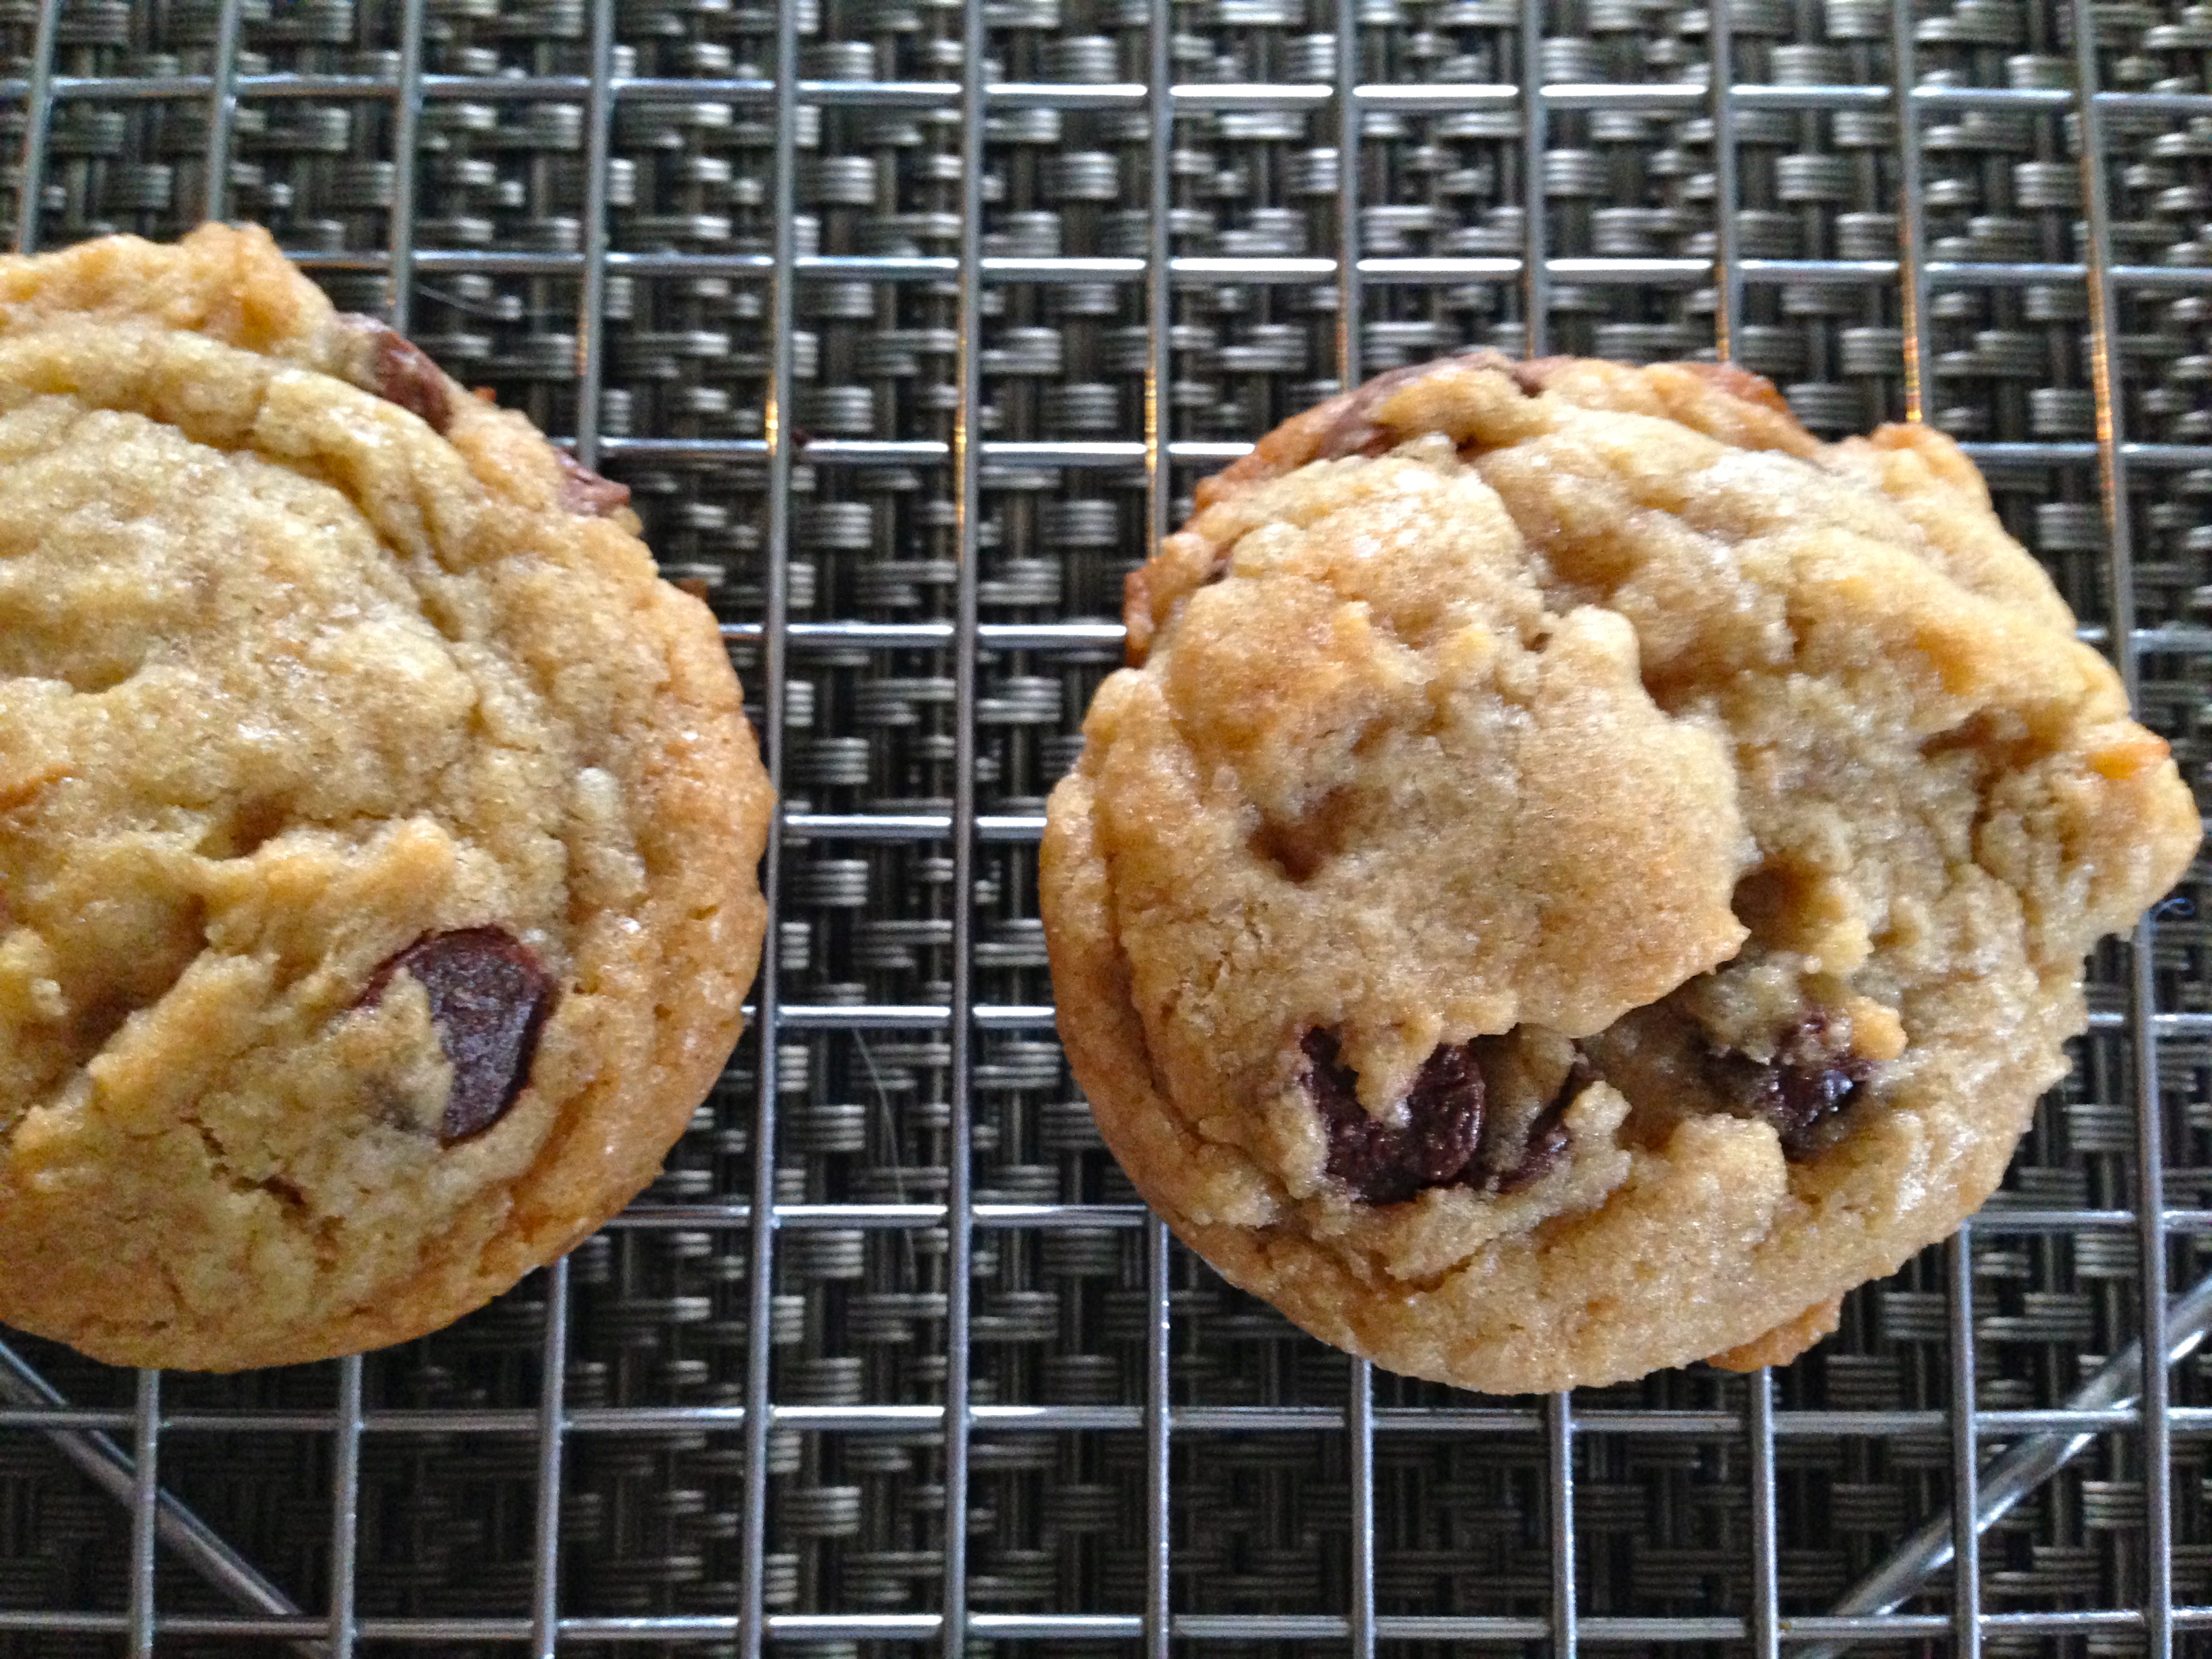
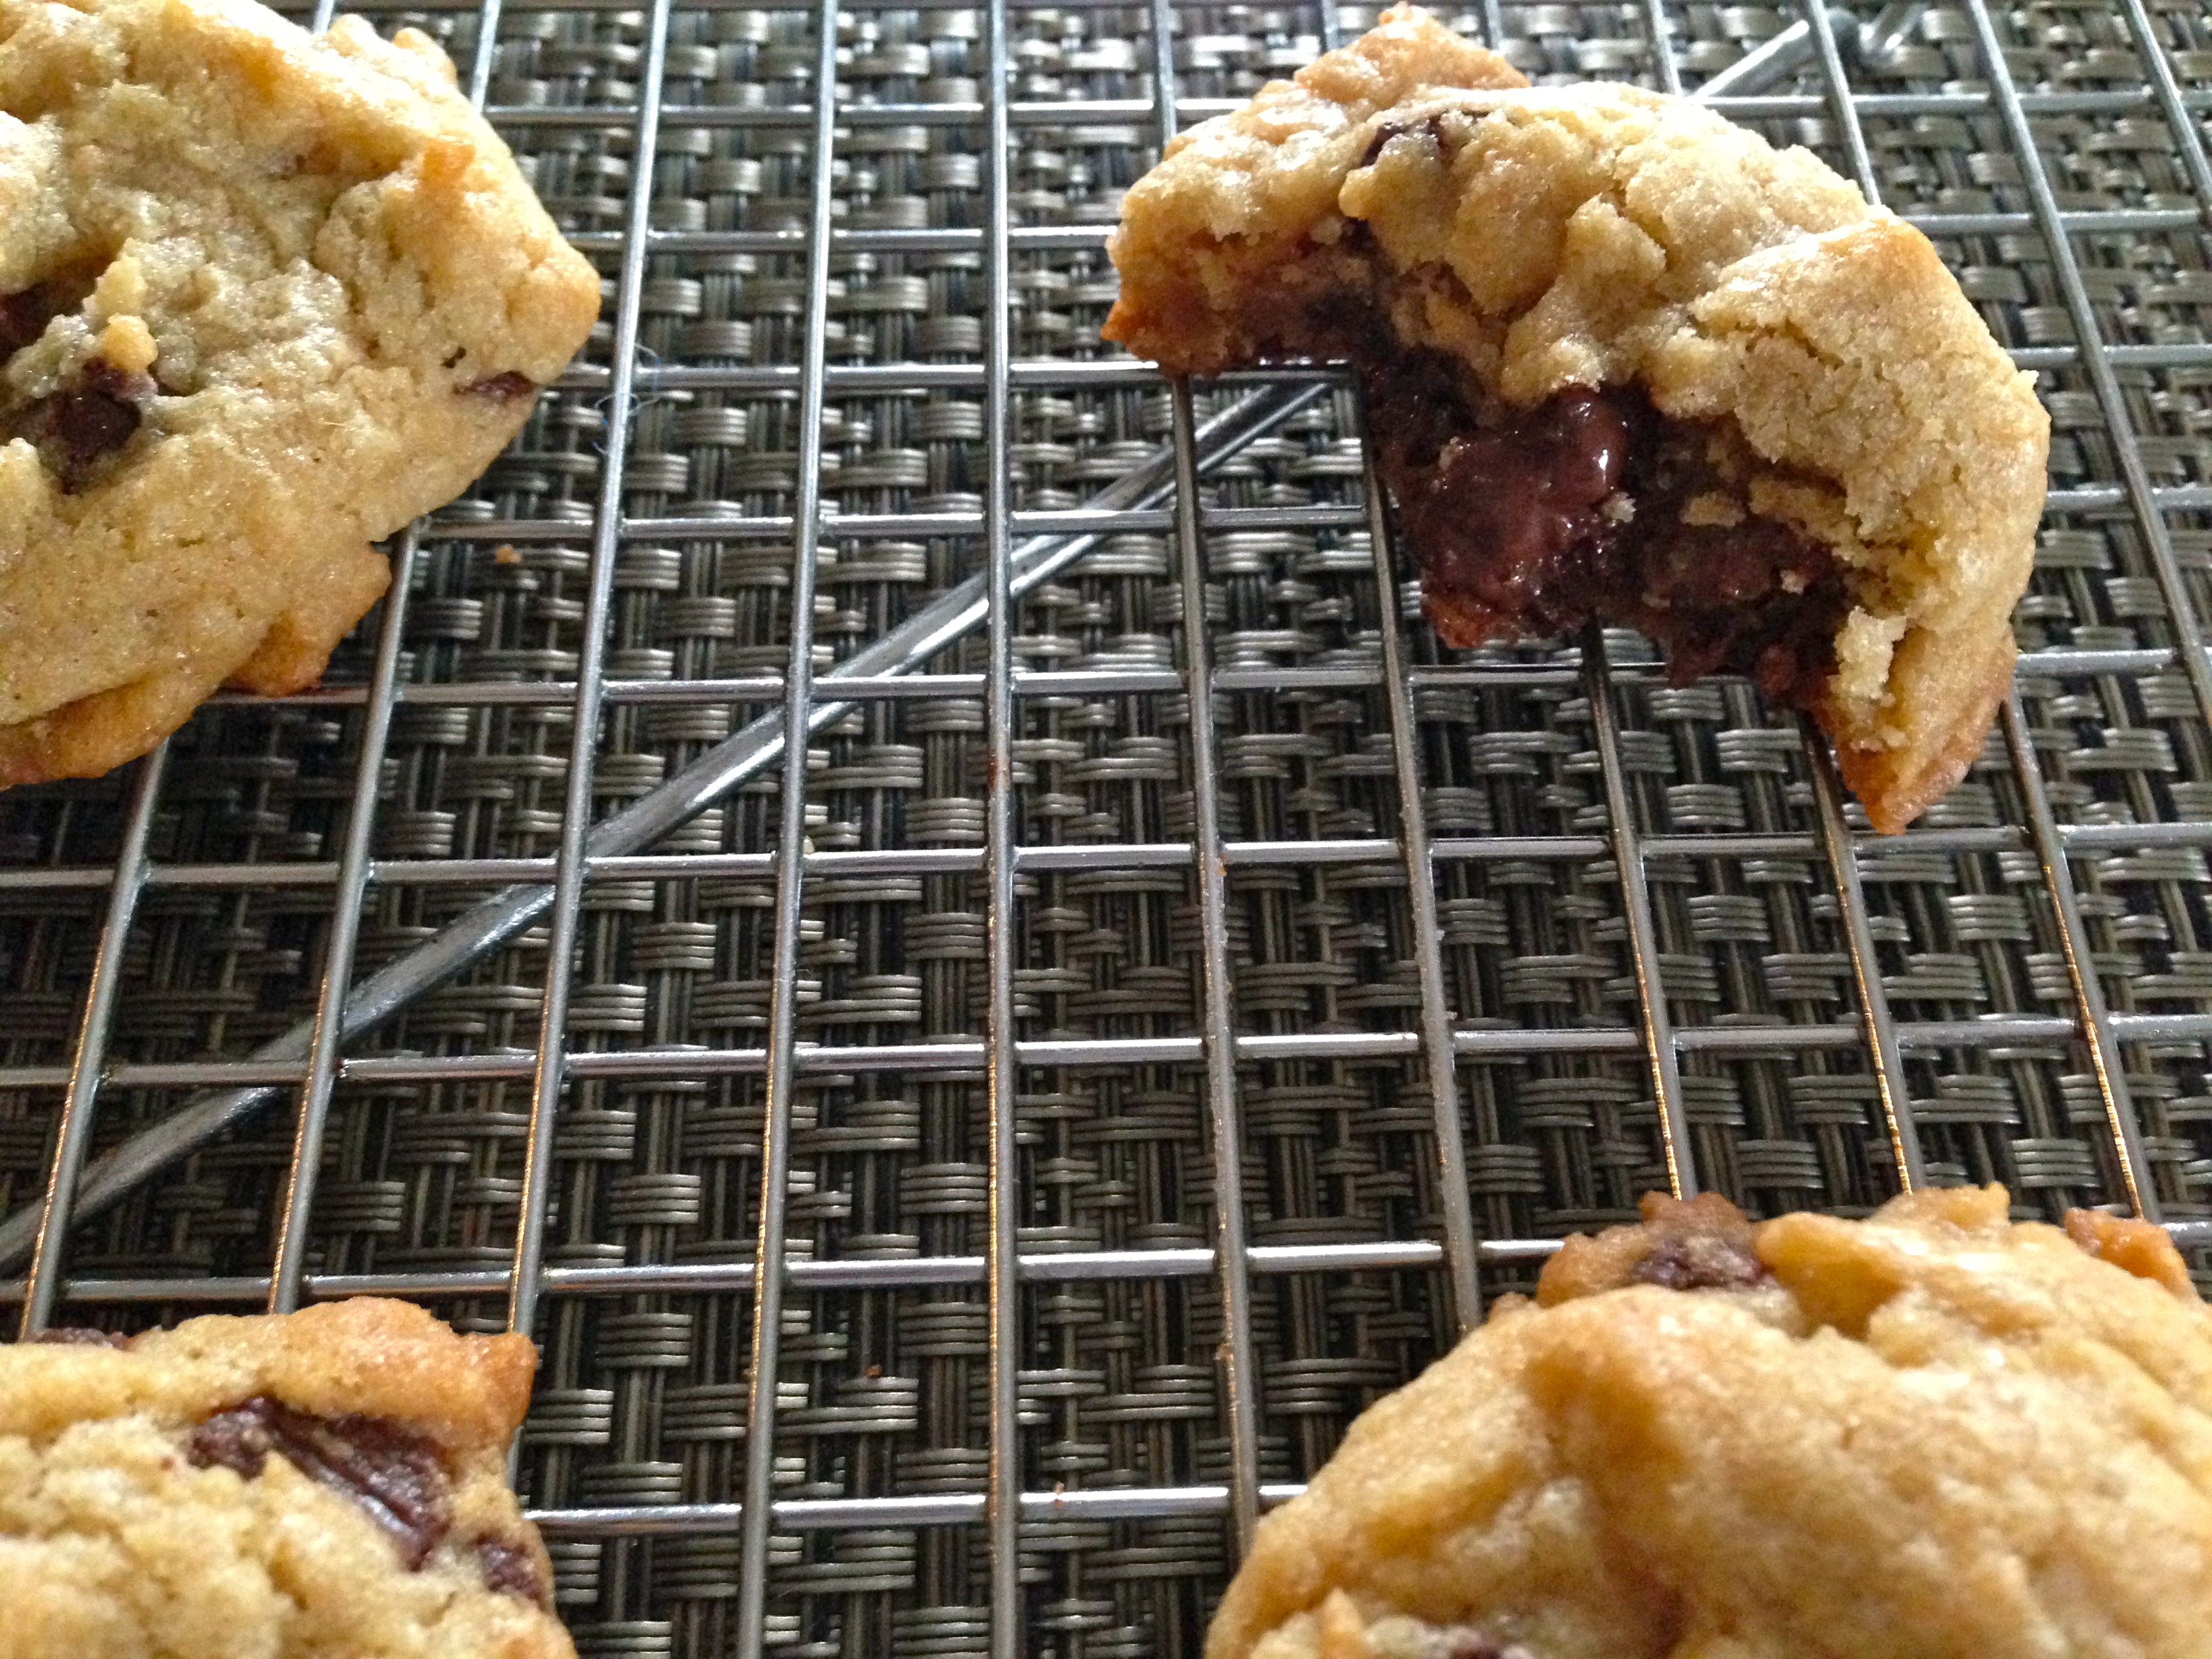
I wanted to make some cookies to give to some workmen who will be doing some work in my apt tomorrow, they are so nice and don’t price gouge, besides paying them I wanted them to have a treat. I thought I would give the cookie recipe in my old Betty Crocker cook book a go. It’s so simple and I must say the cookies are really good. I used dark and milk chocolate chunks and dark brown sugar, the recipe didn’t specify. They came together quickly and baked up soft on the inside a little crisp on the outside and really good!

I’ve owned this cookbook for years and rarely use it, but I think I am going to start experimenting with some of the recipes. I really liked this one.

Betty Crockers Chocolate Chip Cookies

Made 27 cookies for me (recipe said it makes 4 dozen)

1 cup (2 sticks) room temperature unsalted butter

3/4 cup granulated sugar

3/4 cup dark brown sugar

1 egg room temperature

2 1/4 cups all purpose flour

1 tsp baking soda

1 tsp salt

1 tsp vanilla extract

Chocolate chips (I use dark and milk chocolate and never measure)

Nuts are optional but I like hazelnuts or pecans in mine

Pre heat oven to 375 degrees. Line baking sheet with parchment or silpat. Cream butter and sugar using paddle attachment until creamy and smooth, add the egg and vanilla and continue beating until incorporated. Sift the flour, baking soda and salt and add to the creamed mixture and mx just until its combined. Don’t over mix. You can make your cookies right away if you like but I like to refrigerate over night and bring to room temperature before baking. I like to use a 1 1/2 tbs scoop and place a heaping mound on the baking sheet, baking a dozen cookies at a time. You can sprinkle a few flakes of sea salt on top of the cookies before they bake if you like, it’s delicious!

Bake for 10-12 minutes rotating pan halfway through baking. Remove to cooling rack and enjoy!

Yum!

Yum!


Rosemary Walnut And Plum Rugelach

Rugelach

Rugelach

I make rugelach every year for the holidays and every year I try to come up with a new flavor profile. Last year I did chocolate hazelnut which was really nice. This year I wanted a subtle herbal note and an altogether different jam I was kind of stuck on apricot. I thought that buttered walnuts and rosemary would make a nice combination and I made some spiced plum jam this summer, the combination sounded really good to me so I gave it a go. The walnuts have a very subtle rosemary taste (I am not a huge fan of strong rosemary) and the plum jam with gently spicing was wonderful with the walnuts. The crust is my standard cream cheese rugelach recipe, it never fails.

Rosemary Walnuts

1 1/2 cups walnuts

2 tbs butter melted

1 tbs fresh rosemary chopped

Pre heat oven to 350. place parchment sheet on small sheet pan. Mix walnuts, melted butter and rosemary in mixing bowl, pour onto sheet pan and roast for 15-20 minutes, they are done when you can smell the nuts. Remove from oven and let cool.

Makes 4 dozen

The Dough and filling:

8 ounces cream cheese at room temperature

2 sticks unsalted butter at room temperature

1/4 cup granulated sugar + more for sprinkling on cookies

1/4 teaspoon kosher salt

1 teaspoon vanilla extract

2 cups all purpose flour

1 1/2 cup rosemary walnuts

1/2 cup plum jam

1/4 cup light brown sugar packed

  1. In stand mixer fitted with paddle attachment cream the cream cheese and butter until light. Add the sugar, salt and vanilla. With mixer on low add the flour and mix just to combine. Dump dough onto work surface form into a ball cut into four quarters and wrap each in plastic wrap, refrigerate for one hour
  2. Chop walnuts and add brown sugar, mix together.
  3. Remove one of the dough quarters from the refrigerator, roll into a circle on floured work surface. I use the lid of my dutch oven to cut an even circle. Spread jam on the dough round, sprinkle nut/sugar mixture on top of the jam and press down gently with your hand. Cut into quarters and cut each quarter into 3 pieces. Roll from widest end to smallest.
Rugelach

Looks like pizza right??

Place each rugelach on parchment lined baking sheet. Put in freezer for 15 minutes before baking. While they are in freezer pre heat your oven to 350 degrees.

Bake for 15-20 minutes until golden brown. Remove to cooling rack.

Yum!

Yum!

August Bakin Friends

I just started participating in a  great and very fun endeavor called Bakin Friends. A group of cooks are given an ingredient and are paired with another cook who participates, we make something that uses the ingredient and send it to each other, kind of a Food Pen Pal of sorts. I was paired with Jeanette from Houston, Texas  and the ingredient was pretzels. I sent Jeannette some cookies, everything I wanted to send sounded great until I thought about how hot it is in Texas and the thought of chocolate melting while waiting to be delivered didn’t sound appealing. So I decided to do cookies and also went out on a limb and did some white chocolate covered pretzels. I used my chocolate chip cookie recipe and went a little wacky, adding crushed pretzels and chopped snickers, I also threw in some nice dark chocolate. I think they turned out pretty nicely and I got a lovely note from Jeanette saying that she really liked them.

pretzel,snickers Cookies

pretzel,snickers Cookies

White Chocolate Pretzels

White Chocolate Pretzels

Packaged and ready for their trip to Texas

Packaged and ready for their trip to Texas

Now that is what I sent, here is what I received from Alex, totally delicious blondies that had pretzels and peanut M&M’s in them. They were moist and delicious and I loved them. Thank you so much Alex for baking those fantastic blondies, along with the super cute Kitty card and hand written recipe. I really enjoyed them as did a few of my close friends.

Blondies

Blondies

If you are interested in participating in Bakin Friends click on the link above that will take you to  Stephanie’s site for more information. It’s fun and a great way to meet other bloggers and taste their delicious baked goods.  You can send an email to stephanie; stephsbitebybite@gmail.com with Bakin Friends in the subject line and let her know you would like to participate.  On the 6th of every month you will be paired with another cook/baker and you will find out what the secret ingredient is. Your packages should be mailed by the 16th of the month. It’s a lot of fun to participate!

Bakin Friends

Bakin Friends

Cooks Spotlight:Peanut Butter-Chocolate Kiss Cookies

Photo by Susan Pridmore

Photo by Susan-The Wimpy Vegetarian

I saw this recipe on one of my favorite blogs The Wimpy Vegetarian, I have known Susan for quite some time, we first met on Food52 and I admire her delicious recipes, sound nutritional advice and beautiful writing style. Most of her recipes are vegetarian, she uses healthful ingredients and manages to whip up dishes that make you swoon, and believe me they are loaded with flavor and are truly satisfying. These cookies had me drooling, I love peanut butter and chocolate and fully planned on making them for this post but held myself back, I have been on a diet and am making headway with my weight loss and I knew if I made them I would eat them all so I am reserving this recipe (along with a few others) as a treat for when I reach my goal weight, 9 lbs to go!!  Just because I am on a diet that wont stop me from sharing what I believe is an amazing recipe. Look at these : Roasted Tomato Grilled Cheese Sandwich With Harissa Mayonaise or Roasted Strawberries And Honey Ricotta On Crackers. Each recipe is delicious and nutritions and beautifully written, you will feel like you are sitting at the kitchen table chatting with a good friend. Please visit Susan’s beautiful blog, i know you will love it as much as I do, there is a wealth of great recipes, sound advice and wonderful stories.

INGREDIENTS

  • 6 ounces unsalted butter, room temp
  • 3 ounces peanut butter
  • 1/2 teaspoon pure vanilla extract
  • 1/8 teaspoon salt
  • 2.8 ounces confectioners sugar, sifted, plus some for sifting over the baked cookies at the end
  • 4 1/2 teaspoons coconut sugar
  • 1.5 ounces unsweetened cacao (chocolate) powder
  • 1 egg
  • 5 ounces all-purpose flour

INSTRUCTIONS

Preheat oven to 350F. Line baking sheet with parchment paper or a silpat. Fit a pastry bag with a tip for the shape you wish to pipe. Bigger is better here, as the cookie dough can be a little stiff. If you don’t plan to pipe the cookies, they can be spooned out onto the prepared baking sheet too.

Beat the softened butter and peanut butter with a paddle attachment until lighter in color and creamy (about 2 -3 minutes). The color changes due to the air being whipped into it, which translates into a fluffy base for the cookie.

Add the vanilla extract and salt. When fully incorporated, add the sugars and beat again until fully incorporated, starting on low speed.

Add the cocoa powder and egg and mix until fully incorporated.

Sift in the flour in thirds and mix in using a rubber spatula until flour is just incorporated before adding the next 1/3. Do not overmix as this will result in a tougher cookie.

If you’re piping the cookies, spoon ½ cookie dough into the pastry bag and pipe cookies onto the parchment paper or silpat, 1 1/2 to 2 inches apart from each other. I pipe mine about 1 1/2″ in diameter at their base. They will spread a bit in the oven from the butter, and the tops will sink a bit, but the overall shape should hold fine.

Bake for 8 minutes or until just starting to set up. Do not cook until they become hard or browned.

Cool on a cooling rack. For larger cookies, you may want to let them cool on the cookie sheet for 1 minute before removing to a cooking rack.

Sift with a little confectioners sugar just before serving.

No Kid Hungry Bake Sale And Divine Fair Trade Chocolate

Divine Chocolate

Divine Chocolate

Lets face it, as food bloggers a good part of our day is spent thinking about food, I constantly think about what new recipe can I conjure up with the beautiful and seemingly unlimited supply of food available to us. How is it then in this vast country with so much food, how is it that children can go to bed with an empty stomach?  It’s a very sad thought and because of this  I am participating with other food bloggers in a Bake Sale this weekend to benefit “No Kid Hungry“, 100% of the proceeds go to this amazing charity. In America, one of the wealthiest countries in the world 1 in 5 children go to bed hungry, thats a staggering statistic and this has to end. Local food bloggers are all donating baked goods and we are selling them here in Brooklyn at “The Flea” in an effort to raise money and awareness.

Divine Chocolate is one of the sponsers, click on the link to find out more about this wonderful company. They are the only fair trade cocoa company owned by it’s farmers. What a wonderful concept, the farmers/owners share in the company profits. You might ask why the photo of that luscious chocolate, well the good people from Divine have generously donated some chocolate to a handfull of bloggers that we will use in making our goodies for the bake sale and one of the lucky bloggers is moi!!!  I am very excited, because not only is this chocolate delicious, and the baked goods are going to help a very worthy cause but I am so happy to use chocolate that comes from a company that is owned by the farmers themselves. It’s a win win as far as I am concerned.

Back to the bake sale, visit the website to find out more information and what you can do to help. You can make a donation, there are raffles with fantastic prizes and this is something you can feel good about. We all love our children and knowing that we are doing something to help is the best feeling in the world. If you don’t live in NYC, no problem, enter the raffle or make a donation. Think about it, ending childhood hunger in the USA is within our reach and a donation no matter how small brings us one step closer.

I will be posting photo’s of the items I am making and also of the bake sale itself this weekend. We will also be able to meet some of the farmers from Ghana who offer their support for this very worthy cause. More to come….

Preview of the baked goods!

Double Chocolate Espresso Cookies

Double Chocolate Espresso Cookies

Photo taken by Whole Foods

Photo taken by Whole Foods

tumblr_inline_mhj1l1FBgF1qz4rgp

DÉLICES FONDANTS AU NUTELLA // NUTELLA BITES

I want to introduce you to this wonderful blog, Weights And Measures, I fell in love with the beautiful photography and wonderful recipes. It is in French but if you need a translation Mrs. DeYarmond aka Sarah is more than happy to translate a recipe. I saw these wonderful Nutella Bites and felt I MUST share this with you. I know you will love her blog as much as I do, the recipes are impeccable and so delicious. I am a big fan of anything chocolate and when you throw Nutella in the mix I am in heaven.

Mrs. DeYarmond's avatar

DSC_0584Si vous n’aimez ni le chocolat, ni le Nutella, alors cet article ce blog n’est pas pour vous.
Cette recette de petits gâteaux au Nutella, je l’avais griffonné un jour rapidement et c’est dernièrement que j’ai voulu les réaliser {edit : j’ai pu retrouvé l’auteur initiale de cette recette, c’est la talentueuse Sandra Avital, vous trouverez son article ici}. En même temps, pas de grands risques à prendre (sauf peut être de devenir accros et d’en vouloir encore et encore !). J’ai donc trouvé la recette parfaite, sachant qu’à la maison, on est des grands amateurs de pâte à tartiner mangée à la cuillère !

DSC_0560Ces gâteaux au Nutella sont indécemment chocolatés ! Ils restent bien coulants à l’intérieur et gardent le goût intense de la pâte à tartiner. On a la sensation de croquer dans de la pâte à tartiner légèrement biscuitée. Un délice ! Les petits noisettes…

View original post 321 more words

Happy Valentines Day- Caramelized White Chocolate Ice Cream, Chocolate Madeleines And Chocolate Caramel Sauce

Valentines Day

Valentines Day

Happy Valentines Day everyone, I felt I must make something chocolate for today, but didn’t want anything too heavy. This has 3 components, a chocolate madeleine, caramelized white chocolate ice cream and a chocolate caramel sauce. I built this around the caramelized white chocolate that I made, at first I was going to do a mousse but decided on ice cream, after searching the internet I found David Lebovitz recipe and saw that he took a chocolate course that Valhrona offered and made this very same thing. I am therefore crediting the great Mr, Lebovitz for the ice cream recipe. The chocolate caramel sauce is my own creation and is amazing, I sort of winged it having only made caramel sauce for the first time a few weeks ago.  I used the same recipe and simply added dark chocolate to the cream, it worked out perfectly.  I hope everyone has a wonderful day!

Madeleines

Madeleines

Chocolate Madeleines:

A recipe by Gale Gand

Makes 2 dozen

  • 1/2 cup, plus 4 tablespoons unsalted butter softened, for buttering madeleine molds
  • 3 large eggs
  • 1/2 cup granulated sugar
  • 2 tablespoons packed dark-brown sugar
  • 1 cup cake flour (not self-rising)
  • 1/4 cup cocoa powder, preferably Dutch-processed
  • 1 1/2 teaspoons baking powder
  • 1/8 teaspoon salt
  • 1 tsp vanilla extract
  1. Preheat oven to 325 degrees. Brush madeleine pans well with 4 tablespoons softened butter; refrigerate 5 minutes.
  2. In a small heavy-bottomed saucepan, melt remaining 1/2 cup butter over medium heat. Continue to cook until butter turns golden brown, being careful not to let the butter burn. Remove from heat and strain through a fine mesh sieve into a small bowl; set aside.
  3. In the bowl of an electric mixer fitted with the whisk attachment, whip eggs with granulated and brown sugars until light and thickened, 3 to 5 minutes. Add flour, cocoa powder, baking powder, and salt, and stir on low speed until combined. Add vanilla and reserved browned butter; mix just until blended.
  4. Insert a 1/2-inch plain tip into a pastry bag and fill with batter. Pipe mounds of batter into prepared pans until each mold is full, mounding batter in the center of the molds but not filling to the edge. Alternatively, you can use a teaspoon to fill the molds with batter (which is what I did). Bake until madeleines are firm and a little mound is puffed up in the middle, 10 to 12 minutes. Madeleines are best eaten the same day they are baked.

Chocolate Caramel Sauce:

1 cup granulated sugar

6 tbs salted butter (yes salted) cut into tbs size pieces

2 oz bittersweet chocolate chopped (I used scharffen berger 62%)

1/2 cup heavy cream

1 tsp vanilla extract

Put the heavy cream in a glass measuring cup and microwave on high for 45 seconds, add chocolate and microwave another 30 seconds Stir until its smooth, set aside so that it will cool before adding to the caramel.

In large saucepan add the sugar, turn heat to med/high and let sit until it starts to liquify. Start stirring with a heat proof spatula, the sugar will crystalize but thats alright keep stirring until its all liquid. Stop stirring and let it cook until it turns amber in color, now add the butter, stir to combine. Remove from heat and add the chocolate cream. Stir until its incorporated in the caramel. Store in container at room temperature until ready to use. Note: If you make this ahead of time, simply place the bottle or jar in hot water to warm the caramel so it’s pourable.

Ice Cream

Ice Cream

Caramelized White Chocolate Ice Cream:

A Recipe by David Lebovitz

Makes about 1 quart (1l)

Make sure the caramelized white chocolate is warm when you mix it with the cream. You can reheat it in a bowl set over a pan of simmering water, or in a microwave on low power, stirring until smooth.

8 ounces (240g) caramelized white chocolate

1 cup (250ml) heavy cream

2 cups (500ml) whole milk

1/2 cup (100g) sugar

1/8 teaspoon sea salt

5 large egg yolks

1. Mix the warm caramelized white chocolate in a large bowl with the heavy cream, and set a mesh strainer over the top.

2. In a medium-sized saucepan, heat the milk, sugar, and salt.

3. Whisk together the egg yolks in a small bowl and gradually whisk in half of the warm milk, then scrape the warmed yolks back into the saucepan.

4. Cook over moderate heat, stirring constantly with a heatproof utensil, until the mixture thickens and coats the utensil.

5. Immediately pour the custard through the strainer into the white chocolate mixture and stir until smooth. Put the bowl in an ice bath, and stir until cool.

6. Chill thoroughly in the refrigerator, then freeze in your ice cream maker according to the manufacturer’s instructions.

This is the best ice cream I think I have ever had, it’s so creamy and the perfect consistency, thank you Mr, Lebovitz for a wonderful recipe.

Note: In step one I deviated slightly, I heated the cream in the microwave to warm it for 30 seconds, I then added the chocolate and put it back in the microwave for another 20 seconds. It melted the chocolate and made a ganache. It was easier to combine with the custard when it was already melted.

Dessert is served

Dessert is served

img_a2632312aa1

Super Sized Chocolate Chip Cookies

Super Size Chocolate Chip Cookies

Super Sized Chocolate Chip Cookies

I made these amazing cookies and I have to share it with you, they are REALLY good. There are no eggs, no processed sugar, no butter or vegetable oil in them, virtuous, definitely, but oh so scrumptious. I follow Brandi’s blog The Healthy Flavor  and am amazed at the fabulous recipes she comes up with. They are healthful, vegan and really really good!

The fat in these cookies comes from roasted pecan butter, it’s super simple to whip up, and is in my opinion is what makes them so wonderful. The list of ingredients is minimal, whole wheat pastry flour,cornstarch, maple syrup as the sweetener, chocolate, baking soda and powder, sea salt and vanilla. Thats it, simple, healthful and they come together in a flash. Full disclosure, I didn’t have whole wheat pastry flour so I used whole wheat flour with 2 tbs of AP flour, I also decided to use some of the chocolate in my pantry that really needed to be used so I combined, dark chocolate, dark chocolate with peanut butter and milk chocolate.  To make this vegan don’t do as I did just use vegan dark chocolate. Enjoy these cookies with a nice cold glass of milk (I had almond milk) and they are especially good slightly warm. Visit Brandi’s blog and try her recipes, you will love them as much as I do. Thank you so much for creating such a wonderful recipe and allowing me to post it on my blog.

Recipe courtesy of Brandi, The Healthy Flavor:

Ingredients:

1 cup roasted pecan butter. Pecan butter is creamier and oilier than other nut butters, so I wouldn’t recommend subbing anything. I made them with peanut butter and the taste was good, but they were more dry and didn’t hold together as well)

1/2 cup whole wheat pastry flour

2 tablespoons cornstarch

1/4 cup plus 2 tablespoons pure maple syrup

1 teaspoon vanilla extract

1/2 teaspoon baking powder

1/2 teaspoon baking soda

1/4 teaspoon fine sea salt (depending on how much you added when you make the pecan butter, this may need to be adjusted)

1/2-3/4 cup vegan dark chocolate chips plus extra to stick on the top if desired

Tip: The key to getting these as chunky and thick is to follow the exact steps. You must chill the dough first and also only divide the dough into 12 cookies. If you make more than that, they won’t be as fluffy.

Directions:

After making the roasted pecan butter, make sure to measure 1 cup in case you made more than that in the food processor. Add it to a bowl with the syrup and vanilla. Stir until well combined. In a small bowl, sift together the flour, cornstarch, baking powder, baking soda and salt and whisk very well. Make sure there are no lumps. Stir the chocolate chips into the flour mixture. Now add the flour into the wet ingredients a small amount at a time, stirring until just combined. Put the bowl into the fridge for 20 minutes to chill only.

Pre-heat the oven to 375 degrees and line a sheet pan with parchment paper. Depending on how creamy you pulsed your pecan butter, your batter may be a bit crumbly. If so, just press the dough together roughly with your hands by large spoonfuls. Divide the dough into 12-14 cookies only, if you want them thick and fluffy. I added a few extra chocolate chips on top of the cookies too. :) Do NOT flatten or spread out the dough, leave it piled high. They should bake high and fluffy as in the pictures. I made 3 batches and they all turned out fabulously fluffy. Bake for 11 to 12 minutes or until just starting to turn golden brown around the edges. Mine was perfect just after 11 minutes. Do not over bake!

Cool 10 minutes and transfer to cool completely on a cooling rack before handling…if you can contain yourself! :)After they have cooled, place them on a papertowel to drain any extra pecan butter.

Molasses Ginger Whoopie Pies With Ginger/Tangerine Buttercream

Whoopie Pies

Whoopie Pies

This is an unofficial Bake Together with Abby Dodge, it came about after an email to Abby from the great Greg Patent author of many wonderful cookbooks including one of my favorites Baking In America you should also visit his blog The Baking Wizard (aptly named) for some great baking tips and wonderful recipes. Greg was excited about Abby’s Bake Together concept and had made his variation of her delicious Whoopie Pie recipe in her newly released cookbook Mini Treats And Handheld Sweets. she let us all know that if we wanted to we could do the same and make a variation of the recipe.

Whoopie!

Molasses Ginger Whoopie Pies With Ginger Tangerine Cream Cheese Butter Cream
Makes 24 filled whoopie pies

For the whoopies
2 cups (9 ounces) unbleached all-purpose flour
2 teaspoons baking powder
1/2 teaspoon baking soda
1/2 teaspoon table salt
1 tsp ginger
1 tsp cinnamon
1/2 tsp allspice
6 tablespoons (3 ounces) unsalted butter, softened
1/2 cup granulated sugar +1/2 cup dark brown sugar
2 large eggs, at room temperature
1 teaspoon pure vanilla extract (Abby used 1 1/2 tsp vanilla extract or paste)
1/2 cup buttermilk, at room temperature minus 1 tbs
1 tbs molasses
Make the whoopies

1. Position an oven rack in the center of the oven and heat the oven to 350°F. Line three cookie sheets with parchment or nonstick baking liners.

2. Whisk the flour, baking powder, baking soda, spices and salt in a medium bowl until well blended and no lumps remain. Put the butter and sugars in a large bowl. Beat with an electric mixer fitted with the paddle attachment on medium speed until well blended and smooth, about 3 minutes. Add the eggs, one at a time, beating until just blended between additions. Add the vanilla with the last egg. Stop to scrape down the bowl and the beater as needed. Add half of the flour mixture and mix on low speed until just blended. Stir molasses into buttermilk and add the buttermilk and mix until just blended. Add the remaining flour mixture and mix on low speed until just blended.

3. Using a 1-tablespoon mini scoop, shape the dough into balls and arrange about 1 1/2 inches apart on the prepared cookie sheets. Bake, one sheet at a time, until a pick inserted in the center of one whoopie comes out clean, 9 to 11 minutes. Move the sheet to a cooling rack, let the whoopies sit for 10 minutes, and then transfer them to a rack to cool completely.

Make the filling

4 oz cream cheese at room temperature
4 oz softened unsalted butter
3-4 cups confectioners sugar
1/2 tsp powdered ginger
Zest from 1 tangerine  (I used satsuma tangerines)
 
Cream the cream cheese and butter, add confectioners sugar a cup at a time, add the ginger and tangerine zest beating until smooth and spreadable.
 

Assemble the whoopie pies

Turn half of the cooled whoopies over so they are flat side up. Spoon a slightly rounded 1 tablespoon of the filling onto the center of each whoopie. Top with the remaining whoopies, flat side down. Press gently on each cookie to spread the filling almost to the edge.  Roll the edges of the whoopie pies in colored sprinkles, if desired. Whoopies can be served immediately, chilled for 30 minutes or refrigerated up to 2 days. They are best when served slightly chilled.

Day 7 Of 7 Days Of Holiday Cookies- Gingerbread People

Gingerbread People

Gingerbread People

I am finally getting around to posting the last day of my 7 Days of Holiday cookies. I decided to make gingerbread people (not men or ladies) they are androgynous I guess. My piping and decorating skills are less than stellar as evidenced by the sad smiles and the one with a sparkling sugar vest but I’m going to work on it. I made only a few to test the recipe and hone my piping skills.

This recipe is delicious, next time I make it I am going to roll the dough a little thicker than 1/4 inch so they are even plumper. The kids will love these and I hope that after my test run they will look more polished. Because these are for children I didn’t make a royal icing, I didn’t have powdered egg whites and did not want the kids to have raw egg white, so I just mixed confectioners sugar with some water and  a few drops of clear corn syrup. It’s a little sticky and not as easy to work with but safer, I didn’t measure anthing just mixed until I felt the consistency was right. This is adapted from a recipe I found on Martha Stewarts website.

Makes approximately 36 (depending on the size of your cookie cutter)

Ingredients:

  •  3 cups flour
  • 1/2 tsp baking soda
  • 1/4 tsp baking powder
  •  1 stick unsalted butter room temperature
  •  1/2 cup packed dark brown sugar
  •  2 tsp ground ginger
  • 2 tsp ground cinnamon
  •  3/4 tsp course salt
  •  1 egg
  •  1/2 cup molasses (unsulfured)
  • Royal Icing or icing of your choice
  • Fine sanding sugar, for sprinkling
  1. Sift together flour, baking soda, and baking powder into a large bowl. Set aside.
  2. Put butter and brown sugar in the bowl of an electric mixer fitted with the paddle attachment; mix on medium speed until fluffy. Mix in spices and salt, then eggs and molasses. Reduce speed to low. Add flour mixture; mix until just combined. Divide dough into two discs; wrap each in plastic. Refrigerate until cold, about 1 hour.
  3. Preheat oven to 350 degrees. Roll out dough on a lightly floured work surface to 1/4-inch thick. Space 2 inches apart on baking sheets lined with parchment paper or silpat, and refrigerate until firm, about 15 minutes.
  4. Bake for 8-10 minutes, remove to wire rack to cool